 The Complete Node / The Complete Guide -> Table of Contents:
Any word that is highlighted in yellow represents a "tooltip." You can hover over it and see some additional information about that particular term. Any edits to that functionality can be investigagted by heading out to tooltipster.com.
To move a Node application from one box to another, you don't want to move the "node_modules" directory in that it's a huge folder and Node has something in place tha tmakes for a much easier and accurate way of moving things around. Simply move your code sans the node_modules directory and then run npm install in your Terminal after navigating to that directory
Visual Studio Shortcuts -> https://vslive.com/Blogs/News-and-Tips/2015/04/5-VS-Keyboard-Shortcuts.aspx
"Captain's Log" - elaborations on certain core concepts that merited some additional notes (you'll see these referenced as graphic alerts as well)...
A) What is Node?
1) Runtime
B) REPL
A) Characteristics
1) Weakly Typed Language
2) Datatypes Can Be Switched
3) Object Oriented Language
4) Primitive and Reference Data Types
5) Versatile Language
6) Wide Variety of Tasks
B) Core Syntax Review
C) let, var and const
1) ECMA
2) let
3) const
D) Arrow Functions
1) Anonymous vs Named Functions
2) "this"
3) Some Shorthand
E) Working with Objects, Properties and Methods
1) Objects
a) Arrays
map
push
F) Understanding Spread and Rest Operators
1) Spread
a) slice
b) spread
2) Rest
G) Destructuring
H) Async Code and Promises
1) Asynchronous vs Synchonous
2) callback
3) constructor
4) Promises
I) Template Literals
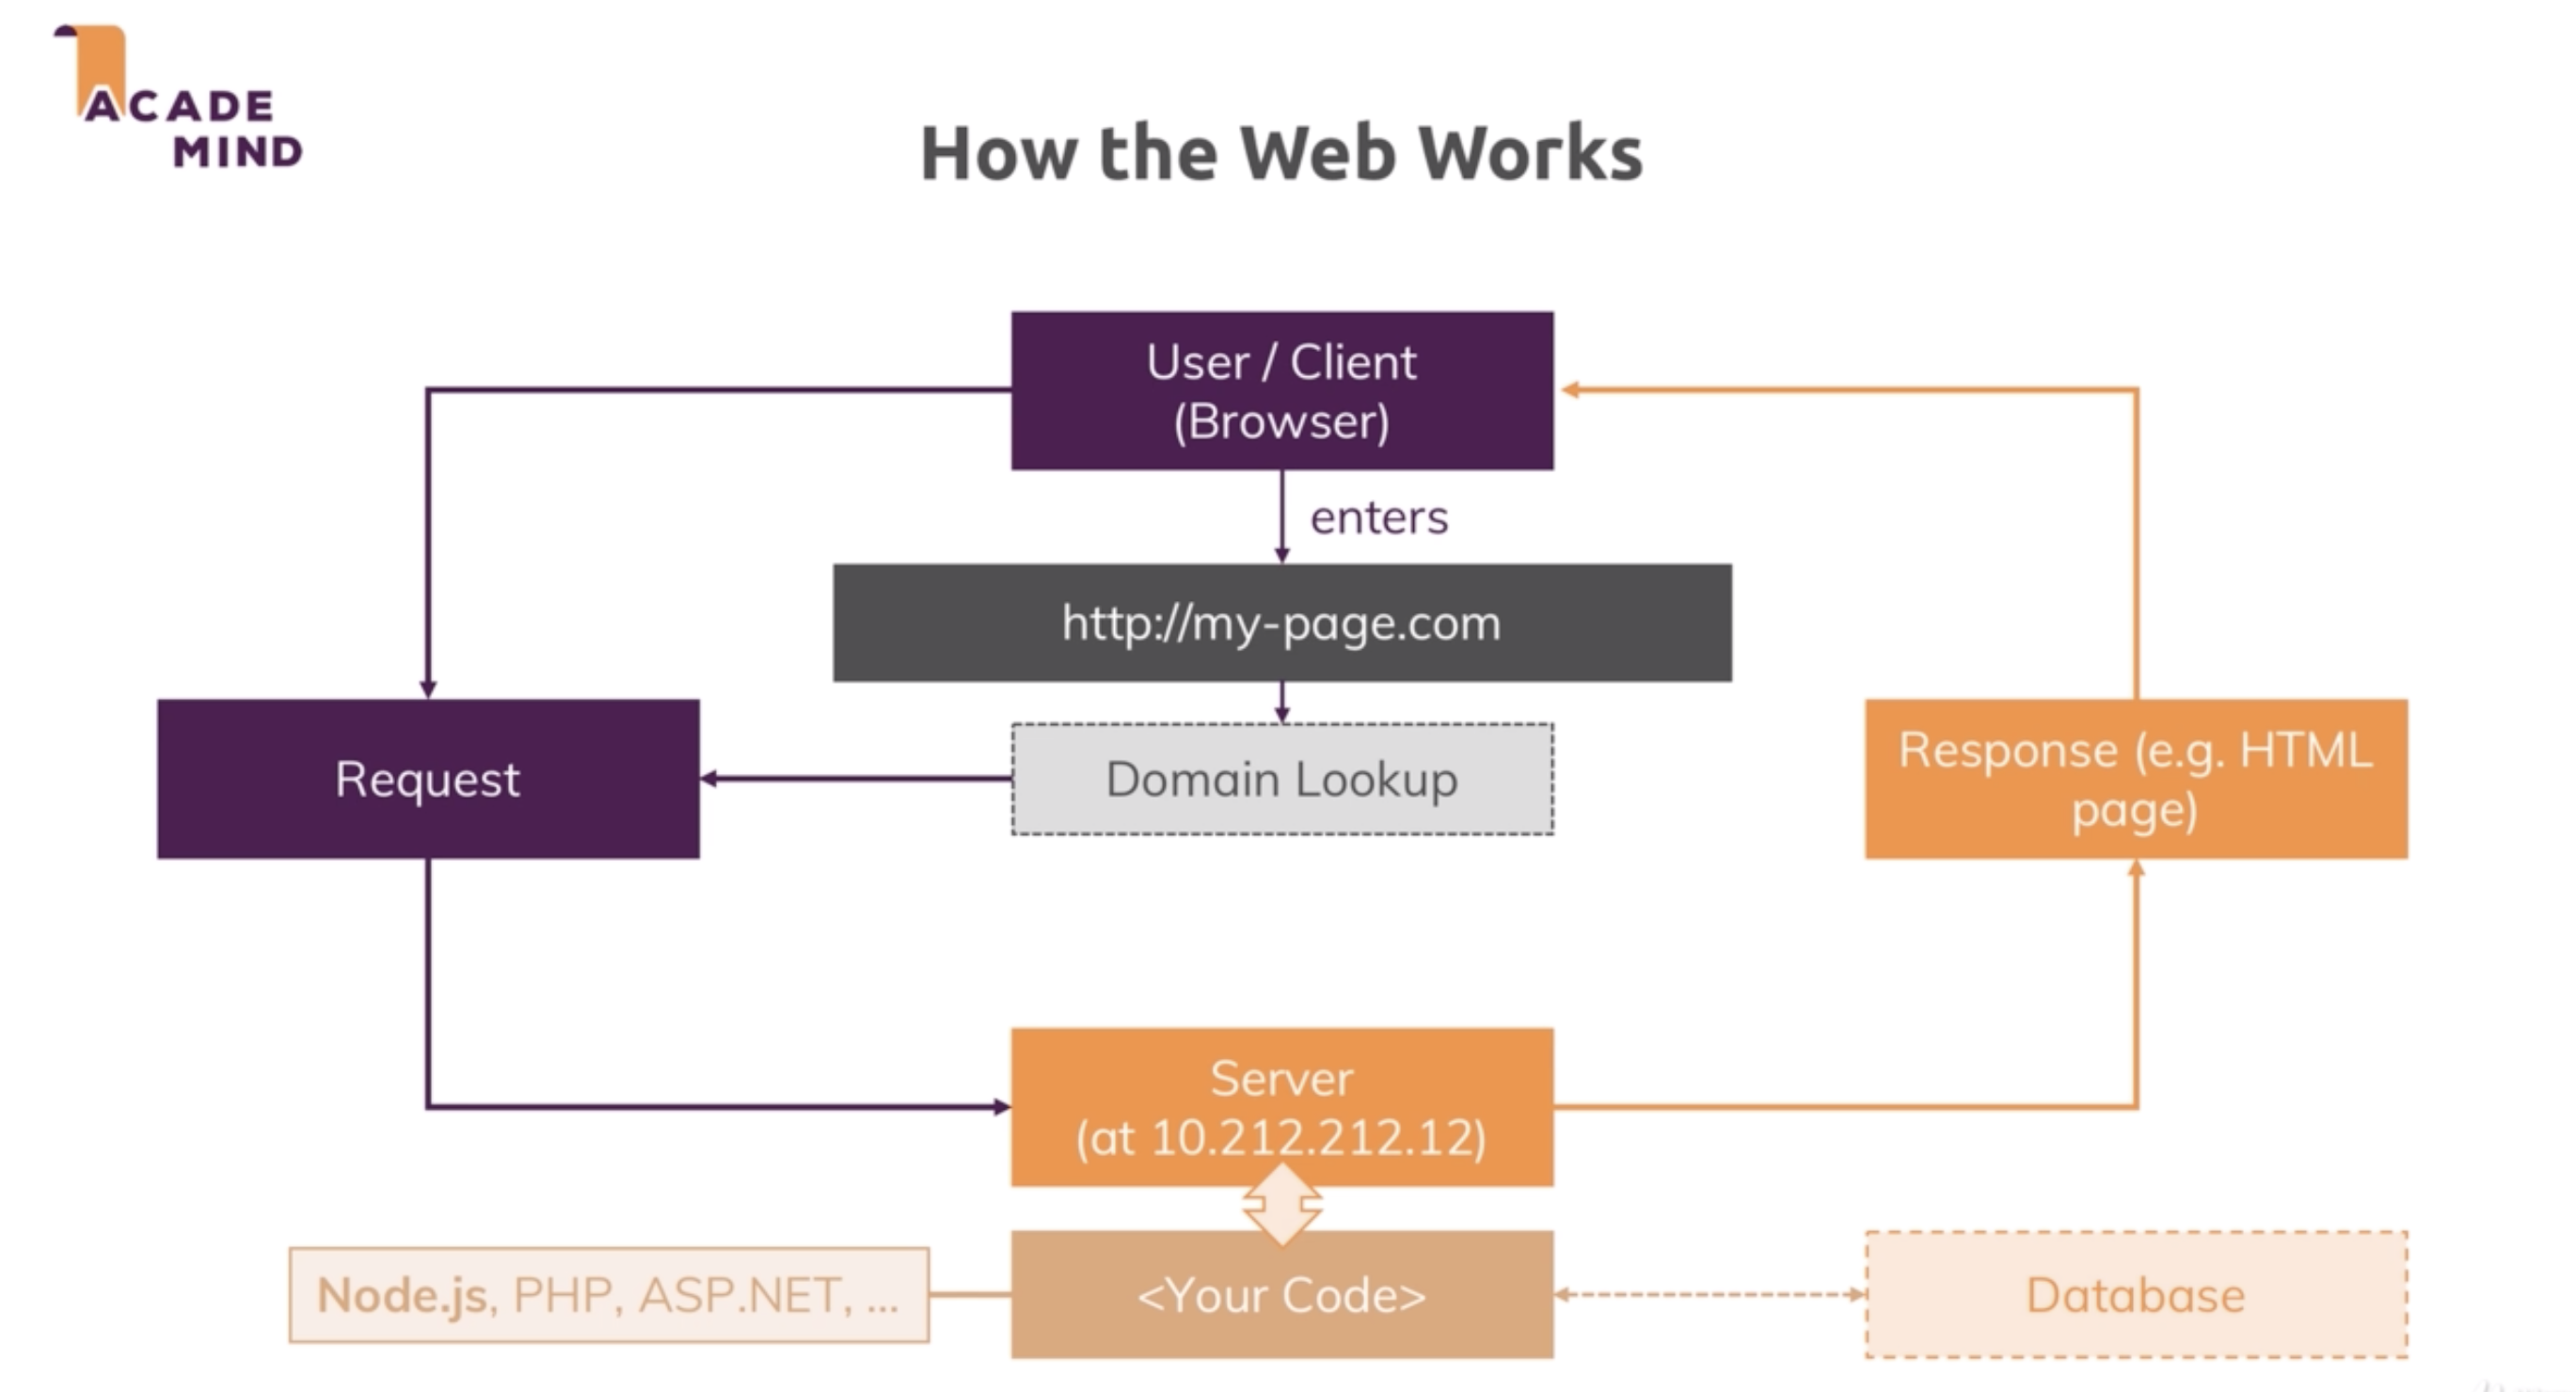
A) How the Web Works
B) Set up a Server
1) Core Modules
2) Setup Code
C) Event Loop
D) Sending Responses
E) Request and Response Headers
F) Routing
G) Redirecting Requests
H) Parsing Requests
I) Understanding Event Driven Code Execution
1) Event Loop
a) Call Stack
b) Blocking
c) Concurrency & Web API's
2) The "better code..."
J) Blocking and Non-Blocking Code / writeFileSync vs writeFile
K) Behind the Scenes
1) Worker Pool
2) Serious Event Loop
L) Using the Node Modules System
M) Homework
A) NPM Scripts
1) npm init
B) Third Party Packages
1) nodemon
a) --save-dev
b) -g
2) Core Concepts
3) Using Nodemon
C) Finding and Fixing Errors
A) Quick Review - Setup a New File
1) npm init
2) nodemon
3) shortcuts
B) Express Setup
C) Middleware
D) How Middleware Works
E) Behind the Scenes
F) Different Routes
G) Parsing Incoming Requests
H) Limiting Middleware Execution to POST Requests
I) Using Express Router
J) Adding a 404 Error Page
K) Filtering Paths
L) Writing HTML
M) Rendering HTML
N) Returning a 404 Page
O) Navigation Helper Function
P) Serving Files Statically (CSS)
A) Sharing Data Across Requests and Users
B) Template Engines
1) Pug Code and Dynamic Content
2) Using Layouts in Pug
i) app.js
ii) main-layout.pug
iii) admin.js
iv) shop.js
v) add-product.pug
3) Handlebars
4) Convert Project to Handlebars
i) add-products.hbs
ii) shop.hbs
5) Using Layouts in Handlebars
i) app.js
ii) main-layout.hbs
iii) admin.js
iv) shop.js
v) add-product.hbs
6) EJS
i) 404.ejs
- head.ejs
- navigation.ejs
- end.js
ii) add-product.ejs
iii) shop.ejs
I've got things organized a little differently in this section. Rather than a conventional "outline" format, I listed everything in order, as far as how it's constructed and then explained.
Here we go...
A) Setup
This first section details what you need to do to set up a basic Node app and then goes through the actual "app.js" file and demonstrates the little bit of code that you need to have in place to constitute a basic beginning for an advanced application.
1) Set Up Directory
2) npm init
3) Install Nodemon
4) Setup Shortcuts
5) Install Express
i) Starting Point of a Working App
B) app.js
6) require("path")
7) const express=require('express');
8) const bodyParser = require('body-parser');
9) const app = express();
10) view engine
11) create routes
12) app.use(bodyParser.urlencoded());
13) express.static(path.join(__dirname, 'public'))
14) app.use("/admin", adminData.routes);
15) 404 page
C) routes/admin.js
1) require('path');
2) const express
3) const rootDir
4) const router
5) const products=[]
6) router.get
7) router.post
8) exports.routes
9) exports.products
D) routes/display.js
1) require('path');
2) const express
3) const rootDir
4) const adminData
5) const router
6) router.get
7) exports.routes
E) utility/path.js
F) header.ejs
G) footer.ejs
H) navigation.ejs
1) Navigation "IF Statement for "Display" Page
2) Navigation "IF Statement for "Admin" Page
I) public / css
J) add-name.ejs
K) admin.js
1) const path = require("path");
2) const express = require("express");
3) const rootDir = require("../utility/path");
4) const rourter = express.Router();
5) products=[];
6) router.get...
7) router.post...
8) exports.router=router;
9) exports.products=products;
A) The Controller
1) admin.js
2) shop.js
3) product.js
B) The Model
1) product.js (controller)
2) product.js (model)
A) How You're Going to Change the Model
1) File System (fs)
2) path
a) join
b) dirname
c) process.mainModule.filename
3) readFile
a) JSON.parse
4) products.push(this)
5) fs.writeFile
A) static fetchAll();
1) path.join
2) process.mainModule.filename
3) readFile
4) return JSON.parse(fileContent);
B) Callback - The Sequel
1) inner function
A) Helper Function
A) Add a Route
B) Add a Method to the Controller
C) Basic HTML vs Content (Callback review)
1) Basic HTML
2) Dynamic Content
a) Controller
b) View
A) Add Button
B) Add ID
C) Retrieve ID
1) The Order of Your Routes
A) The Controller
B) The Model
C) The View
A) Add to Cart
1) The View
2) The Route
3) The Controller
B) Add to Cart as an Include
A) Laying Down Some Basics
1) const fs
2) const p
B) Adding a Product to Your Cart (exp (exploded view)
1) err -> callback
2) fetching, analyzing, adding -> exploded view
i) find function
ii) spread operator
iii) concatenate array (ES6 using spread operator)
A) Router
B) Controller
1) "Edit" Query Parameter
C) View
A) Controller
B) View
A) product.ejs
A) Router
B) Controller
C) Model
1) construct
A) Router
B) Controller
C) Model
1) product.js
2) cart.js
A) Router
B) Controller
A) Router
B) Controller
C) Model Fix (slight bug repair to the "deleteProduct" function)
A) SQL
B) NoSQL
C) Differences and Advantages
1) ACID
2) Scalability
A) Installing MySql Package
1) MySql Workbench Notes
B) Establishing Database Connection
C) Creating a Table
D) SELECT Statement
1) Model
2) Controller
E) INSERT Statement
1) Model
2) Controller
E) View Details
1) Model
2) Controller
A) Definition
B) Connecting to Database
C) Defining a Model
D) Creating and Inserting a Product
D) Retrieving Products
E) Retrieving One Product
1) findByPk
2) where: { id: prodId }
E) Editing a Product
F) Deleting a Product
G) Adding a One to Many Relationship
H) Adding a Dummy User
1) Establishing User as Part of the Request Object
I) Using Magic Methods
J) One to Many & Many to Many Relationships
K) Creating and Fetching a Cart
1) Create Cart
2) Retrieve Cart
L) Adding Products to the Cart
1) Adding a Brand New Product
2) Adding an Existing Product
M) Deleting Products From the Cart
N) Adding an Order
1) Setting up Model
2) Setting up Router and Controller
O) Resetting the Cart and Outputting Orders
1) Reset the Cart
2) Router Error
3) Outputting Orders
A) Basics
1) BSON
2) Relationships
3) Installation
4) Connection
i) Connection Pool
B) Using Database Connection
1) products.js Model
2) admin.js Controller
C) Mongo DB Compass
D) Retrieving Products
1) Model
2) Controller
E) Fetching a Single Product
1) Cursor
2) ObjectId
3) Model
4) Controller
F) Editing a Product
1) Controller (Product Display)
2) Controller (Product Edit)
3) Model (Product Edit)
G) Deleting a Product
1) Model
2) Controller
H) Ternary "IF" Change on save()
I) Adding a User
1) Model (user.js)
2) Controller (app.js)
J) Adding a Product w/ User
1) Controller (admin.js)
2) Model (product.js)
K) Cart Items & Orders
1) User Model (user.js)
2) app.js (add more substance to "req.user")
L) Storing Multiple Items in the Cart
M) Displaying Cart
N) Deleting Cart Items
O) Adding an Order
1) users.js (model)
2) shop.js (controller)
A) ORM vs ODM
B) Installing Mongoose and Connecting to the Database
1) Install Mongoose
2) Using Mongoose to Connect to the Database
C) Creating the Schema
D) Save a Product
E) Fetch All Products
F) Fetch A Single Product
G) Edit A Product
H) Delete A Product
I) Adding and Using a User Model
1) user.js Model
2) app.js
J) Using Relations in Mongoose
1) product.js
2) admin.js
K) Additional Notes for Managing Relations in Mongoose
1) Retrieving the Entire User Object
2) Specifying Which Data You Want to Retrieve
L) Adding User Data to the Shopping Cart
1) user.js Controller
2) user.js Model
M) Loading the Cart w/ Product Information (populate)
N) Delete Cart Item
O) Add Order
1) user collection
2) shop.js Controller
P) Display Orders
A) Cookie Defined
B) Creating the Login Form
1) Create Your Route
2) Register Your Route in app.jst
3) Create Your Controller
4) Create Your View
C) Creating a Cookie
D) Manipulating a Cookie (Max-Age, Secure, HttpOnly)
E) Sessions
F) Installing Session Middleware
G) Using Session Middleware
H) Using MongoDB to Store Sessions
1) app.js
2) auth.js
I) Deleting a Cookie (Logout)
1) nav.js (your button)
2) auth.js
2) auth.js (your Controller)
J) Fixing Some Bugs
1) navigation.ejs
2) Display Cart
This is the real world project I was tasked with building that transformed a working PHP application into a MERN app.
A) Basic Setup
1) app.js
2) start.js (route)
3) start.js / auth.js (controller)
4) index.ejs / login.ejs (view)
B) Security
1) Necessary Middleware and Packages
a) Mongoose
i) app.js
b) Express Session
i) app.js
c) MongoDB Session
i) app.js
d) bcryptjs
i) auth.js
A) Signup Form and Insert Code
1) signup.ejs
2) auth.js (Controller)
B) Encryption / bcryptjs
C) Login Controller (auth.js)
D) Route Protection
1) Using a Line by Line Approach
2) Using Middleware
E) Understanding and Preventing CSRF Attacks
F) Providing User Feedback
1) Import / Register it in "app.js"
2) Add it to postLogin on "auth.js" Controller
3) Add it to the "login.ejs" View
A) sendgrid.com
B) auth.js
A) Resetting Passwords
1) reset-password.ejs
2) getReset Controller
3) postReset Controller
4) getNewPassword Controller
a) reset password link / route
b) the Controller
c) the reset-password view
5) postNewPassword Controller
B) Adding Authorization
1) Displaying Products
2) Editing Products
3) Deleting Products
A) Basic Email Validation
1) auth.js Routes
2) auth.js Controller
B) Using the Error Message Field
C) Custom Validator Fields
D) More Validators
E) Equality
F) Async Validation
G) Keeping User Input
1) signup.ejs
2) auth.js Controller
H) Conditional CSS Classes
1) auth.js Controller
2) signup.ejs Controller
3) forms.css
I) Sanitizing Data
J) Validating Product Info
1) Validator Package
2) admin.js Controller
A) Error Theory
1) throw
2) try / catch (syncronous)
B) Throwing Errors in Code (app.js)
C) Returning Error Pages
1) Regular Page
D) Using Express Middleware for Errors
E) Using Express Middleware for Errors-> Correctly
F) Errors & Http Response Codes
A) What Are They?
B) Data Formats and Routing
1) JSON
2) Routing
C) Core Principles
D) Sending Requests and Responses | CORS Errors
1) Codepenn| POST REQUEST / GET REQUEST
This is a practical application involving a React UI with a real live API dynamic!
A) Retrieving Posts
1) Feed.js (React)
2) feed.js (Node Controller)
B) Creating Posts
C) Adding Validation
1) React Validation
2) Adding Server Side Validation
D) Adding a Database
E) Static Images and Error Handling
1) Static Images
2) Elegant Errors
F) Displaying a Single Post
G) Uploading an Image
H) Updating Posts
I) Deleting Posts
1) feed.js (route)
2) feed.js (controller)
J) Pagination
1) feed.js (front end)
2) feed.js (Controller)
K) Building a User Model (route, model, app.js)
L) Adding User Validation (auth.js [route], auth.js [controller])
M) Signing Users Up
1) bcryptjs
2) auth.js (Controller)
3) App.js (front end)
N) How Validation Works (JWT)
O) Validating User Login
1) auth.js (Controller)
P) Logging in and Creating JSON Web Tokens (JWTs)
1) auth.js (route)
2) auth.js (controller)
3) App.js (front end)
Q) Using and Validating the Token
1) Feed.js
2) is-auth.js
3) feed.js (route)
R) Adding Auth Middleware to All Routes and Methods
1) Feed.js (front end)
2) SinglePost.js
S) Connecting Posts to Users
1) post.js (model)
2) feed.js (controller)
T) Adding Authorization Checks
U) Clearing Post-User Relations
V) Getting Rid of "Unexpected token < in JSON at position 0"
A) Intro
B) socket.io
C) Making it Work
1) Installation
i) app.js (api)
ii) Feed.js (react)
D) Identifying Realtime Potential
E) Sharing the IO Instance Across Files
F) Synchronizing POST Additions
1) Adding IO to feed.js (Controller)
2) Feed.js (front end)
G) Adding Name to Posts
H) Updating Posts on All Connected Clients
1) Controller
2) Feed.js (front end)
I) Sorting Correctly
J) Deleting Posts
1) feed.js Controller
2) Feed.js (front end)
A) What is GraphQL
B) Setup and Our First Query
1) Setup
2) Our First Query
i) app.js
ii) schema.js and resolvers.js
C) Defining a Mutation
1) schema.js
D) Adding a Mutation Resolver & GraphiQL
1) schema.js
2) resolvers.js
3) GraphiQL
E) Adding Validation
1) validator | resolvers.js
F) Handling Errors
G) Hooking Up the Front End
1) CORS Error
A) EADDRINUSE
A) AWS
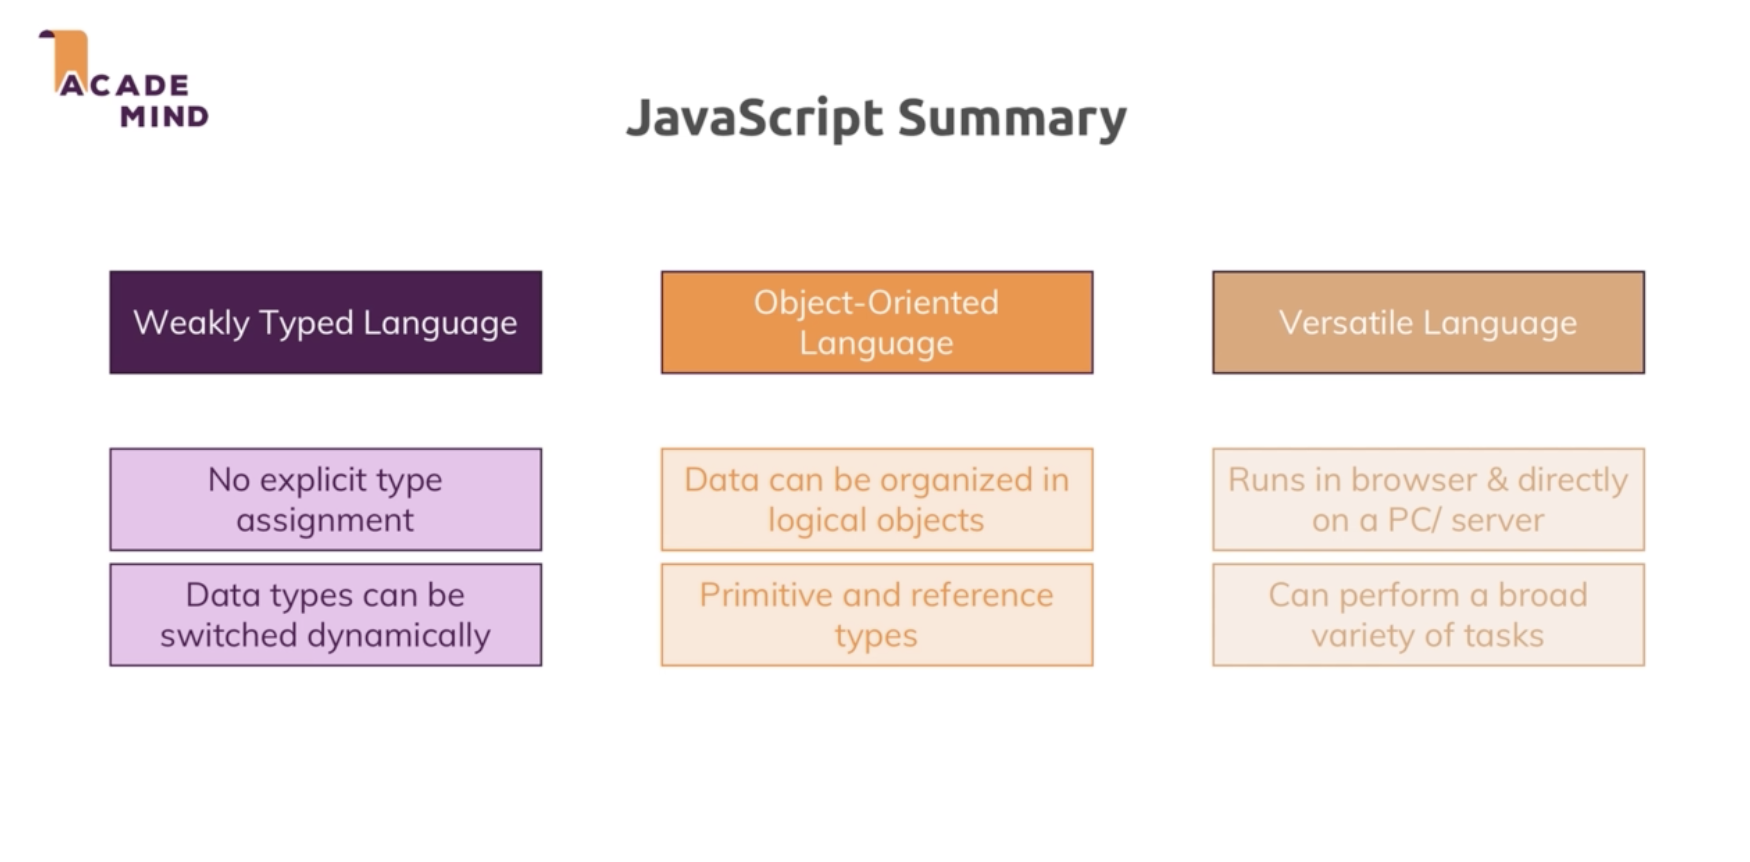 A) Characteristics (back to top...)
1) Weakly Typed Language (back to top...)
By "weakly," we mean that while JavaScript does recognize strings, booleans and integers, it doesn't insist that you define the datatype in the context of creating a variable.
For example, with PDO, you have to define the parameter as an "INT" or a "STR." JavaScript doesn't make you do that.
2) Datatypes Can be Switched (back to top...)
You can have a variable that starts out in your code as a "string," and then switch it to be an "integer" and JavaScript does not freak out.
3) Object Oriented Language (back to top...)
Remember, an "object" is a combination of properties and values. JavaScript can be organized in that way.
4) Primitive and Reference Data Types (back to top...)
Also, JavaScript makes use of the "Primitive" and "Reference" types. Click here for an indepth explanation, but the bottom line is that you have two types of data. You've got the "primitive" type which is going to be either undefined, null, boolean, number, string, or symbol. The other type of data is "Reference" and that's going to be an "object."
All that to say, that when you're manipulating data, if the variable stores a primitive value, when you manipulate its value, you are working on the actual value stored in the variable. In other words, the variable that stores a primitive value is accessed by value.
Unlike the primitive value, when you manipulate an object, you are working on the reference to that object, rather than the actual object. In short, a variable that stores an object is accessed by reference.
There...!
5) Versatile Language (back to top...)
You can run JavaScript on a server or on your own box - which is what Node.js is all about.
6) Wide Variety of Tasks (back to top...)
JavaScript can also provide a wide variety of tasks! We'll see more of that later (it's not like we haven't already seen that...)!
B) Core Syntax Review (back to top...)
Here's a quick example of some things we should already be aware of:
A) Characteristics (back to top...)
1) Weakly Typed Language (back to top...)
By "weakly," we mean that while JavaScript does recognize strings, booleans and integers, it doesn't insist that you define the datatype in the context of creating a variable.
For example, with PDO, you have to define the parameter as an "INT" or a "STR." JavaScript doesn't make you do that.
2) Datatypes Can be Switched (back to top...)
You can have a variable that starts out in your code as a "string," and then switch it to be an "integer" and JavaScript does not freak out.
3) Object Oriented Language (back to top...)
Remember, an "object" is a combination of properties and values. JavaScript can be organized in that way.
4) Primitive and Reference Data Types (back to top...)
Also, JavaScript makes use of the "Primitive" and "Reference" types. Click here for an indepth explanation, but the bottom line is that you have two types of data. You've got the "primitive" type which is going to be either undefined, null, boolean, number, string, or symbol. The other type of data is "Reference" and that's going to be an "object."
All that to say, that when you're manipulating data, if the variable stores a primitive value, when you manipulate its value, you are working on the actual value stored in the variable. In other words, the variable that stores a primitive value is accessed by value.
Unlike the primitive value, when you manipulate an object, you are working on the reference to that object, rather than the actual object. In short, a variable that stores an object is accessed by reference.
There...!
5) Versatile Language (back to top...)
You can run JavaScript on a server or on your own box - which is what Node.js is all about.
6) Wide Variety of Tasks (back to top...)
JavaScript can also provide a wide variety of tasks! We'll see more of that later (it's not like we haven't already seen that...)!
B) Core Syntax Review (back to top...)
Here's a quick example of some things we should already be aware of:
var name = "Bruce";
var instrument = "drums";
var sticks = "sticks";
function description(thename, theax, theclubs) {
return thename + " plays " + theax + " with " + theclubs;
}
console.log(description(name, instrument, sticks));
var greeter = "hey hi";
var times = 4;
if (times > 3) {
var greeter = "say Hello instead";
}
console.log(greeter) //"say Hello instead"
let greeting = "say Hi";
let times = 4;
if (times > 3) {
let hello = "say Hello instead";
console.log(hello);//"say Hello instead"
}
console.log(hello) // hello is not defined
let greeting = "say Hi";
greeting = "say Hello instead";
// this will return an error
let greeting = "say Hi";
let greeting = "say Hello instead"; //error: Identifier 'greeting' has already been declared
let greeting = "say Hi";
if (true) {
let greeting = "say Hello instead";
console.log(greeting);//"say Hello instead"
}
console.log(greeting);//"say Hi"
class NameField {
constructor(name) {
const field = document.createElement('li');
field.textContent = name;
const nameListHook = document.querySelector('#names');
nameListHook.appendChild(field);
}
}
➁ class NameGenerator {
constructor() {
➂ const btn = document.querySelector('button');
➃ this.names = ['Max', 'Manu', 'Anna'];
this.currentName = 0;
➄ btn.addEventListener('click', () => {
this.addName();
});
// Alternative:
// btn.addEventListener('click', this.addName.bind(this));
}
addName() {
console.log(this);
➃ const name = new NameField(this.names[this.currentName]);
this.currentName++;
if (this.currentName >= this.names.length) {
this.currentName = 0;
}
}
}
➀ const gen = new NameGenerator();
<!DOCTYPE html>
<html lang="en">
<head>
<meta charset="UTF-8">
<meta name="viewport" content="width=device-width, initial-scale=1.0">
<meta http-equiv="X-UA-Compatible" content="ie=edge">
<title>JS & "this"</title>
</head>
<body>
<button>Add Name</button>
<ul id="names"></ul>
<script src="app.js"></script>
</body>
</html>
➀ -> This is what puts the key in the ignition and gets the motor running. ➁ -> Here's the Class that's being instantiated and because you've got a constructor in place, that piece of the code is going to fire immediately ➂ -> const btn = document.querySelector('button'); this is looking through the document and grabbing the fist element that matches "button" ➃ -> this.names is the syntax that we would use to create the equivalent to a property. "names" is now available throughout the Class as you can see in the "addName" method ➄ -> here we're using the arrow operator and it's especially utilitarian in that we're using it as a way to afford us the opportunity to use the "this" operator in order to streamline the code that you see commented out. Take a look at what is written below... In the video, this is what was originally tried: btn.addEventListener('click', this.addName; The logic was that we could invoke the "addName" method by simply prefacing it with "this." After all, isn't that what "this" is supposed to do? The problem is that "this" is not only looking within the Class that it's positioned in, it's also going by the element that triggered the function in question. In this case, it's looking at the "btn." Because "addName" is not part of the "btn" dynamic, it throws and error. To get around that, you use the "bind" element. It's going to look like this: btn.addEventListener('click', this.addName.bind(this)); By using this, we're telling JavaScript to not look for "addName" in the context of the button, but rather to look for it in the context of the Class. Now, we're good to go. Here is where the Arrow Function comes to bear. Instead of writing btn.addEventListener('click', this.addName.bind(this));, we can write this: btn.addEventListener('click', () => { this.addName(); }); The Arrow Function gives us the chance to tell JavaScript to assume the scope of the button command to include the NameGenerator Class rather than just the button itself. 3) Some Shorthand (back to top...) This works: const add = (a, b) => { return a + b; }; If you've got a function that's a mere, one-line-return kind of dynamic, you can simply do this: const add = (a,b) => a + b; If I don't have any more than one argument, I don't need the paranthesis: const add = a => a + 1; ...and, in the event that I don't have any arguments at all, I can just have empty parenthesis and I'm good to go... const randomAdd = () => 1 + 2; BTW: To make "randomAdd" fire, you would write this in your GIT Bash: console.log(randomAdd()); E) Working with Objects, Properties and Methods (back to top...) Here we go: 1) Objects (back to top...) const person = { // "person" is an object name: 'Bruce', // key value pairs are called "properties" or "fields" of the object age: '55', greet () { // you can also have an anonymous function as a property of the object (note the way the syntax is notated console.log('Hi, I am ' + this.name +' and I am ' + ths.age); } person.greet(); } The above will output: Hi, I am Bruce and I am 55 a) Arrays (back to top...) An object can also be an array... const hobbies = ["drums", "gigs"]; for (let x of hobbies) { console.log(x); } This will output: drums gigs
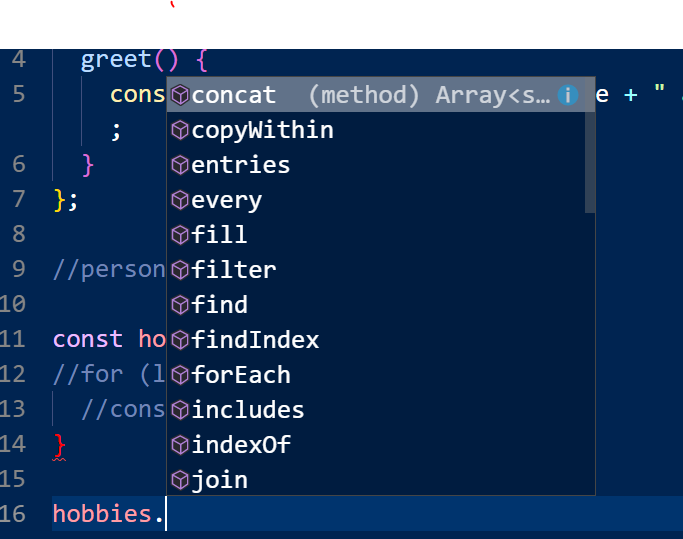 One thing that's kind of interesting is the number of possibilities that open up when you're dealing with arrays.
When you add a "dot" at the end of your "hobbies" object, you get a display that shows you several options (see image to the right). Let's take a look at "map."
map
"map" allows you to edit the way in which the array is displayed. Check it out:
console.log(
hobbies.map(hobby => {
return "Hobby: " + hobby;
})
);
console.log(hobbies);
This will output:
[ 'Hobby: drums', 'Hobby: gigs' ]
[ 'drums', 'gigs' ]
And because of the options we have available to us as "shorthand" with the arrow function, we can get the same output using this:
console.log(hobbies.map(hobby => "Hobby: " + hobby));
push
While a "const" is typically something that doesn't change, because it's an array and therefore technically what is referred to as a "reference type," you can change the elements within the array without violating the "const" dynamic.
So, if I do this:
const hobbies = ["drums", "gigs"];
hobbies.push("cuts");
console.log(hobbies);
I get this:
[ 'drums', 'gigs', 'cuts' ]
This is an important concept because it underscores the difference between "primative values" and "reference types." A "reference type" is a piece of code that is pointing to something. in other words, it represents a digital address of some kind of object. The "const" in the above example, technically, hasn't changed because it's an address as opposed to a legitimate value.
F) Understanding Spread and Rest Operators
One thing that's kind of interesting is the number of possibilities that open up when you're dealing with arrays.
When you add a "dot" at the end of your "hobbies" object, you get a display that shows you several options (see image to the right). Let's take a look at "map."
map
"map" allows you to edit the way in which the array is displayed. Check it out:
console.log(
hobbies.map(hobby => {
return "Hobby: " + hobby;
})
);
console.log(hobbies);
This will output:
[ 'Hobby: drums', 'Hobby: gigs' ]
[ 'drums', 'gigs' ]
And because of the options we have available to us as "shorthand" with the arrow function, we can get the same output using this:
console.log(hobbies.map(hobby => "Hobby: " + hobby));
push
While a "const" is typically something that doesn't change, because it's an array and therefore technically what is referred to as a "reference type," you can change the elements within the array without violating the "const" dynamic.
So, if I do this:
const hobbies = ["drums", "gigs"];
hobbies.push("cuts");
console.log(hobbies);
I get this:
[ 'drums', 'gigs', 'cuts' ]
This is an important concept because it underscores the difference between "primative values" and "reference types." A "reference type" is a piece of code that is pointing to something. in other words, it represents a digital address of some kind of object. The "const" in the above example, technically, hasn't changed because it's an address as opposed to a legitimate value.
F) Understanding Spread and Rest Operators
"Immutability" is that property of an array where you're never simply adding something to an array, rather you're constantly replacing the array with a copy plus whatever additions / changes you're making to it. In other words, the array is "immutable."
1) Spread (back to top...)
"Spread" is an operator that you use to add elements to an array by copying the existing array and then adding an element to it. Take a look:
a) slice (back to top...)
const copiedArray = hobbies.slice();
console.log(copiedArray);
When I run "node.js," I get my copied array:
C:\wamp\www\adm\node>node play.js
[ 'drums', 'gigs' ]
"slice" copies the array and you can also pass arguments into it to limit the range of elements within the array you want to copy.
b) spread (back to top...)
If you were to do this:
const copiedArray = [hobbies];
console.log(copiedArray)
We would get this:
C:\wamp\www\adm\node>node play.js
[ [ 'drums', 'gigs' ] ]
You get what's called a "nested array." It's an array within an array. While that might be helpful to use at some point, it's not what we're looking for now. However, if we add the "spread" operator, we're telling the system to take all of the elements within the object we're getting ready to "spread" and add those to the object that surrounds what it is that we're spreading.
So, if we do this:
const copiedArray=[...hobbies];
console.log(copiedArray);
We get:
C:\wamp\www\adm\node>node play.js
[ 'drums', 'gigs' ]
Perfect!
And what you can do with Arrays, you can also do with Objects.
Here's your "person object:
const person = {
name: "Bruce",
age: 55,
greet() {
console.log("Hi, I am " + this.name);
}
};
We can use the "..." operator to extract that object and distribute its elements to the object that our "spread" operator is attached to. Just be sure to use "{}" instead of the square brackets. So, it will look like this:
const copiedPerson = { ...person };
console.log(copiedPerson);
...and that will render:
C:\wamp\www\adm\node>node play.js
{ name: 'Bruce', age: 55, greet: [Function: greet] }
2) Rest (back to top...)
"Rest" is similiar to "spread" only in reverse.
Take for example this situation:
We're going to use an arrow function to return an array.
const CFA = (var1, var2, var3) => {
return [var1, var2, var3];
};
console.log(CFA("sandwich", "friends", "Coke"));
When we run that in our command prompt, we get this:
C:\wamp\www\adm\node>node play.js
[ 'sandwich', 'friends', 'Coke' ]
This, however, is limiting because we can't add any elements to that array on the fly. For example, we couldn't do this:
console.log(CFA("sandwich", "fries", "Coke", "cookie"));
It wouldn't return an error, but we would get the same result.
By using the "Rest" operator though, we've got access to some more flexibility. Watch...
Instead of const CFA=(var1, var2, var3)), we do const CFA=(...vars). The whole syntax looks like this:
const CFA = (...vars) => {
return vars;
};
Now, when I pass in another property into the array like what I did before, I get the entire array...
C:\wamp\www\adm\node>node play.js
[ 'sandwich', 'frieds', 'Coke', 'cookie' ]
G) Destructuring (back to top...)
const person = {
name: "Bruce",
age: 55,
greet() {
console.log("Hi, I am " + this.name);
}
};
const printName = personData => {
console.log(personData.name);
};
printName(person);
node play.js
Hello
Hi
Timer is done!
The fact that "setTimeout" is first, because there's a delay of 1 millisecond, it will get fired after the other two lines have run.
So...
Asynchronous Code - means that there's a delay, it doesn't happen right away
Synchronous Code - happens immediately
2) callback (back to top...)
Also, a "callback" is a function that is executed within another function.
You see it a lot in JQuery. For example, this:
$('#button').click(function() {
alert"Michelle");
});
The function with the "button" code is technically a "callback" in that it's a function within a function.
As far as the way it's being used here, this example does a pretty good job of unravelling the mystery...
function doHomework(subject, callback) {
alert(`Starting my ${subject} homework.`);
callback();
}
doHomework('math', function() {
alert('Finished my homework');
});
In this example, this:
function() {
alert('Finished my homework');
...is what's being recognized in the system in the context of the "callback" variable. So, you get "Starting my math homework" which is the first part of the "doHomework" function. Then it moves to the "callback" which is the function function() { alert('Finished my homework');.
3) constructor (back to top...)
"Constructors" is a JavaScript device that allows you create many objects of the same type. Click here for more information.
4) Promises (back to top...)
Constructors constitute something you want to be aware of because of the way they facilitate the "promise" dynamic.
"Promises" represent a more verbose / easier way of triggering callbacks. Thing is, you rarely have to write them on your own as much as they are happening behind the scenes in the context of pre-packaged blocks of syntax. For now, just know how they look:
const fetchData = () => {
const promise = new Promise((resolve, reject) => {
setTimeout(() => {
resolve("Done!");
}, 1500);
});
return promise;
};
setTimeout(() => {
console.log("Timer is done!");
fetchData().then(text => {
console.log(text);
});
}, 2000);
console.log("Hello");
console.log("Hi");

- http
- https
- fs
- path
- path
- os
const http = require("http");
const server = http.createServer((req, res) => {
console.log(req.url, req.method, req.headers); // here's where you're logging some activity
});
server.listen(3000);
brucegust@BRUCEGUST59AC MINGW64 /c/wamp/www/adm/node/project
$ node app.js
/ GET { host: 'localhost:3000', // here's the method and the URL. The rest of the info is header info...
connection: 'keep-alive',
'cache-control': 'max-age=0',
'upgrade-insecure-requests': '1',
'user-agent':
'Mozilla/5.0 (Windows NT 10.0; Win64; x64) AppleWebKit/537.36 (KHTML, like Ge
cko) Chrome/71.0.3578.98 Safari/537.36',
accept:
'text/html,application/xhtml+xml,application/xml;q=0.9,image/webp,image/apng,
*/*;q=0.8',
'accept-encoding': 'gzip, deflate, br',
'accept-language': 'en-US,en;q=0.9',
cookie: '_ga=GA1.1.2029811492.1513464095' }
If you wanted to send some html code and some text, it would look like this:
const http = require("http");
const server = http.createServer((req, res) => {
console.log(req.url, req.method, req.headers);
res.setHeader("Content-Type", "text/html"); "res" means "response"
res.write("<html>");
res.write("<head><title>Test Page</title>");
res.write("<body><h1>I've got to fix that stupid NOMAS site!</h1></body>");
res.write("</html>");
res.end(); //this is important!
});
server.listen(3000);
I've got fix that stupid NOMAS site!
E) Request and Response Headers (back to top...) Part of what we wrote a moment ago included "headers." While that may be a familiar term, there are some things about that we'll get into later. For now, here's an online resource that lists everything we'll ever need as far as "Request and Response Headers." F) Routing (back to top...) What we're going to do in this example is use an element in the URL to dictate the flow and functionality of our page. Check it out:const http = require("http");
const server = http.createServer((req, res) => {
const url = req.url; // set up a const ->url
if (url === "/") { // if url equals nothing, then fire the following code...
res.write("<html");
res.write("<head><title>My First Page</title></head>");
res.write(
'<body><form action="/message" method="POST"><input type="text" name="message"><button type="submit">Send</button></form></body>'
); // we've got a little form, here...!
res.write("</html>");
return res.end(); // *see the notes below...
}
res.setHeader("Content", "text/html");
res.write("<html");
res.write("<head><title>My First Page</title></head>");
res.write("<body><h1>Yo, dog!</h1></body>");
res.write("</html>");
res.end();
});
server.listen(3000);
const http = require("http");
const fs = require("fs");
const server = http.createServer((req, res) => {
const url = req.url;
const method = req.method; // set up a new const called "method" so we can track whether or not something's been posted
if (url === "/") {
res.write("<html");
res.write("<head><title>My First Page</title></head>");
res.write(
'<body><form action="/message" method="POST"><input type="text" name="message"><button type="submit">Send</button></form></body>' //here's your form
);
res.write("</html>");
return res.end();
}
if (url === "/message" && method === "POST") { // if the URL is "message," which is the route of the posted form, and the method equals "POST," then...
fs.writeFileSync("message.txt", "DUMMY"); // write a new file called, "message.txt"
res.statusCode = 302;
res.setHeader("Location", "/");
return res.end(); // remember to return the "res.end" dynamic so the code doesn't continue to run
}
res.setHeader("Content", "text/html");
res.write("<html");
res.write("<head><title>My First Page</title></head>");
res.write("<body><h1>Yo, dog!</h1></body>");
res.write("</html>");
res.end();
});
server.listen(3000);
const http = require("http");
const fs = require("fs");
const server = http.createServer((req, res) => {
const url = req.url;
const method = req.method;
if (url === "/") {
res.write("<html");
res.write("<head><title>My First Page</title></head>");
res.write(
'<body><form action="/message" method="POST"><input type="text" name="message"><button type="submit">Send</button></form></body>'
);
res.write("</html>");
return res.end();
}
if (url === "/message" && method === "POST") {
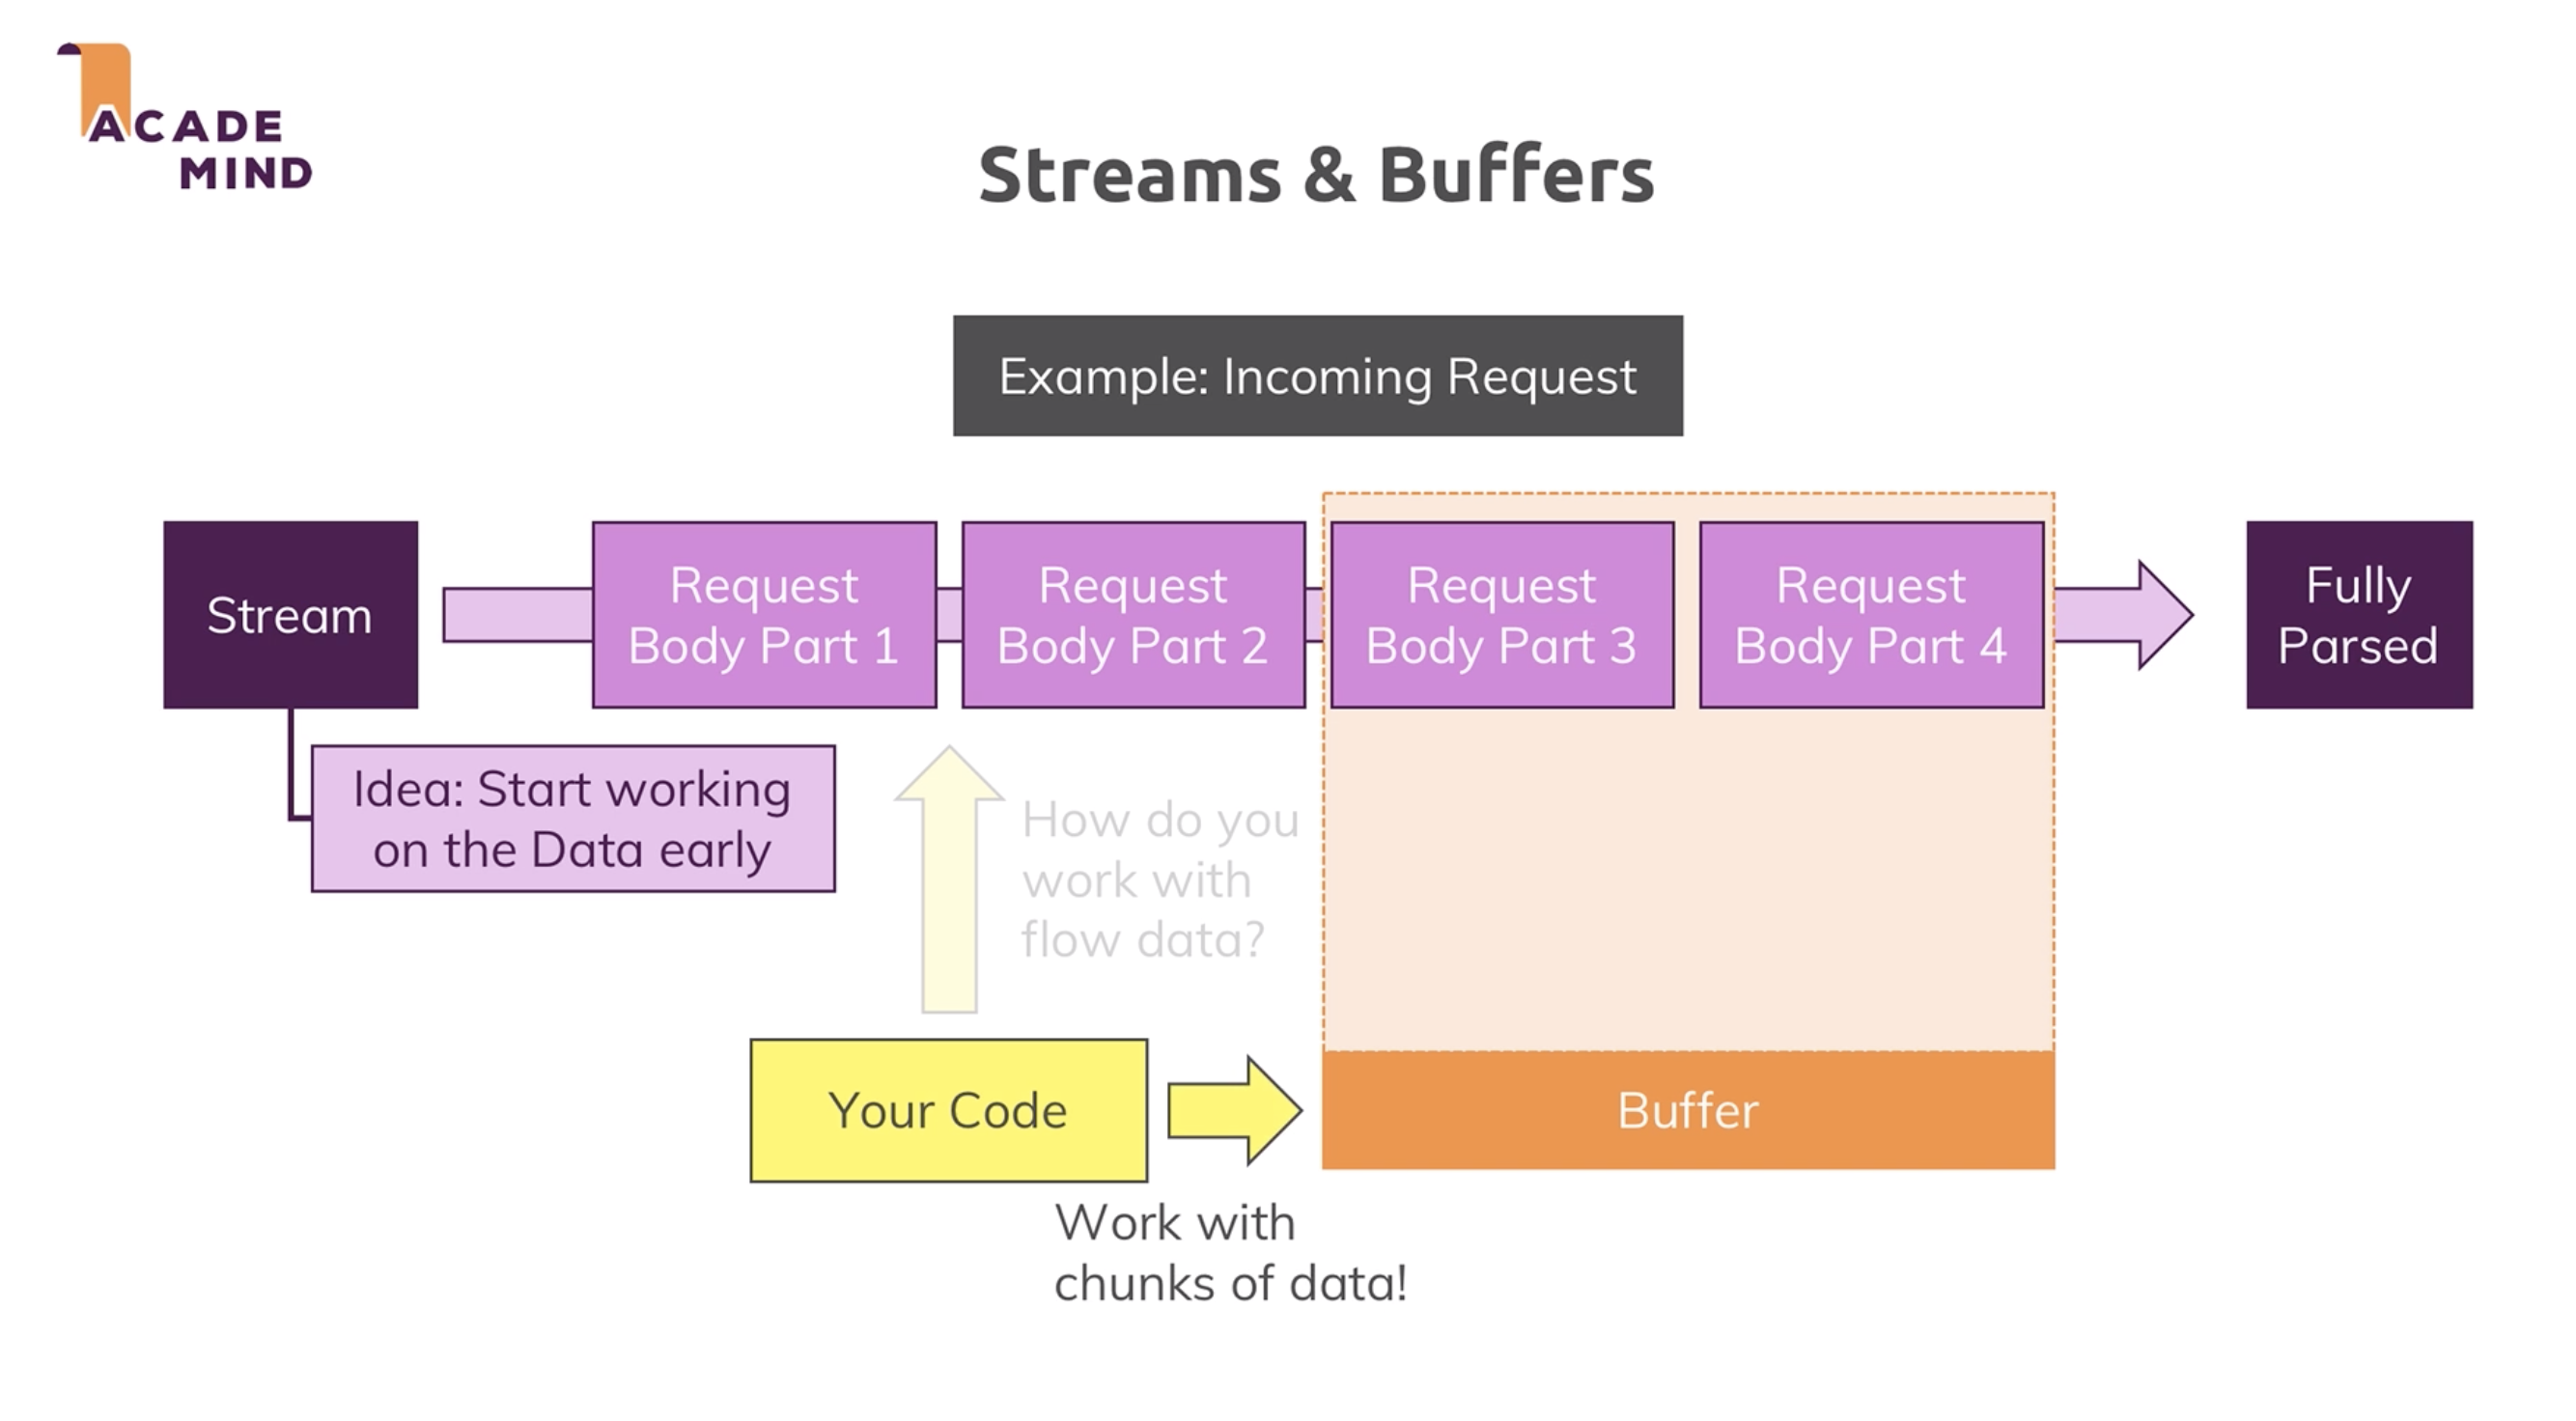
const body = [];
req.on("data", chunk => {
console.log(chunk);
body.push(chunk);
});
req.on("end", () => {
const parsedBody = Buffer.concat(body).toString();
console.log(parsedBody);
});
fs.writeFileSync("message.txt", "DUMMY");
res.statusCode = 302;
res.setHeader("Location", "/");
return res.end();
}
res.setHeader("Content", "text/html");
res.write("<htm>l");
res.write("<head><title>My First Page</title></head>");
res.write("<body><h1>Yo, dog!</h1></body>");
res.write("</html>");
res.end();
});
server.listen(3000);
brucegust@BRUCEGUST59AC MINGW64 /c/wamp/www/adm/node
$ node play.js
<Buffer 6d 65 73 73 61 67 65 3d 62 72 69 6e 67 2b 69 74>
message=bring+it
To take this apart, let's take a look at the syntax above that's in bold:
❸ const body = [];
❶ req.on("data", ❷ chunk => {
console.log(chunk);
❹ body.push(chunk);
});
❺ req.on("end", () => {
❻ const parsedBody = Buffer.concat(body).toString();
console.log(parsedBody);
});
The way this breaks down is relatively simple.
You've got some incoming data based on your route and your method: if (url === "/message" && method === "POST") {. Before you got write or create a file, we're going to assert a little code so we can access the incoming data stream.
❶ We're going to start by "registering" an Event Listener. An Event Listener is basically a piece of code that's triggered by a certain event.
In this case, "on" is a method that we have available to use thanks to the server we created earlier (const server = http.createServer((req, res) => {).
BTW: We're not altering our "body" constant as far as reassigning it. In other words, we're not doing something like:
body = "hello";
"body" was originally defined as an empty array. While we can add values to that array, we can't redefine the "body"as the object. We can, however, edit its value.
req.on("data", (chunk) => { //using an ES6 arrow function
The "on" method expects two arguments. The first is the name of the event itself which, in this case, is "data..."
❷ The second argument is what we do after that event has been "heard." In this instance, the second argument is actually a function. By default, the function is going to be looking for a "chunk" as per the way Node operates in this context, hence the "chunk" in the opening parenthesis.
For the function, we're going to start by instantiating a new constant called "body" and then we're pushing
❸ const body=[]; - the body is going to be an empty array
❹ body.push(chunk) - we're pushing our "chunk" of data into the empty array.
❺ req.on('end', () => { - Now, we've got register yet another new Listener to handle what amounts to the end result. Again, we'll grab the "on" method which will expect two arguments. The first one is "end." It's going to "listen" for what is the end of the incoming request.
❻ const parsedBody = Buffer.concat(body).toString(); - at this point, we can rely on the fact that the "body" constant contains all of the info that corresponds to the incoming request and we're going to use the "Buffer" object to combine it into a single string.
Alright, now...
Let's take the incoming string and write that to the message.txt file. To do that is relatively easy.
The code is going to look like this:
req.on("end", () => {
❶ const parsedBody = Buffer.concat(body).toString();
❷ const message = parsedBody.split('=')[1];
❸ fs.writeFileSync("message.txt", message);
});
❶ This has already been discussed. We're using the "Buffer" object to take all the pieces that have been collected and turn them into a cohesive string.
❷ "message" is going to be what holds the portion of the "parsedBody" array that coincides with the "message" value. The "parsedBody" value is going to be a series of "key / value" pairs. "message" is going to be the value to the right of equal sign that's in the first position in the array.
❸ We're now using a line from the original code, but we're placing it within the "end" function so that we're now writing the "message" constant value to the "message.txt" file.
I) Understanding Event Driven Code Execution (back to top...)
JavaScript is a "single threaded, asynchronous language."
A "thread" is the smallest sequence of programmed instructions that can be managed independently by a scheduler, which is typically a part of the operating system. So, in other words, you're dealing with one systemic conversation at a time.
However...
While it may be one conversation, it's very much like an order in a restaurant kitchen. It's one order, but you're engaging several processes simultaneously. If someone orders a Bacon & Cheese Hamburger, you're toasting the bun, grilling the meat, cooking the bacon - all at the same time.
Now, imagine a situation where everything about the preparation of that Back & Chesse Hamburger was being done in order. So, I start with grilling the meat and only after I'm done grilling the meat do I toast the bun. And only after I'm done toasting the bun to begin to fry the bacon.
That kind of approach would be called a "Synchonous" process. Everything is being done in a specific order.
"Asynchronous," on the other hand, means I'm multi-tasking. So, I'm grilling the meat, frying the bacon and toasting the bun all at the same time. It's a very efficient way of getting things done, but...
...it can lead to trouble if one of your processes outruns another that it's dependent on. If my meat is done cooking before the bun is ready, then I've got no place to put my beef patty. This is why you have to be careful when you're writing JavaScript because, while it is capable of running asynchronous code, it can be very unforgiving if you're not structuring your code so it's not triggering processes that require other functions to conclude before they start turning over.
That said, take a look at what we just wrote:
if (url === "/message" && method === "POST") { // everything in grey gets triggered with the "Post" dynamic
const body = [];
req.on("data", chunk => {
console.log(chunk);
body.push(chunk);
});
req.on("end", () => {
const parsedBody = Buffer.concat(body).toString();
const message = parsedBody.split("=")[1];
fs.writeFileSync("message.txt", message);
});
res.statusCode = 302;
res.setHeader("Location", "/");
return res.end();
}
res.setHeader("Content", "text/html");
res.write("<html");
res.write("<head><title>My First Page</title></head>");
res.write("<body><h1>Yo, dog!</h1></body>");
res.write("</html>");
res.end();
});
- the code just above it will continue to fire, even after we've sent out the response
- should something happen in the context of our EventListener that would otherwise affect the response which has already been sent, then that's going to be a problem
$ node play.js
<Buffer 6d 65 73 73 61 67 65 3d 62 72 69 6e 67 2b 69 74>
_http_outgoing.js:470
throw new ERR_HTTP_HEADERS_SENT('set');
^
Error [ERR_HTTP_HEADERS_SENT]: Cannot set headers after they are sent to the cli
ent
at ServerResponse.setHeader (_http_outgoing.js:470:11)
at IncomingMessage.req.on (C:\wamp\www\adm\node\play.js:27:11)
at IncomingMessage.emit (events.js:182:13)
at endReadableNT (_stream_readable.js:1094:12)
at process._tickCallback (internal/process/next_tick.js:63:19)
To do this correctly, you leave the order of the code intact, but you change the "fs.writeFileSync" line and convert it to a function that DOES NOT fire synchronously. Instead it fires as a proper call back.
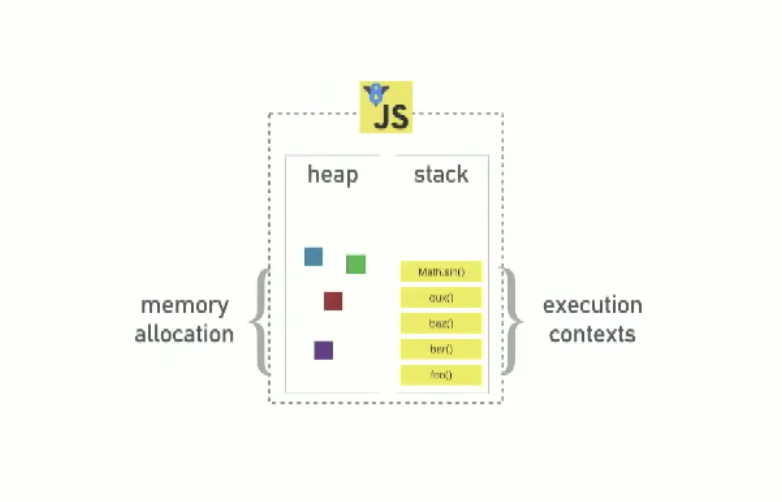
Terms and Concepts...
Runtime - when a program is running Heap - or Binary Heaps, is the systemic approach that JavaScript takes in storing information (see above graphic) JavaScript Engine - it's a computer program that executes JavaScript code Compiled vs Interpreted Code - Computer code is often a collection of characters that are unique in that they're written in a particular programming language. There are two types of software: Application Software and System Software. An example of System Software would be the Windows OS or Linux. These "machines" understand numbers and that's it. Everything you want these Operating Systems to do has to be a command that's been interpreted into some kind of digit. Application Software would be applications like Word or Photoshop.
 Computer Operating System is going to be a combination of System Software and Application Software (see graphic to the right).
Compiler - a Compiler is a computer program that transforms computer code written in one programming language (the source language) into another programming language (the target language).
There are two types of computer programs. They're either going to be "compiled" or "interpreted." A "compiled" program will result in a program that is capable of performing some task. An "interpreted" program will result in something actually being done (see both Wikipedia and Indiana University). JavaScript is an "interpreted" code.
Single Thread - one Call Stack. It's doing one thing at a time.
Client Side - a computer action that's taking place on your user's (client's) computer. "Server side," conversely, means that it's a piece of functionality that's occuring on the web server.
Non-Blocking - this term refers to the way in which Node.js is set up in such a way where it can move things from the Call Stack to other parts of the Event Loop (Task Cue, Worker Pool, etc) so it doesn't prevent the user's experience from getting slowed down by having to wait for a particular process to conclude
Computer Operating System is going to be a combination of System Software and Application Software (see graphic to the right).
Compiler - a Compiler is a computer program that transforms computer code written in one programming language (the source language) into another programming language (the target language).
There are two types of computer programs. They're either going to be "compiled" or "interpreted." A "compiled" program will result in a program that is capable of performing some task. An "interpreted" program will result in something actually being done (see both Wikipedia and Indiana University). JavaScript is an "interpreted" code.
Single Thread - one Call Stack. It's doing one thing at a time.
Client Side - a computer action that's taking place on your user's (client's) computer. "Server side," conversely, means that it's a piece of functionality that's occuring on the web server.
Non-Blocking - this term refers to the way in which Node.js is set up in such a way where it can move things from the Call Stack to other parts of the Event Loop (Task Cue, Worker Pool, etc) so it doesn't prevent the user's experience from getting slowed down by having to wait for a particular process to conclude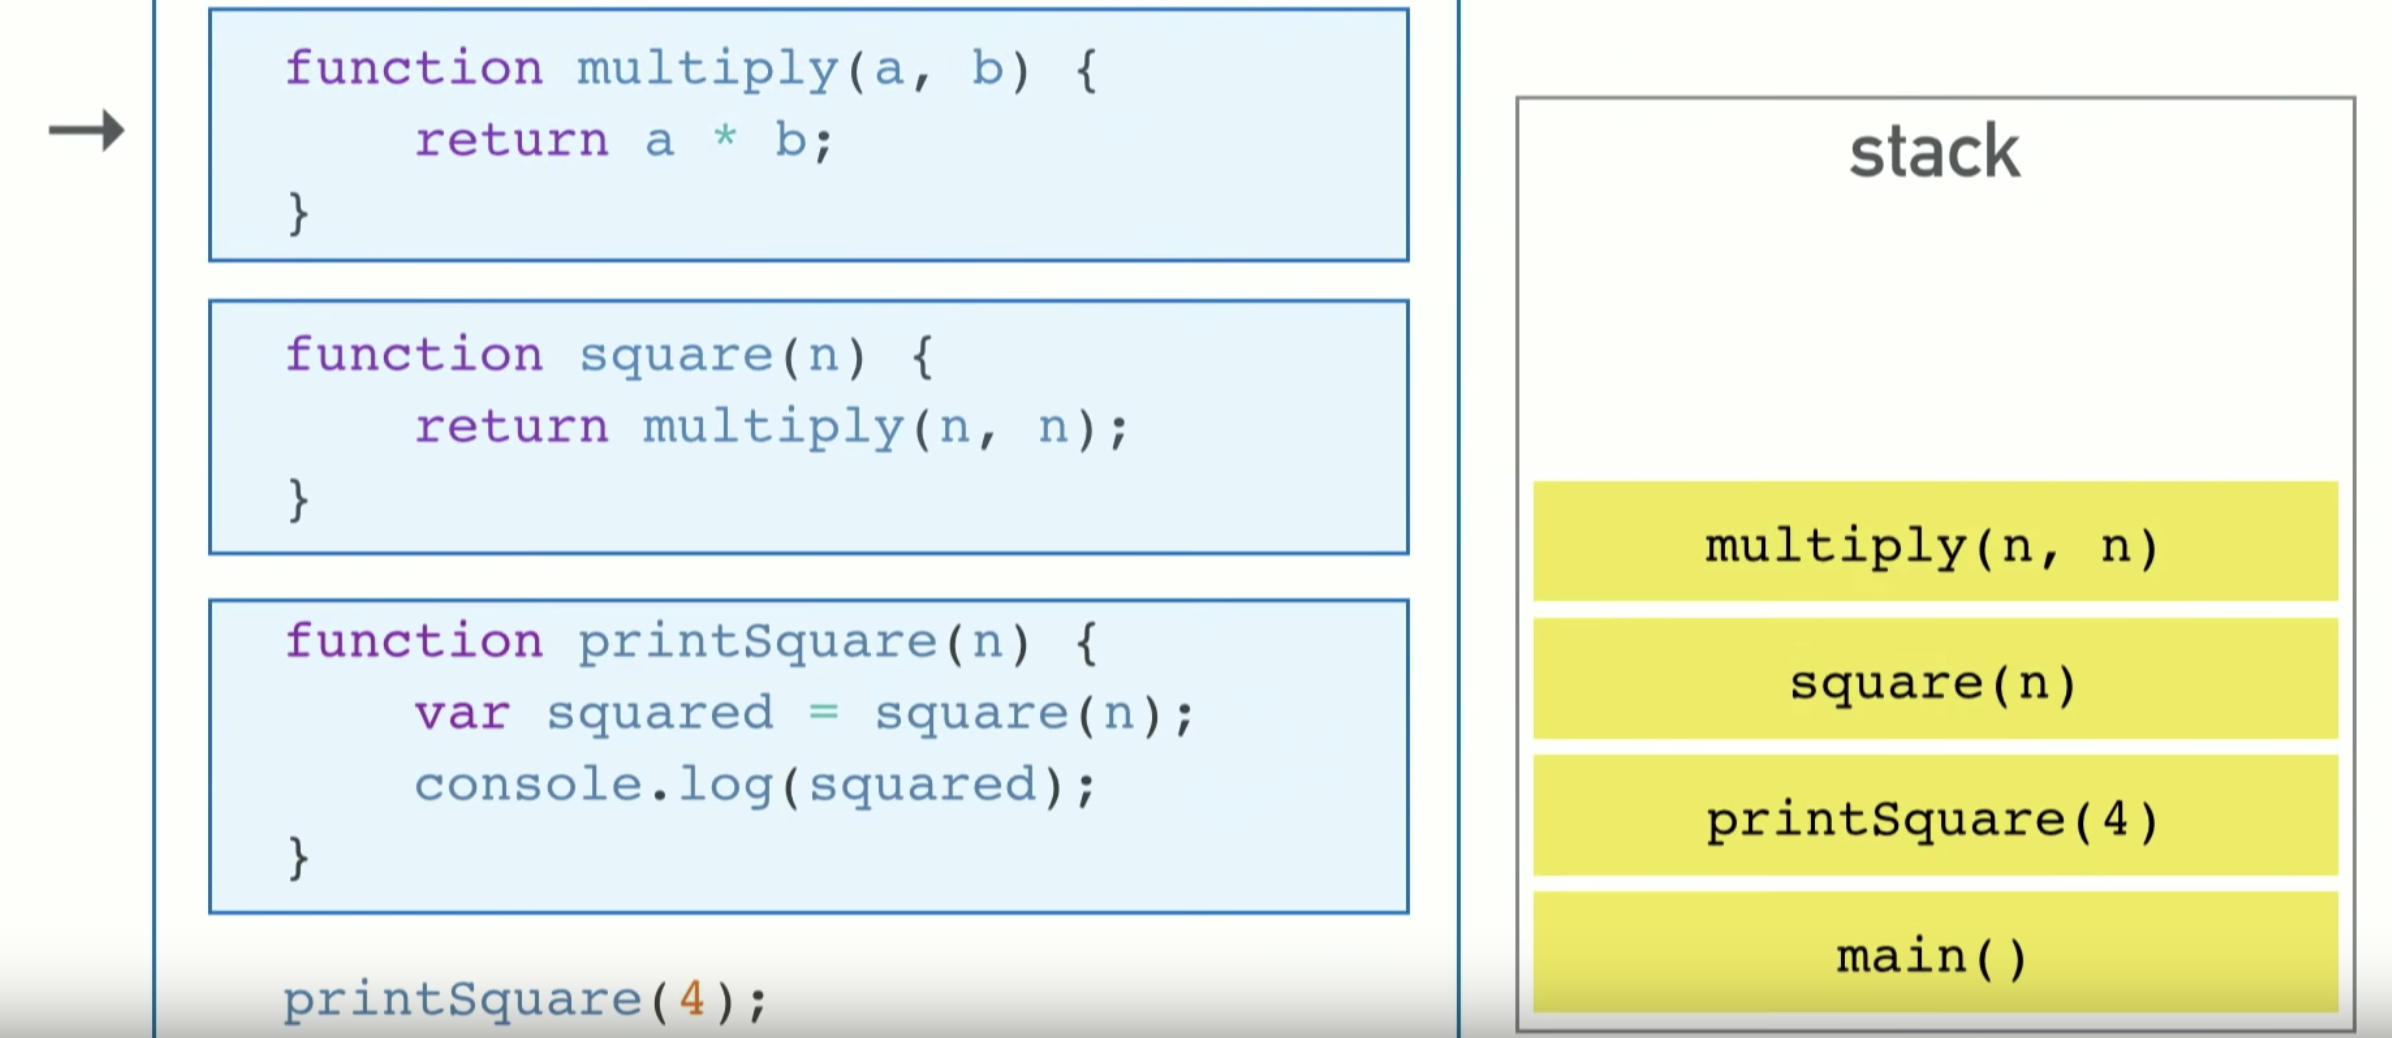
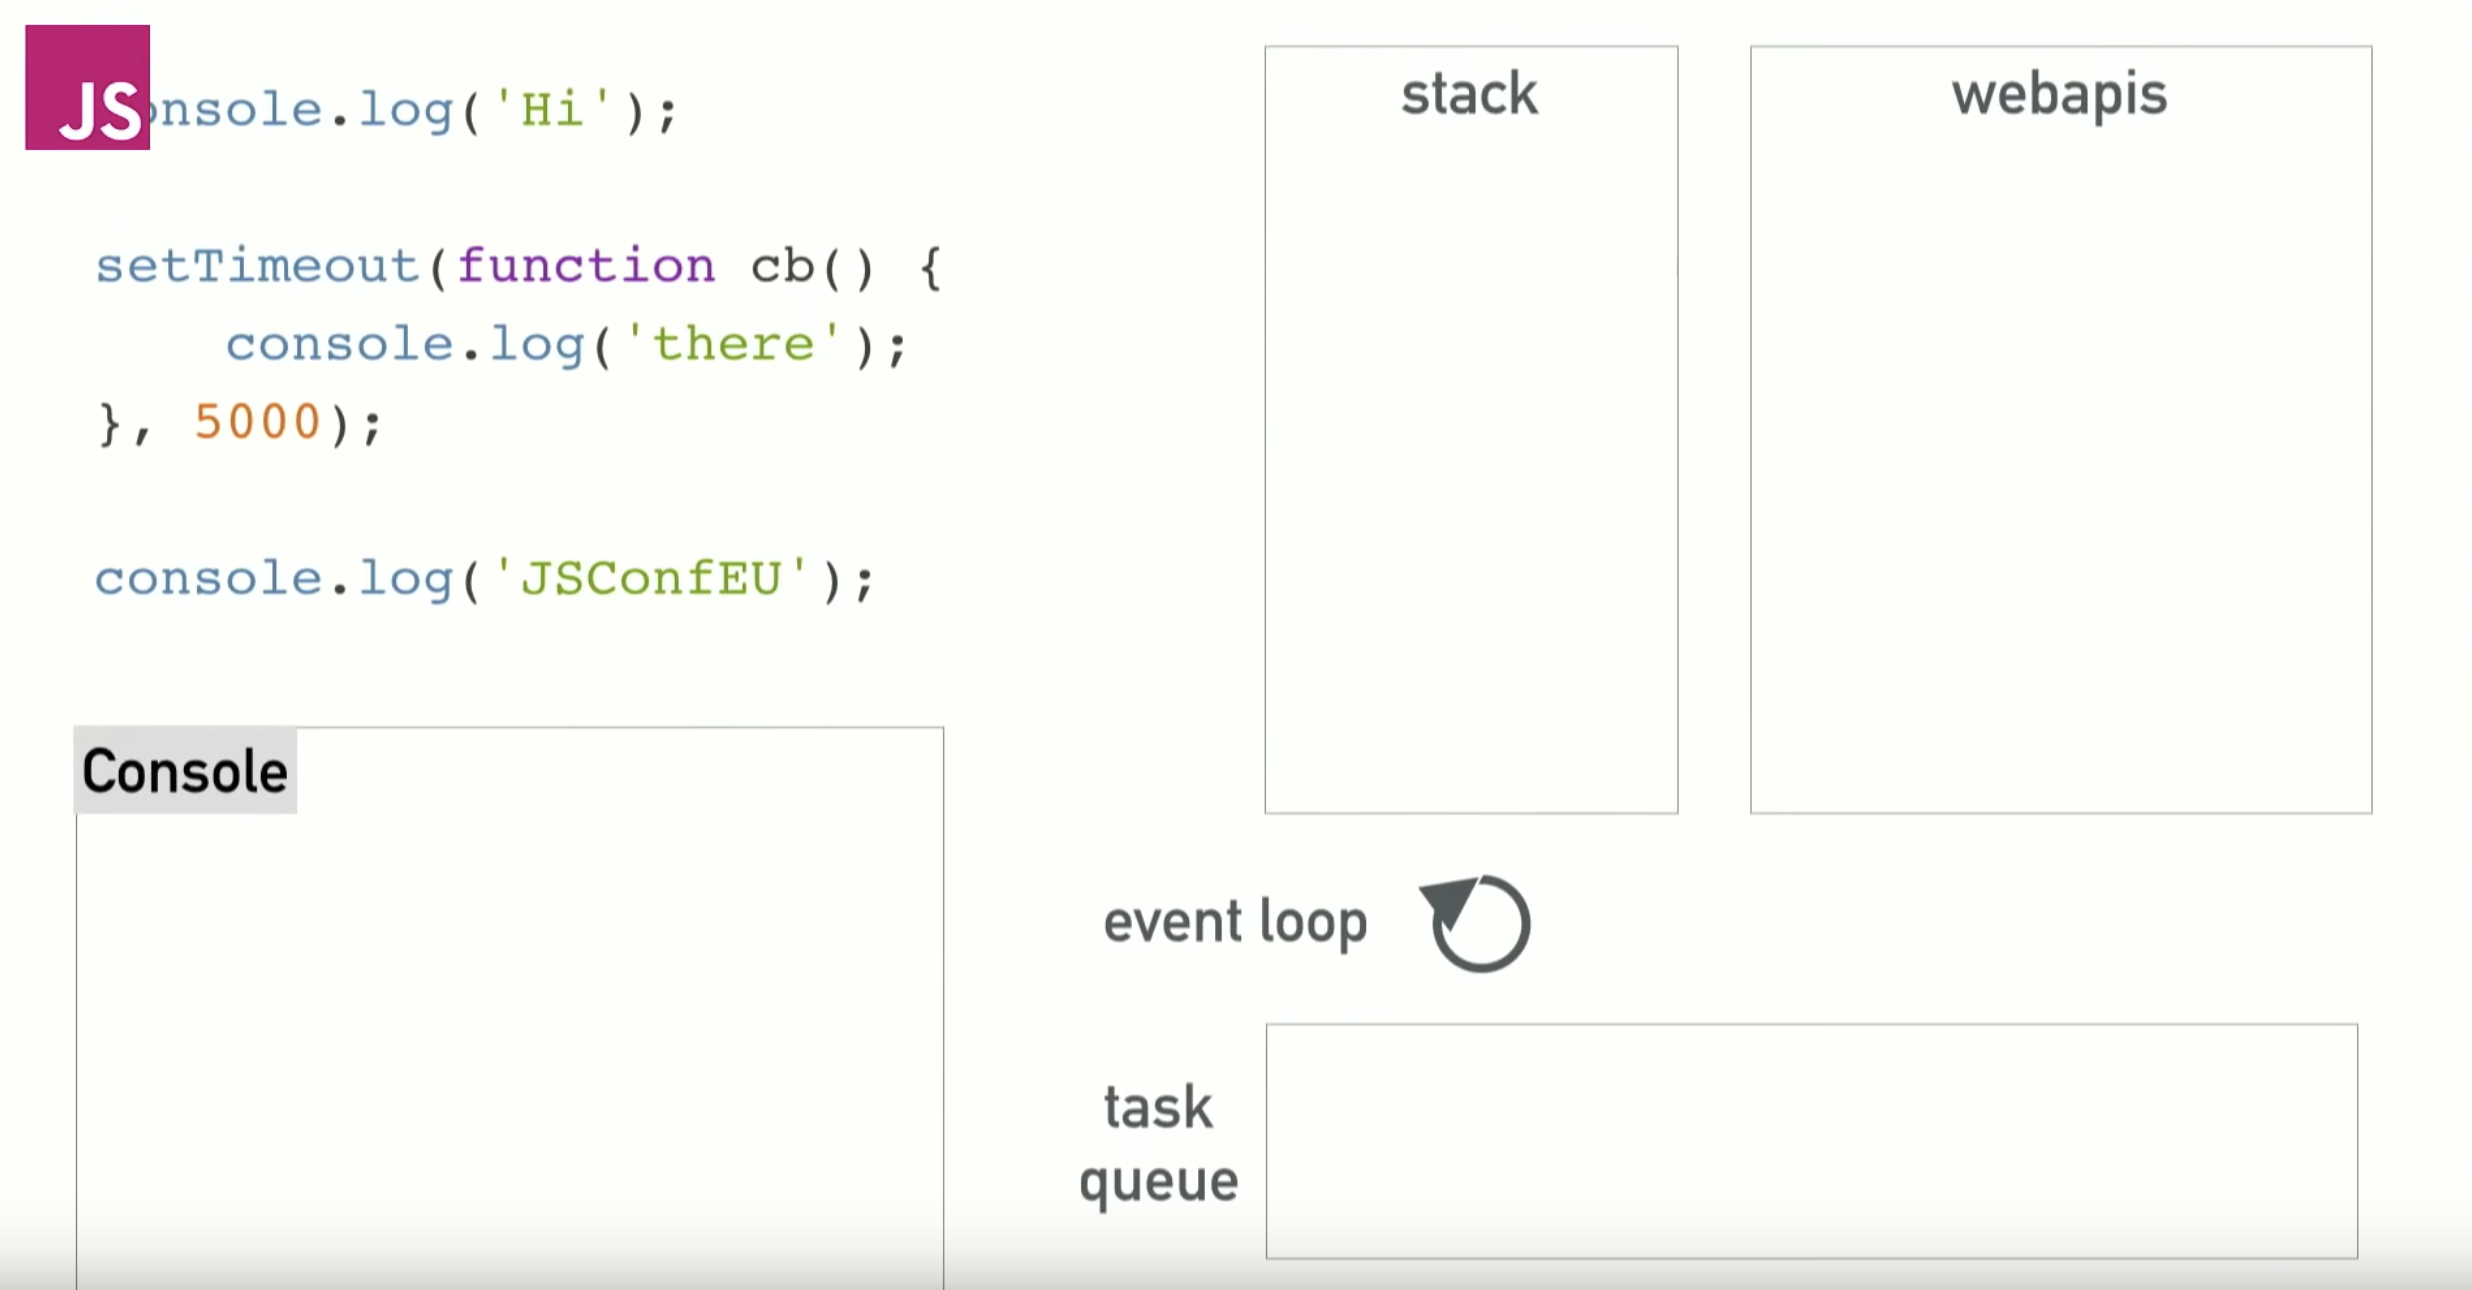
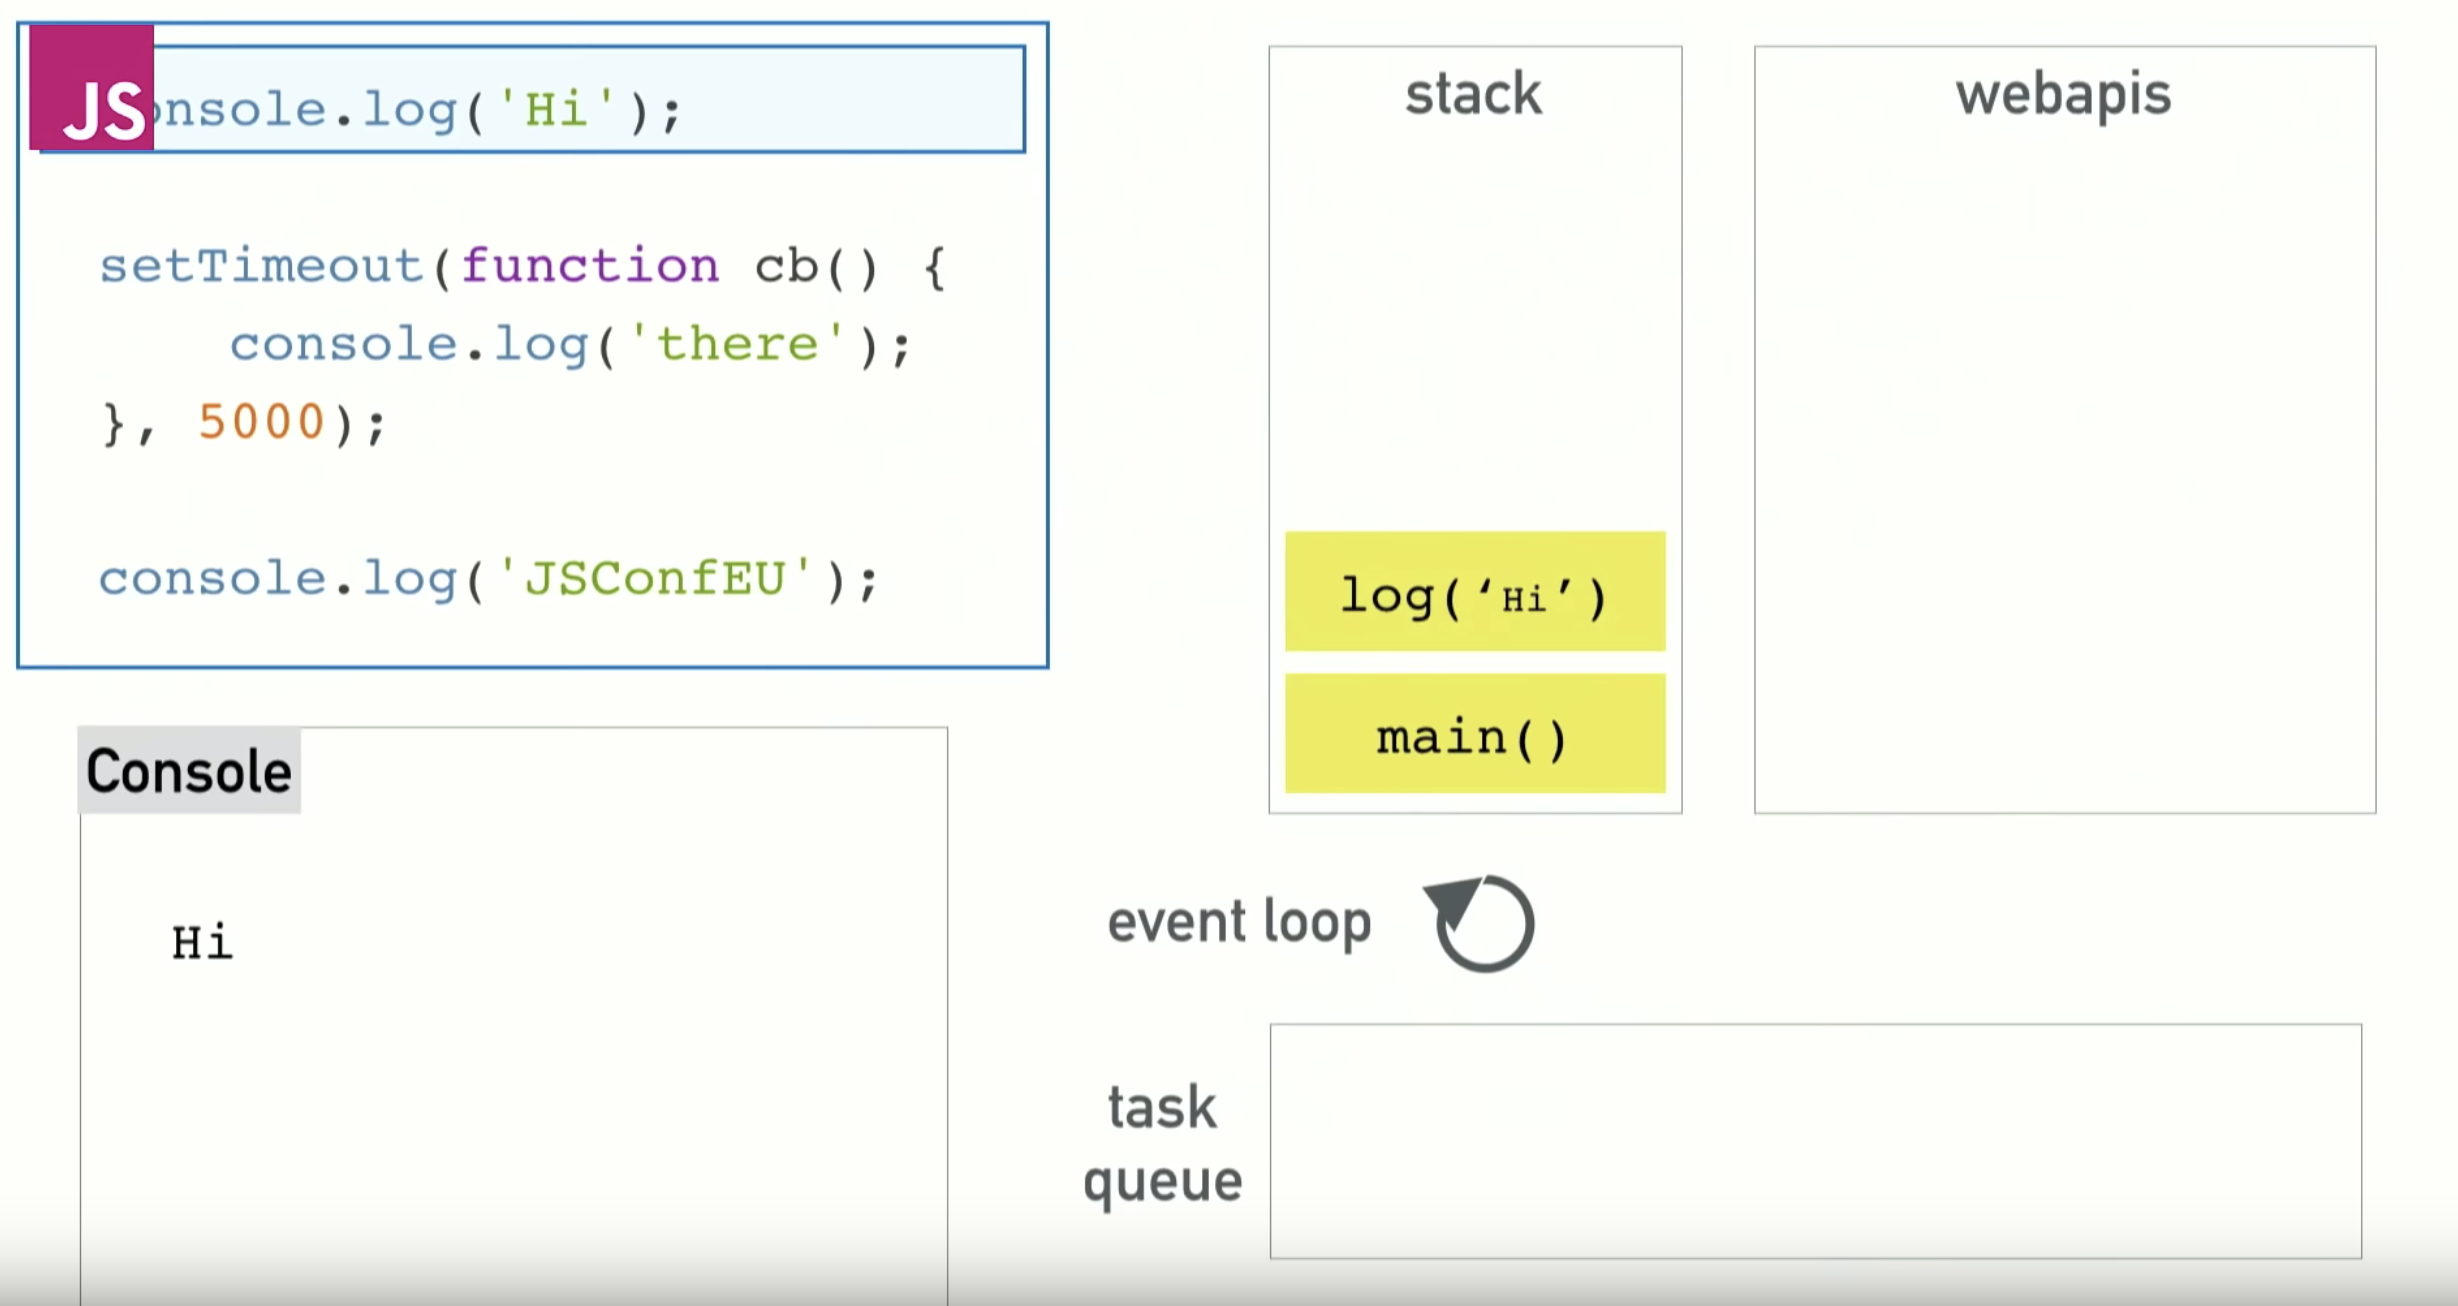
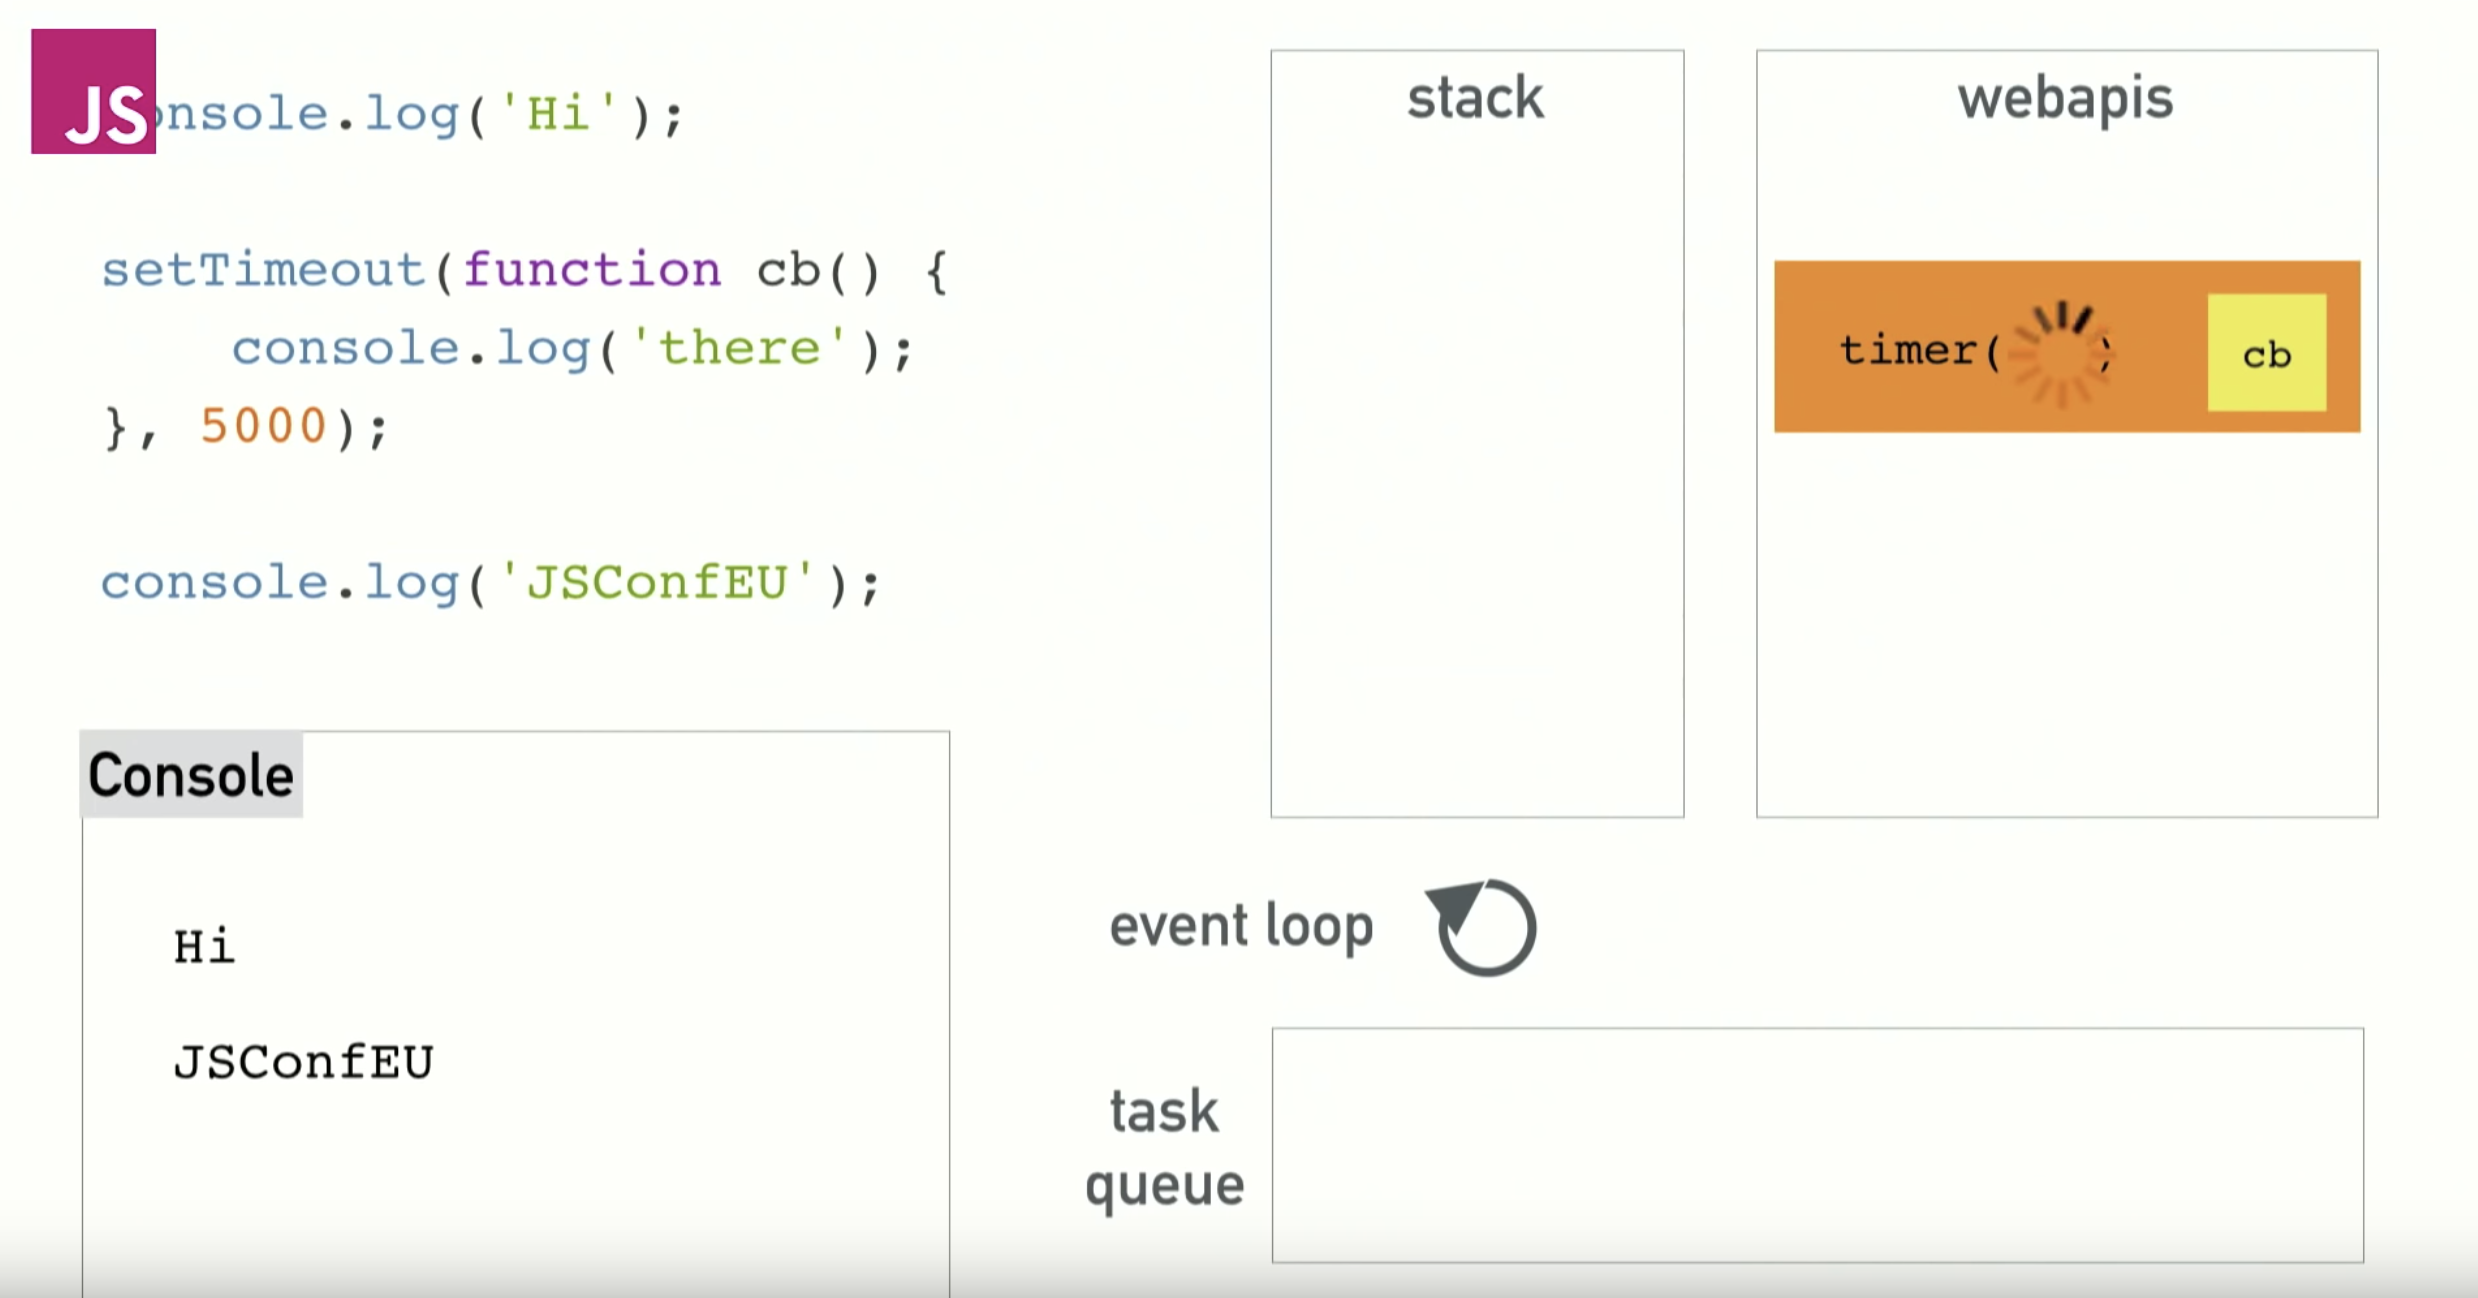
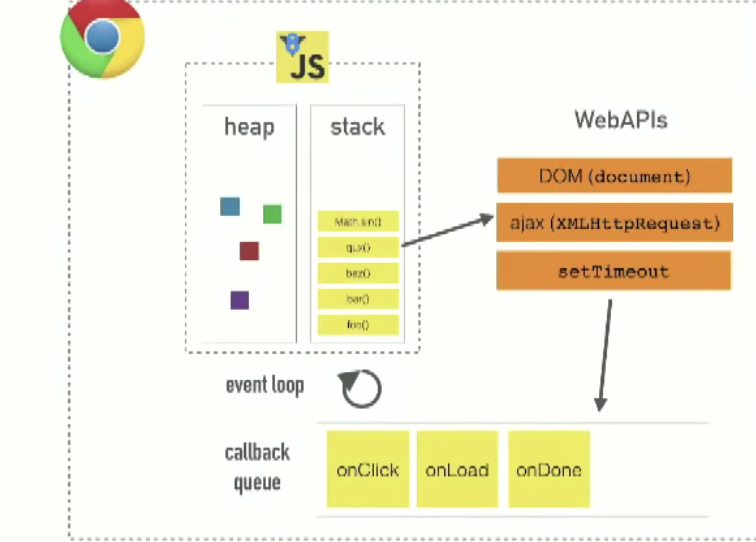 i) Web APIs (back to top...)
Web APIs are pieces of functionality that exist in the context of your web browser. Things like the DOM, AJAX and setTimeout. These are the "extra" pieces of the puzzle that JavaScript makes use of in order to deliver asyncronous processes (see diagram to the right).
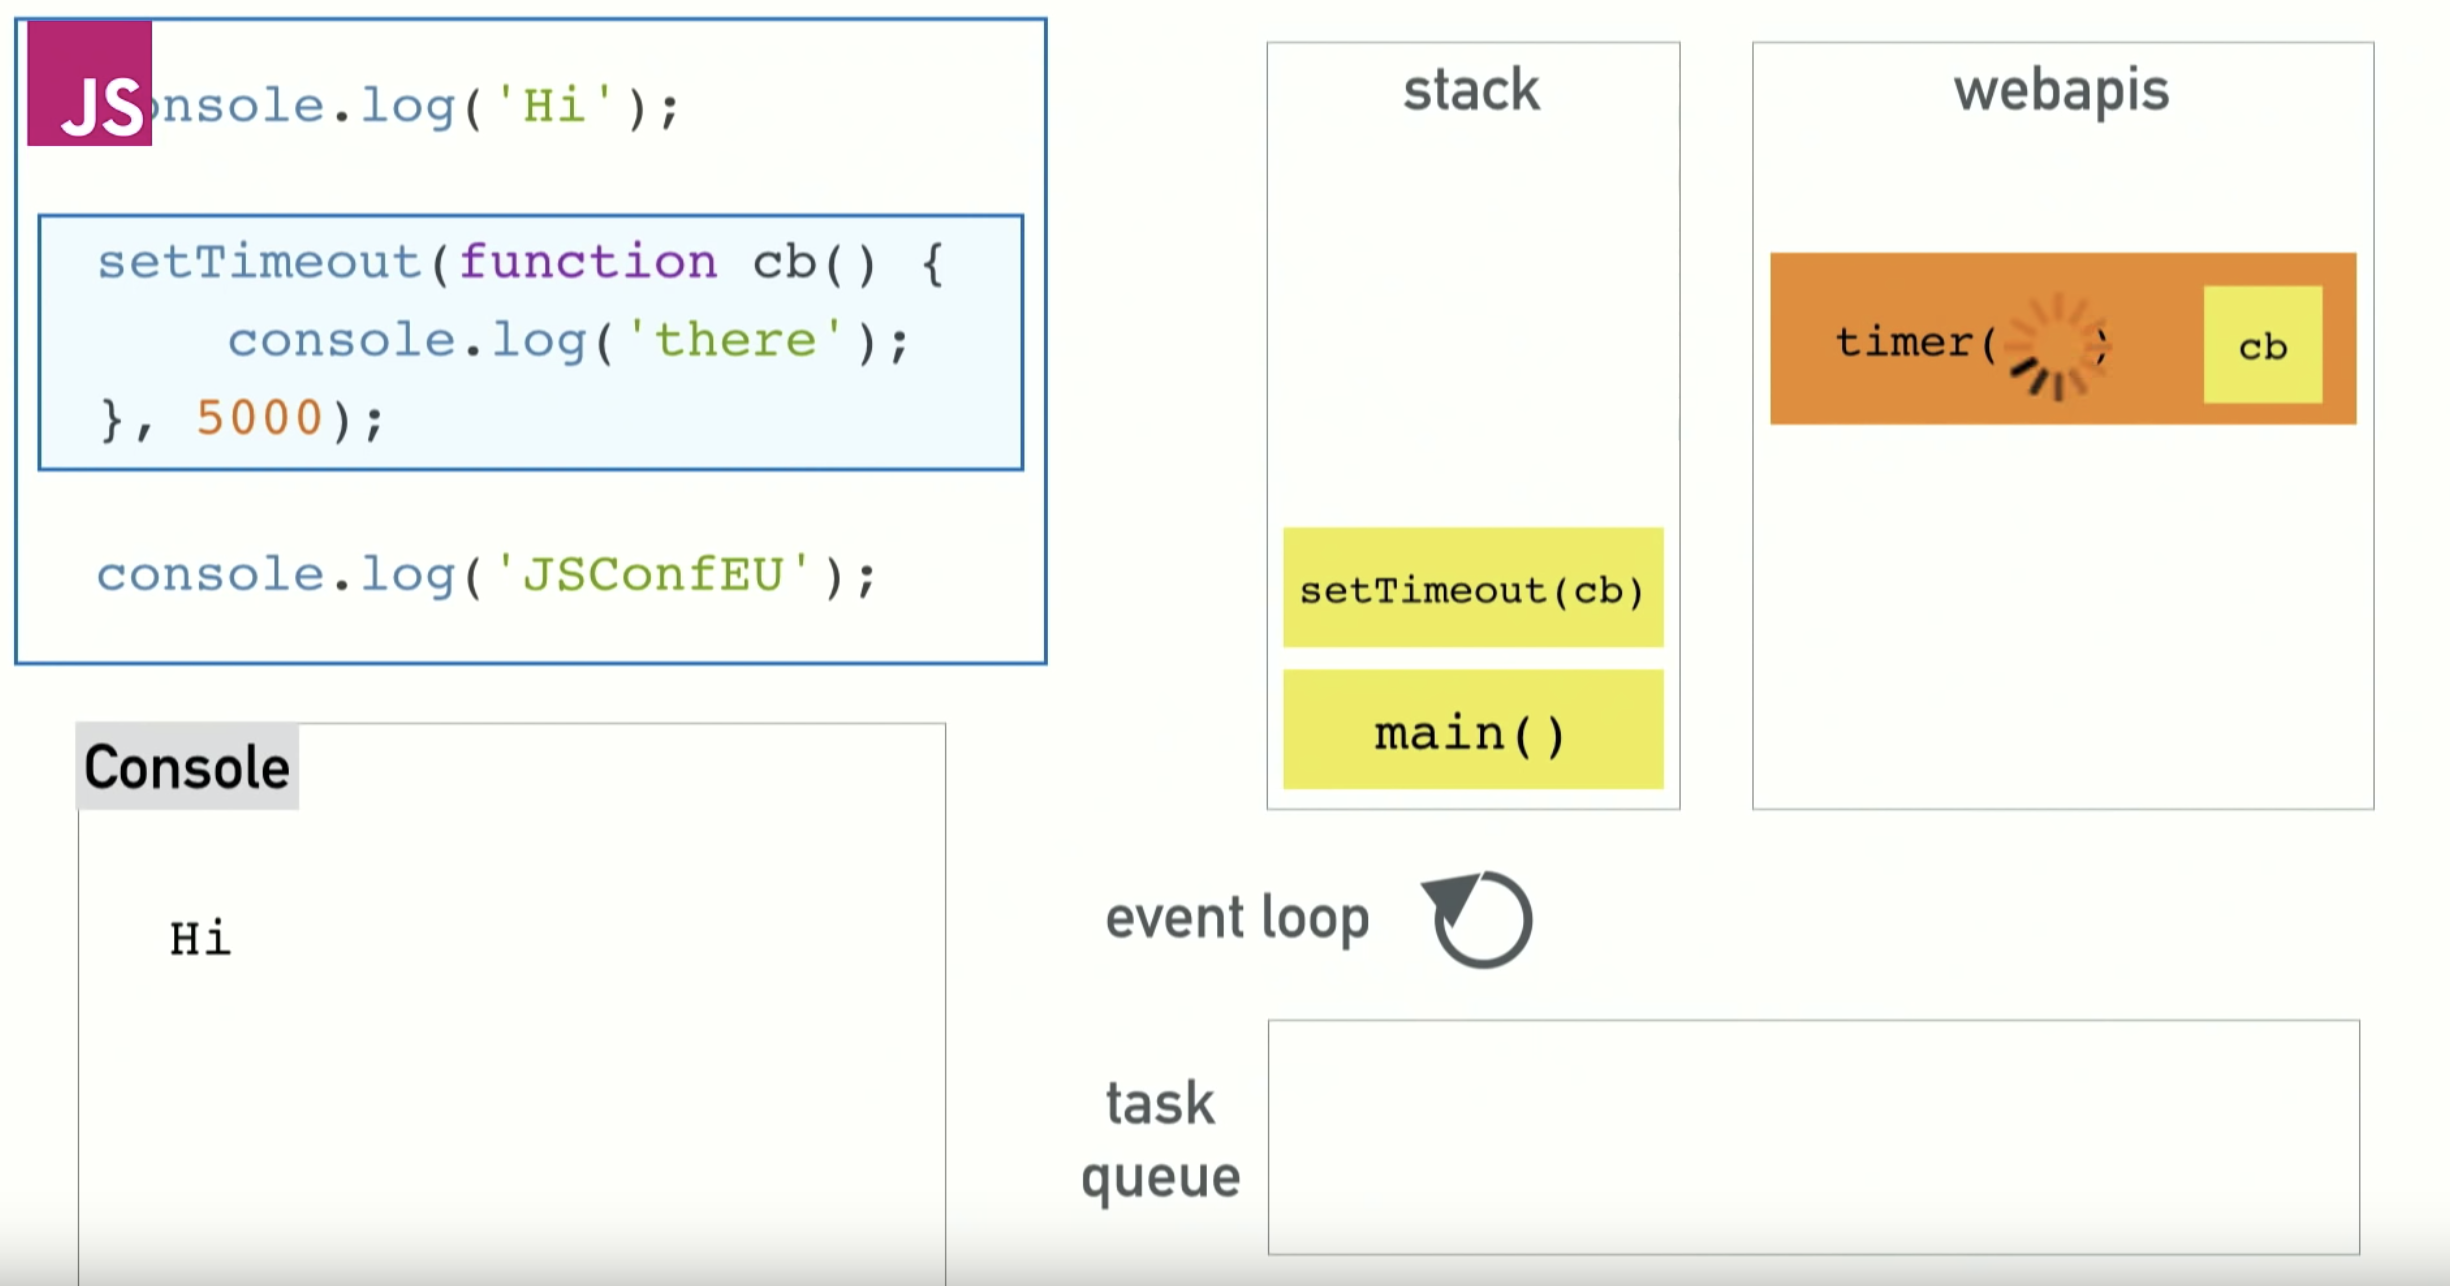
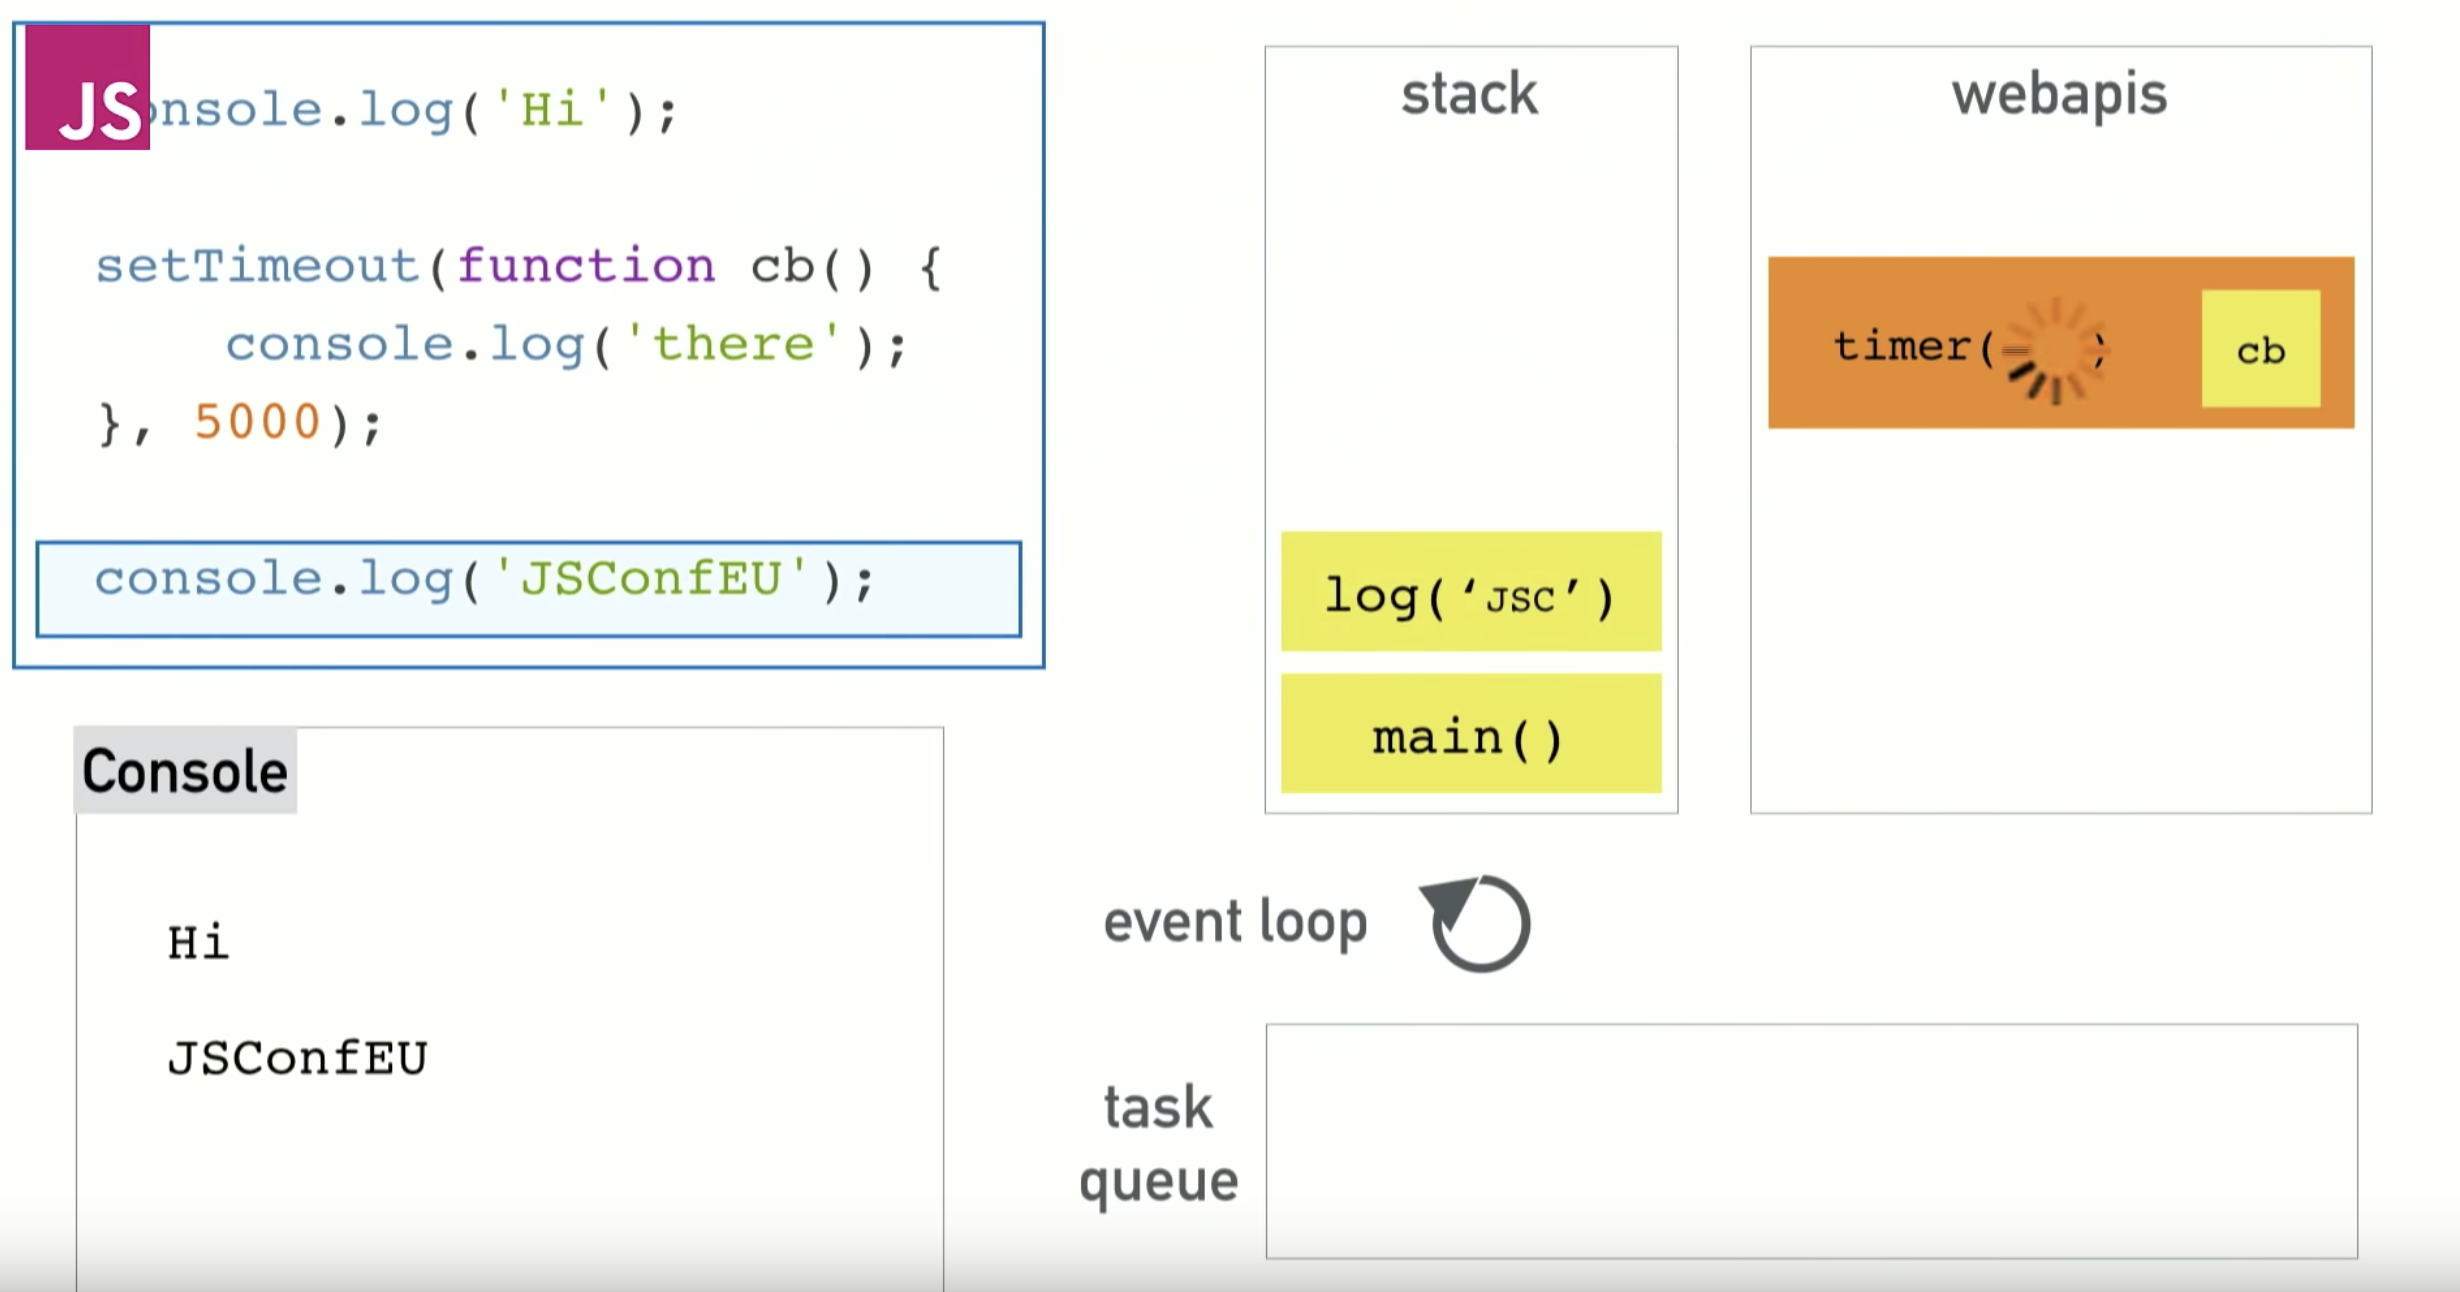
In the diagram you see below, you've got a setTimeout function that's going to be added to the stack, but then moved over to the API section where it will do its thing. Meanwhile, the Stack continues to function like it normally does in that it keeps moving things to the top and then discarding them as their respective functions are accomplished.
BTW: What you see below is exactly the same with Node, only instead of Web API's, they're replaced with C++ API's which give you the same functionality, but without the web browser.
That said, let's take a look at how this works...
i) Web APIs (back to top...)
Web APIs are pieces of functionality that exist in the context of your web browser. Things like the DOM, AJAX and setTimeout. These are the "extra" pieces of the puzzle that JavaScript makes use of in order to deliver asyncronous processes (see diagram to the right).
In the diagram you see below, you've got a setTimeout function that's going to be added to the stack, but then moved over to the API section where it will do its thing. Meanwhile, the Stack continues to function like it normally does in that it keeps moving things to the top and then discarding them as their respective functions are accomplished.
BTW: What you see below is exactly the same with Node, only instead of Web API's, they're replaced with C++ API's which give you the same functionality, but without the web browser.
That said, let's take a look at how this works...
The HyperText Transfer Protocol (HTTP) 302 Found redirect status response code indicates that the resource requested has been temporarily moved to the URL given by the Location header. A browser redirects to this page but search engines don't update their links to the resource (in 'SEO-speak', it is said that the 'link-juice' is not sent to the new URL
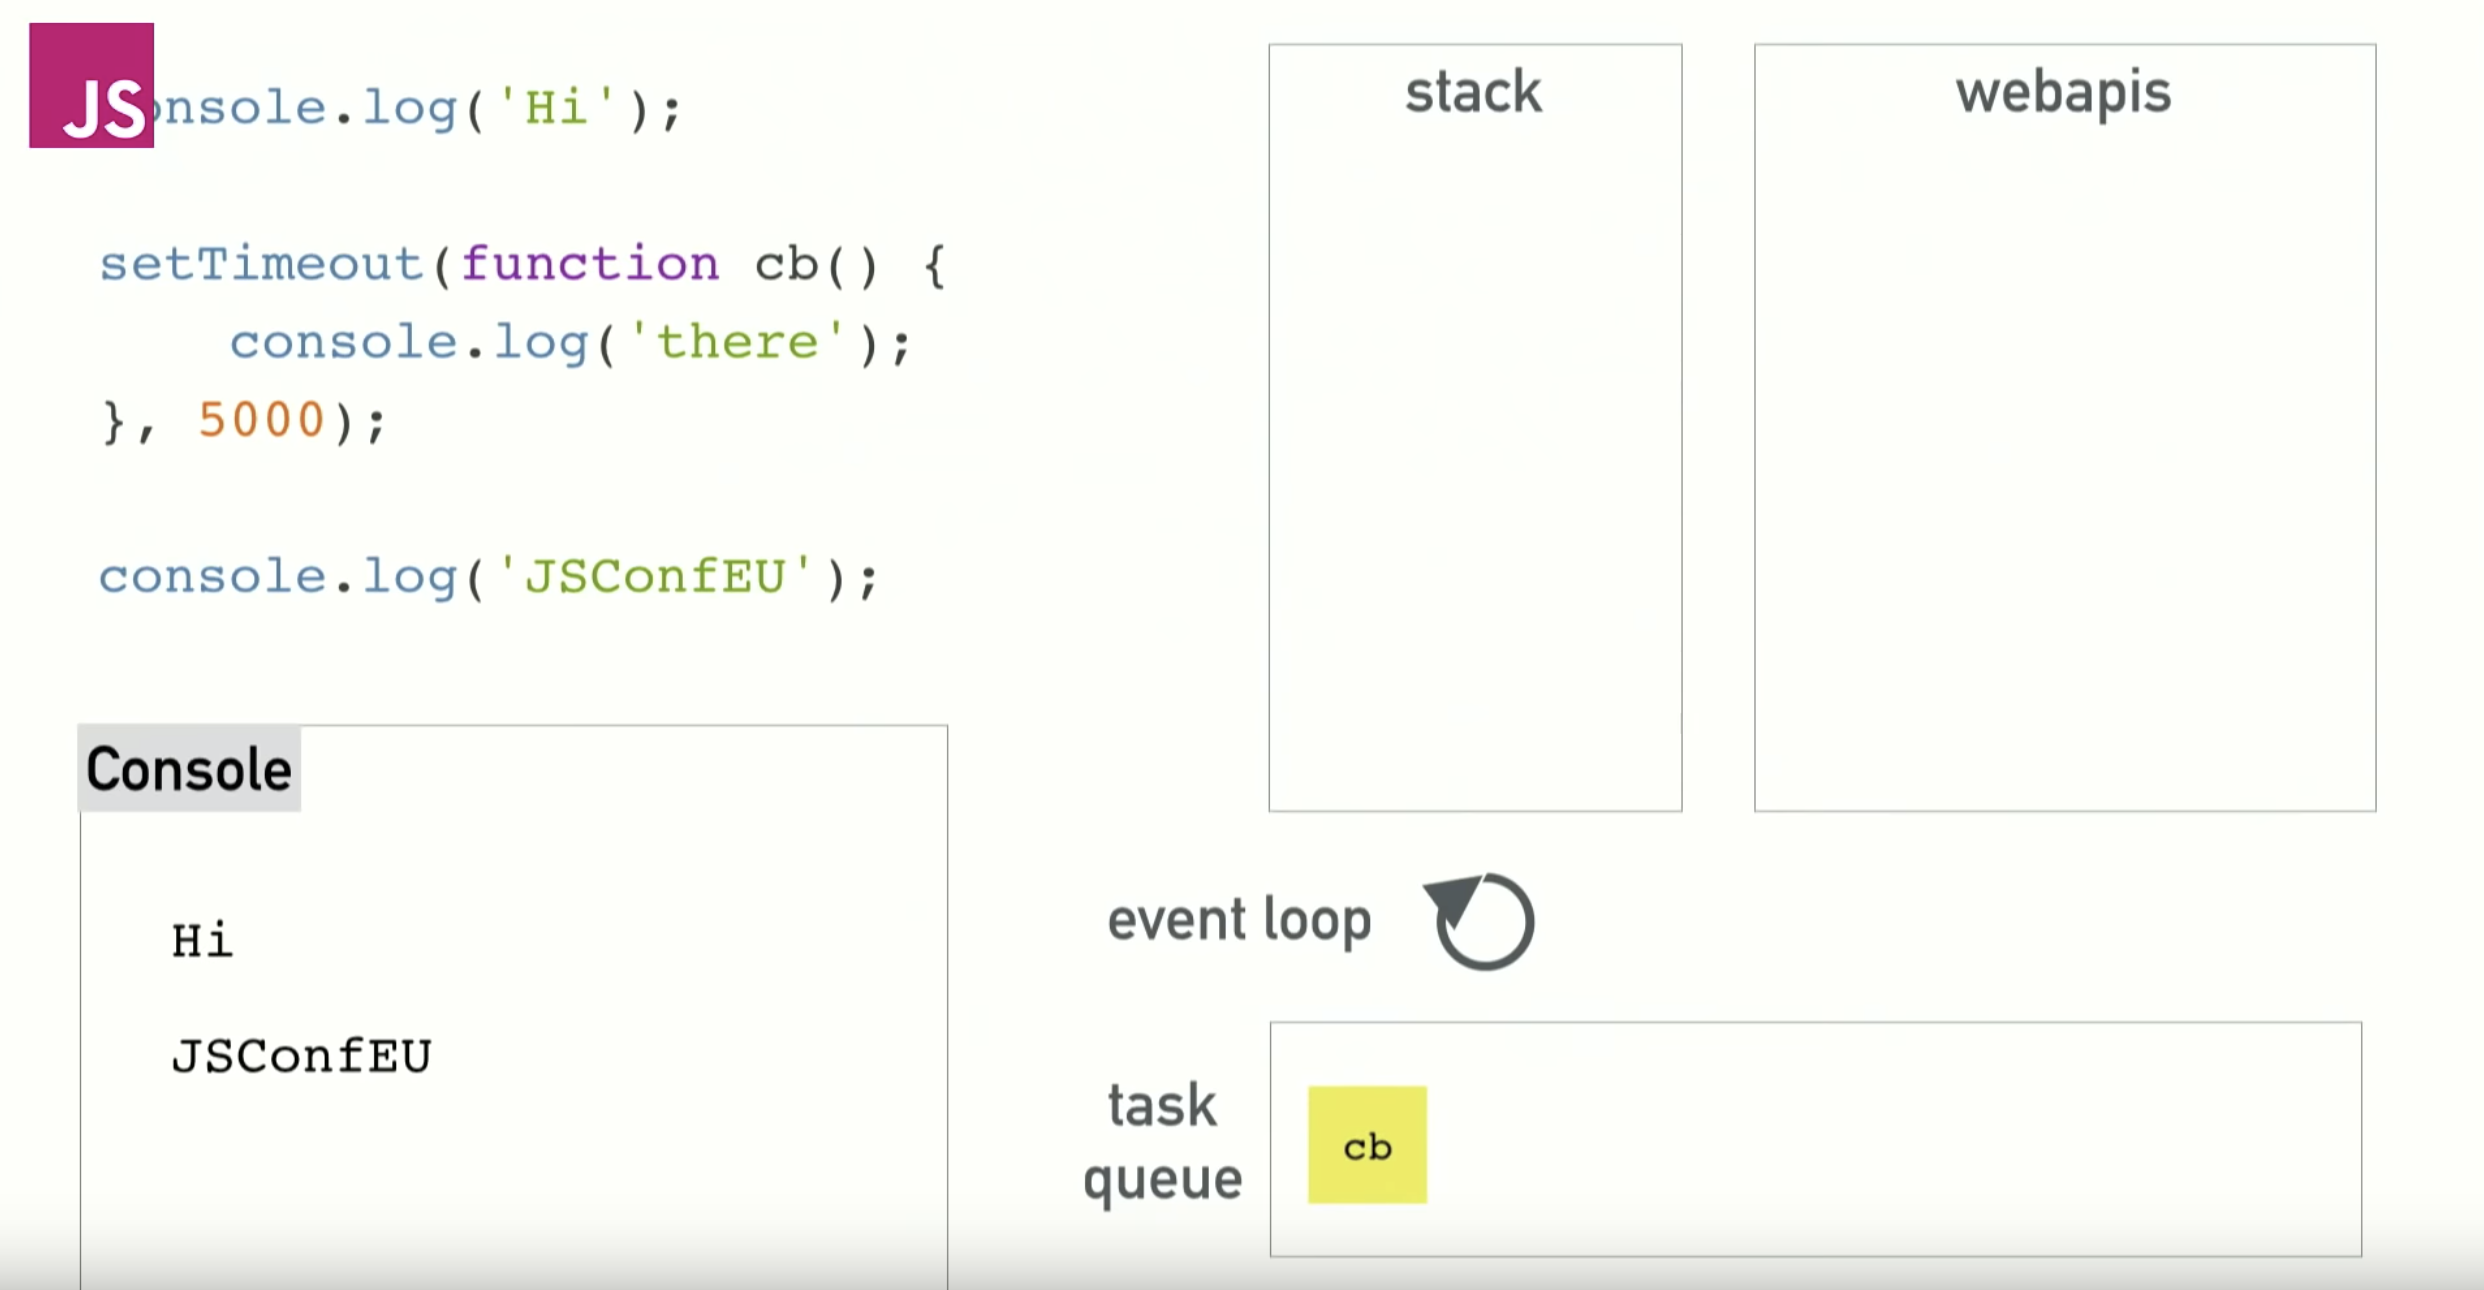
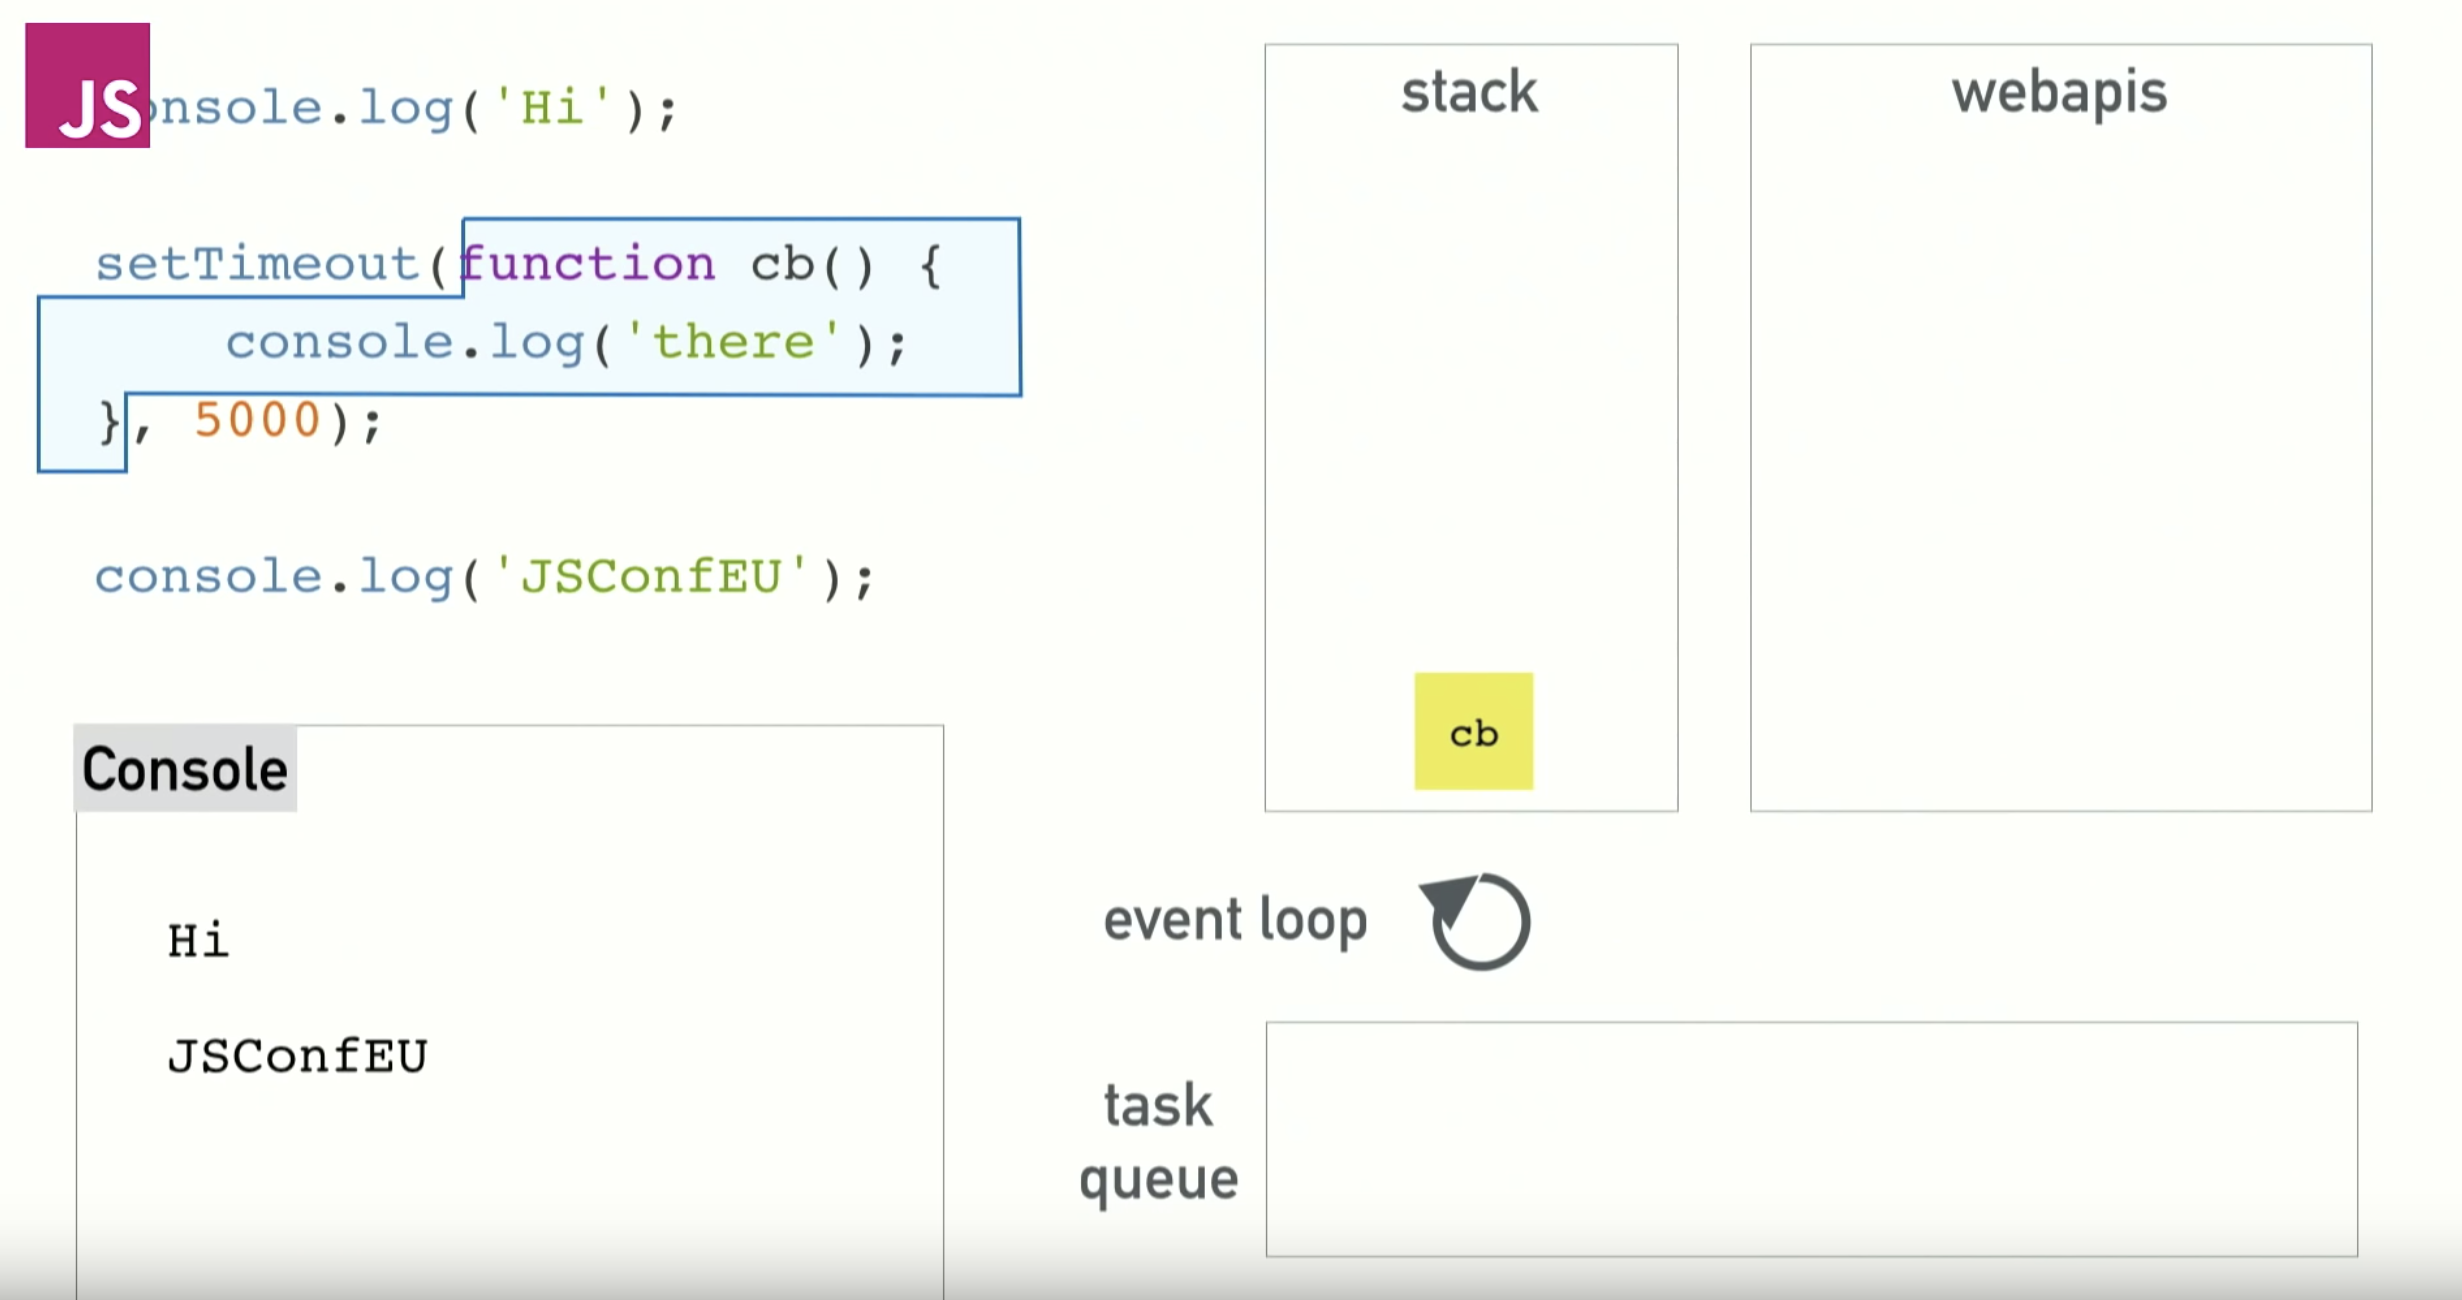
A "Call Back" is a function that, by definition, is going to be moved into the Task Cue and made to wait until the Call Stack is empty.
It's not necessarily "wrong" to think of it as something that is attached to a setTimeout with a value of "0." After all, it's the setTimeout dynamic that's going to move it into the Web API box. But, you don't necessarily have to think about it that way, as long as you're recognizing the fact that the "Call Back" is being placed into the "Task Cue" and made to wait until the Stack has been depleted.
You can see the video tutorial that breaks all this down by clicking here.
2) The "better code..." (back to top...)
if (url === "/message" && method === "POST") { // everything in grey gets triggered with the "Post" dynamic
const body = [];
req.on("data", chunk => {
console.log(chunk);
body.push(chunk);
});
req.on("end", () => {
const parsedBody = Buffer.concat(body).toString();
const message = parsedBody.split("=")[1];
fs.writeFileSync("message.txt", message);
});
res.statusCode = 302;
res.setHeader("Location", "/");
return res.end();
}
res.setHeader("Content", "text/html");
res.write("<html");
res.write("<head><title>My First Page</title></head>");
res.write("<body><h1>Yo, dog!</h1></body>");
res.write("</html>");
res.end();
});
if (url === "/message" && method === "POST") { // everything in grey gets triggered with the "Post" dynamic
const body = [];
req.on("data", chunk => {
console.log(chunk);
body.push(chunk);
});
return req.on("end", () => {
const parsedBody = Buffer.concat(body).toString();
const message = parsedBody.split("=")[1];
fs.writeFileSync("message.txt", message);
res.statusCode = 302;
res.setHeader("Location", "/");
return res.end();
});
}
res.setHeader("Content", "text/html");
res.write("<html");
res.write("<head><title>My First Page</title></head>");
res.write("<body><h1>Yo, dog!</h1></body>");
res.write("</html>");
res.end();
});

const http = require("http");
//everything that 's in orange, you're copying and pasting into a new file called "routes.js"
const fs = require("fs");
const server = http.createServer((req, res) => {
const url = req.url;
const method = req.method;
if (url === "/") {
res.write("<html");
res.write("<head><title>My First Page</title></head>");
res.write(
'<body><form action="/message" method="POST"><input type="text" name="message"><button type="submit">Send</button></form></body>'
);
res.write("</html>");
return res.end();
}
if (url === "/message" && method === "POST") {
const body = [];
req.on("data", chunk => {
console.log(chunk);
body.push(chunk);
});
return req.on("end", () => {
const parsedBody = Buffer.concat(body).toString();
const message = parsedBody.split("=")[1];
fs.writeFile("message.txt", message, err => {
res.statusCode = 302;
res.setHeader("Location", "/");
return res.end();
});
});
}
res.setHeader("Content", "text/html");
res.write("<html");
res.write("<head><title>My First Page</title></head>");
res.write("<body><h1>Yo, dog!</h1></body>");
res.write("</html>");
res.end();
});
server.listen(3000);
const http = require("http");
const routes = require("./routes"); // here's where you're importing "routes" into the flow...
const server = http.createServer(routes); // here's where you're implementing the imported code
server.listen(3000);
const fs = require("fs");
const requestHandler = (req, res) => { // this is the way in which you're "wrapping" all of the code you've brought over from "play.js" in a const called "requestHandler." Notice the "request" and the "response" objects...
const url = req.url;
const method = req.method;
if (url === "/") {
res.write("<html");
res.write("<head><title>My First Page</title></head>");
res.write(
'<body><form action="/message" method="POST"><input type="text" name="message"><button type="submit">Send</button></form></body>'
);
res.write("</html>");
return res.end();
}
if (url === "/message" && method === "POST") {
const body = [];
req.on("data", chunk => {
console.log(chunk);
body.push(chunk);
});
return req.on("end", () => {
const parsedBody = Buffer.concat(body).toString();
const message = parsedBody.split("=")[1];
fs.writeFile("message.txt", message, err => {
res.statusCode = 302;
res.setHeader("Location", "/");
return res.end();
});
});
}
res.setHeader("Content", "text/html");
res.write("<html");
res.write("<head><title>My First Page</title></head>");
res.write("<body><h1>Yo, dog!</h1></body>");
res.write("</html>");
res.end();
}; // here's the "end" of your "responseHandler" const
module.exports = requestHandler; // here's how you're making Node aware of the "requestHandler" export that can be implemented into other files
const http = require("http");
const server = http.createServer((req, res) => {
const url = req.url;
const method = req.method;
if (url === "/") {
res.setHeader("Content-Type", "text/html");
res.write("<html>");
res.write("<head><title>Assignment</title>");
res.write(
"<body><form action='/users' method='POST'><input type='text' name='message'><button type='submit'>Send</button></form></body>"
);
res.write("</html>");
res.end();
}
if (url === "/users" && method === "POST") {
const body = [];
req.on("data", chunk => {
body.push(chunk);
});
req.on("end", () => {
const parsedBody = Buffer.concat(body).toString();
console.log(parsedBody);
});
res.setHeader("Content-Type", "text/html");
res.write("<html>");
res.write("<head><title>Assignment</title>");
res.write("<body>Form has been submitted!</body>");
res.write("</html>");
res.end();
}
});
server.listen(3000);
brucegust@BRUCEGUST59AC MINGW64 /c/wamp/www/adm/node
$ npm init // here's your command
This utility will walk you through creating a package.json file.
It only covers the most common items, and tries to guess sensible defaults.
See `npm help json` for definitive documentation on these fields
and exactly what they do.
Use `npm install ` afterwards to install a package and
save it as a dependency in the package.json file.
Press ^C at any time to quit. //here are all your questions
package name: (node)
version: (1.0.0)
description: node course
entry point: (play.js) // this one is important in that you want to correctly identify the file that's used to kick off your code
test command:
git repository:
keywords:
author: Bruce Gust
license: (ISC)
About to write to C:\wamp\www\adm\node\package.json:
{ // here's the JSON file that's about to be written into your director
"name": "node",
"version": "1.0.0",
"description": "node course",
"main": "\u001b[D\u001b[D\u001b[D\u001b[Dplay.js)",
"scripts": {
"test": "echo \"Error: no test specified\" && exit 1"
},
"author": "Bruce Gust",
"license": "ISC"
}
Is this OK? (yes)
Once you click on "OK," a new file appears in your home directory. It's the "package.json" file.
Now, watch this:
{
"name": "node",
"version": "1.0.0",
"description": "node course",
"main": "\u001b[D\u001b[D\u001b[D\u001b[Dplay.js)",
"scripts": {
"test": "echo \"Error: no test specified\" && exit 1",
"start": "node play.js" // you can write a little shortcut, here, so instead of having to type, "node play.js" every time, now you can just type npm start
},
"author": "Bruce Gust",
"license": "ISC"
}
The last lectures contained important concepts about available Node.js features and how to unlock them.
You can basically differentiate between:
Global features: Keywords like const or function but also some global objects like process
Core Node.js Modules: Examples would be the file-system module ("fs"), the path module ("path") or the Http module ("http")
Third-party Modules: Installed via npm install - you can add any kind of feature to your app via this way
Global features are always available, you don't need to import them into the files where you want to use them.
Core Node.js Modules don't need to be installed (NO npm install is required) but you need to import them when you want to use features exposed by them.
Example:
const fs = require('fs');
You can now use the fs object exported by the "fs" module.
Third-party Modules need to be installed (via npm install in the project folder) AND imported.
Example (which you don't need to understand yet - we'll cover this later in the course):
// In terminal/ command prompt
npm install --save express-session
// In code file (e.g. app.js)
const sessions = require('express-session');
3) Using Nodemon (back to top...)
Now that you've got Nodemon installed, to use it we're just going to edit our package.json file so it's automatically triggered every time we go to start our app.
Right now, our package.json file looks like this:
{
"name": "node",
"version": "1.0.0",
"description": "node course",
"main": "\u001b[D\u001b[D\u001b[D\u001b[Dplay.js)",
"scripts": {
"test": "echo \"Error: no test specified\" && exit 1",
"start": "node play.js"
},
"author": "Bruce Gust",
"license": "ISC",
"devDependencies": {
"nodemon": "^1.18.9"
}
}
In the last lecture, we added nodemon as a local dependency to our project.
The good thing about local dependencies is that you can share projects without the node_modules folder (where they are stored) and you can run npm install in a project to then re-create that node_modules folder. This allows you to share only your source code, hence reducing the size of the shared project vastly.
The attached course code snippets also are shared in that way, hence you need to run npm install in the extracted packages to be able to run my code!
I showed that nodemon app.js would not work in the terminal or command line because we don't use local dependencies there but global packages.
You could install nodemon globally if you wanted (this is NOT required though - because we can just run it locally): npm install -g nodemon would do the trick. Specifically the -g flag ensures that the package gets added as a global package which you now can use anywhere on your machine, directly from inside the terminal or command prompt.
C) Finding and Fixing Errors (back to top...)
You've got three kinds of errors. Syntax, Runtime and Logic. Most of these errors you're going to be able to identify in the context of the color coding and characters displayed in Visual Studio.
You can also use the Visual Studio Debugger to investigate errors in your logic. Click here and here for more information on how to use the Visual Studio Debugger.
A) Quick Review - Setup a New File (back to top...)
Real quick, we're going to start a new file just for the sake of keeping things real. So, set up a new directory and then from there...
1) npm init (back to top...)
This is going to set up your json file where it will list all of your dependencies etc.
2) nodemon (back to top...)
Here, you're going to type npm install nodemon --save -dev That's going to set your nodemon dynamic so you don't always have to manually restart your server.
3) shortcuts (back to top...)
Now, set up your shortcut for your "start" command. Instead of having to type node start app.js, with this all you'll do is type "npm start."
To make that happen, go to your JSON file and type...
"scripts": {
"test": "echo \"Error: no test specified\" && exit 1",
"start": "nodemon app.js"
},
B) Express Setup (back to top...)
To set up Express, you're going to type this: npm install --save express.
Once that's done, when you go to your "app.js" file, you'll do this:
const http = require("http");
const express = require("express");
const app = express();
const server = http.createServer(app);
server.listen(3000);
 BTW: If you were to hover over the "express" word in the the const express = require("express");, press "Cntrl-click," it will take you to the "index.d.ts" file. There you'll see how "Express" is being exported as export = e;. That's why you can execute it as a function. It's also a valide request handler, which is is why you can pass it into "http.createServer." It sets up a certain way it handles incoming requests.
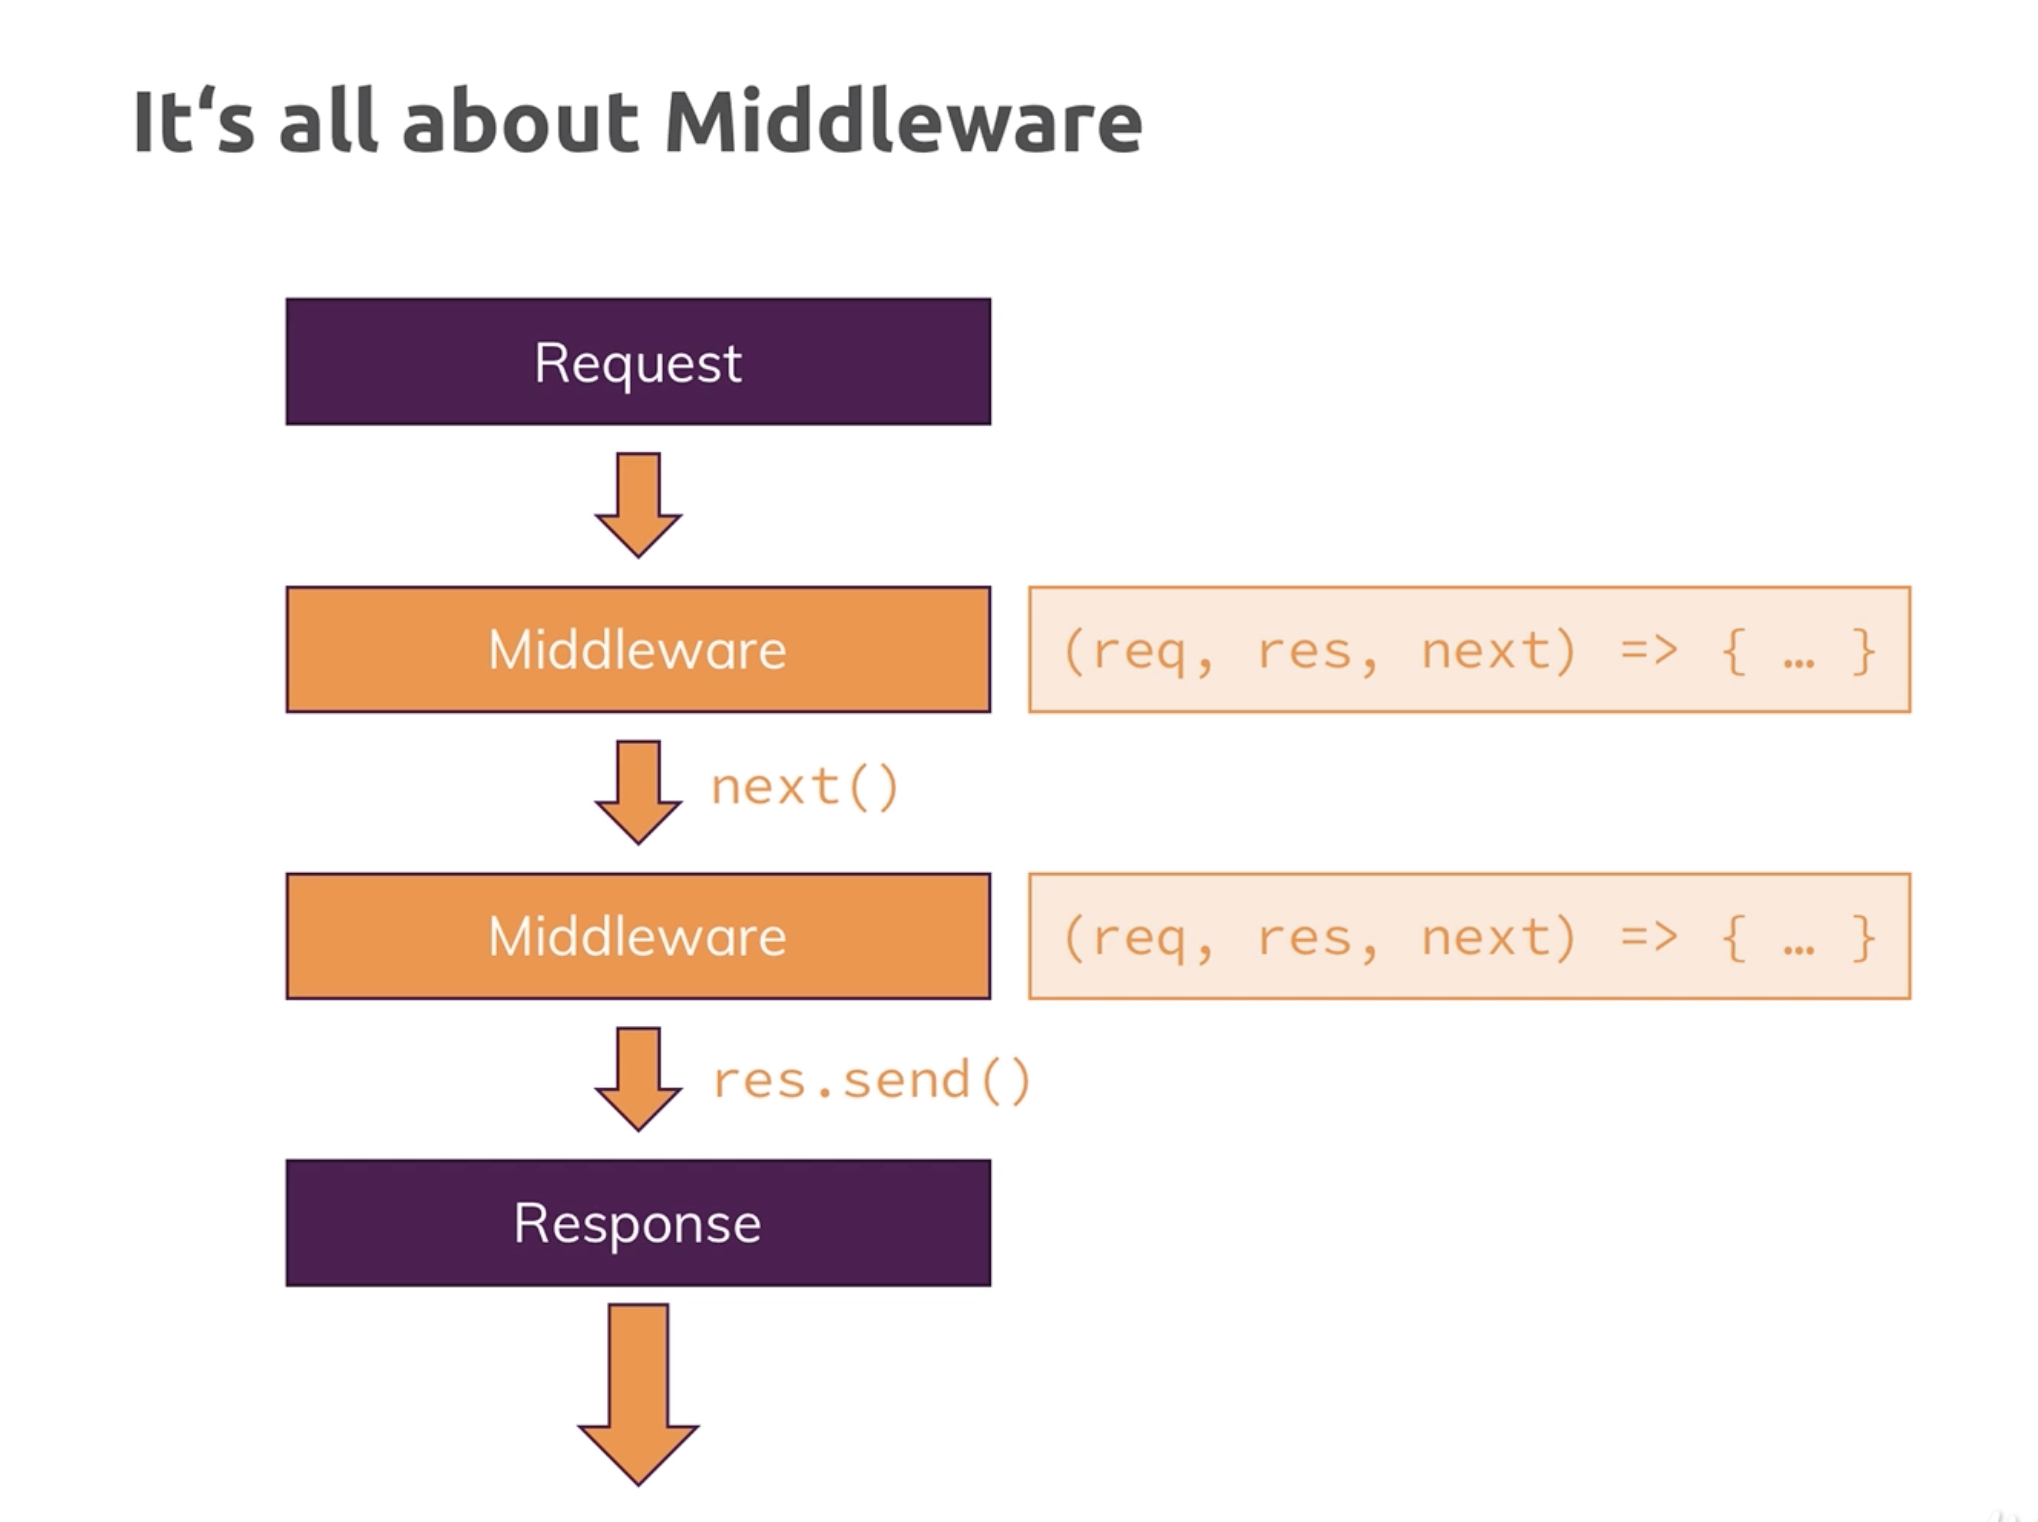
C) Middleware (back to top...)
Express functions as a kind of middleware in that it's processing incoming requests and funneling it through some code that we would otherwise have to write.
Thank God for Express. Thank God for Middleware.
This is the way it's going to get set up.
Here's your "app.js" file:
BTW: If you were to hover over the "express" word in the the const express = require("express");, press "Cntrl-click," it will take you to the "index.d.ts" file. There you'll see how "Express" is being exported as export = e;. That's why you can execute it as a function. It's also a valide request handler, which is is why you can pass it into "http.createServer." It sets up a certain way it handles incoming requests.
C) Middleware (back to top...)
Express functions as a kind of middleware in that it's processing incoming requests and funneling it through some code that we would otherwise have to write.
Thank God for Express. Thank God for Middleware.
This is the way it's going to get set up.
Here's your "app.js" file:
const http = require("http");
❶ const express = require("express");
❷ const app = express();
❸ app.use((req, res, next) => {
console.log("In the middleware");
});
const server = http.createServer(app);
server.listen(3000);
"Middleware" is defined as "software that acts as a bridge between an operating system or database and applications, especially on a network." It's an apt description of "Express" in the way "Express" allows for the opportunity to compose a lot of functionality with minimal code.
It's more than just a library, though. It's not like JQuery in that with Express, you have access to a technology that's serving as the bridge between two technologies. In this case, you're iteracting with the digital zone that exists between the web browser and your application. Specifically, the "request" and the "response" object.
For more information, click here.
❶ instantiate the express paradigm
❷ put the express package into a constant called "app"
❸ "use" is a method available to us via Express. It expects three arguments: request, response and "next." "next" is important and you'll see why in a minute.
If you put "In the middleware" like you see it above, you'll get "In the middleware" in the console.
However, if you do this:
app.use((req, res, next) => {
console.log("In the middleware");
});
app.use((req, res, next) => {
console.log("In the middleware again");
});
The only thing you're going to get in the console is "In the middleware." You won't get "In the middleware | In the middleware again." You have to include "next" like this:
app.use((req, res, next) => {
console.log("In the middleware");
next(); // allows the request to continue to the next middleware in line
});
app.use((req, res, next) => {
console.log("In the middleware again");
});
Now the server knows to be going through your code in a way that anticipates another round of functionality. If you don't call, "next," your code will die at that point.
D) How Middleware Works (back to top...)
Right here...
app.use((req, res, next) => {
res.send('<h1>Hello from Express</>');
console.log("In the middleware again");
Rather than having to do res.write... and manually write all of the HTML header info etc., we can use "res.send" and Express will do all of that header information for us.
So, instead of having to document all of those "write" chunks, Express sets up those HTML headers for us.
E) Behind the Scenes (back to top...)
If you head out to the GIT Repository for Express and click on "lib" and then look at the "response.js" code, you'll see where these shortcuts and snippets are coming from.
Do a search for "send(" and you'll see how we're able to pull off "res.send()" like we did earlier, as far as the headers being crafted for us.
This is line #141 of the response.js file:
switch (typeof chunk) {
// string defaulting to html
case 'string':
if (!this.get('Content-Type')) {
this.type('html');
}
Another healthy piece of background information is on the "application.js" file located also in the "lib" directory. This is coming from line #609 and #610:
http.createServer(app).listen(80);
* https.createServer({ ... }, app).listen(443);
This is what allows us to make some additional "cuts" to our "app.js" code.
Now, instead of this:
const server = http.createServer(app);
server.listen(3000);
... we can do this:
app.listen();
Plus, we can also get ride of "const http = require("http");
BOOM!
F) Different Routes (back to top...)
If you go out to expressjs.com, you can see the documentation that pertains to "path."
What we're looking at is app.use([path,] callback [, callback...]).
Based on that, if we did this:
app.use('/', (req, res, next)
...the addition of '/', means that we're now "routing" our user to the syntax that immediately follows that code.
This, however, is the default.
For more information, click here.
"/" applies to any route that starts with a slash. That, of course, is going to be every route. So, while it obviously is useful for the sake of empty route, be aware that without additional code, this is as far as your user will ever get!
To get to that place where we can handle other routes, we do this:
const express = require("express");
const app = express();
app.use("/add-product", (req, res, next) => {
console.log('The "Add Product" Page');
res.send('<h1>The "Add Product" Page!</h1>);
// if you put your customary "next" here, this route would not be acknowledged
});
app.use("/", (req, res, next) => {
console.log("In the middleware again");
res.send("<h1>Hello from Express</h1>");
});
app.listen(3000);
The reason this works the way that it does is because Express reads the code top to bottom. If you put a "next" in the first clause, the code would continue and the "add-product" dynamic wouldn't register. In the absence of the "next" dynamic, you've got a legitimate routing clause.
By the way, if we wanted to have some dynamic in place that always ran, regardless of the route, then you would simply put this on the top of the stack:
app.use("/", (req, res, next) => {
console.log("Always running, my man!");
next();
});
As a whole, it would look like this:
const express = require("express");
const app = express();
app.use("/", (req, res, next) => {
console.log("Always running, my man!"); // here's what we're going to run every time
next();
});
app.use("/add-product", (req, res, next) => {
console.log('The "Add Product" Page');
res.send('<h1>The "Add Product" Page</h1>');
});
app.use("/", (req, res, next) => {
console.log("In the middleware again");
res.send("<h1>Hello from Express</h1>");
});
app.listen(3000);
Always running, my man!
The "Add Product" Page
Always running, my man!
In the middleware again
Notice that while you're sending a response only once, the fact that we're writing to console based on the presence of the "/" character in a way that is constant is what produces the redundancy of that piece of the code.
G) Parsing Incoming Requests (back to top...)
With this we're going to have a form that posts to a particular route and then parse the incoming data using Express.
What was kind of convolluted before, is now pretty streamlined. Check it out:
const express = require("express");
❶ const bodyParser = require("body-parser");
const app = express();
❷ app.use(bodyParser.urlencoded());
app.use("/add-product", (req, res, next) => {
res.send(
'<form action="/product" method="Post"><input type="text" name="title"><button type="submit">Add Product</button></form>'
);
});
app.use("/product", (req, res, next) => {
❸ console.log(req.body);
res.redirect("/");
});
app.use("/", (req, res, next) => {
res.send("<h1>Hello from Express</h1>");
});
app.listen(3000);
const express = require("express");
const bodyParser = require("body-parser");
const app = express();
app.use(bodyParser.urlencoded());
app.use("/add-product", (req, res, next) => {
res.send(
'<form action="/product" method="Post"><input type="text" name="title"><button type="submit">Add Product</button></form>'
);
});
app.use("/product", (req, res, next) => {
console.log(req.body);
res.redirect("/");
});
app.use("/", (req, res, next) => {
res.send("<h1>Hello from Express</h1>");
});
app.listen(3000);
const express = require("express");
const bodyParser = require("body-parser");
const app = express();
❶ const adminRoutes = require("./routes/admin");
❷ const shopRoutes = require("./routes/shop");
❸ app.use(bodyParser.urlencoded());
❹ app.use(adminRoutes);
❺ app.use(shopRoutes);
app.listen(3000);
❶ const express = require("express");
❷ const router = express.Router();
❸ router.get("/add-product", (req, res, next) => {
res.send(
'<form action="/product" method="Post"><input type="text" name="title"><button type="submit">Add Product</button></form>'
);
});
❹ router.post("/product", (req, res, next) => {
console.log(req.body);
res.redirect("/");
});
❺ module.exports = router;
const express = require("express");
const router = express.Router();
router.get("/", (req, res, next) => {
res.send("<h1>Hello from Express</h1>");
});
module.exports = router;
const express = require("express");
const router = express.Router();
router.get("/admin/add-product", (req, res, next) => { // notice how we're now adding "admin" to the URL
res.send(
'<form action="/add-product" method="Post"><input type="text" name="title"><button type="submit">Add Product</button></form>'
);
});
router.post("admin/add-product", (req, res, next) => { // and here as well
console.log(req.body);
res.redirect("/");
});
module.exports = router;
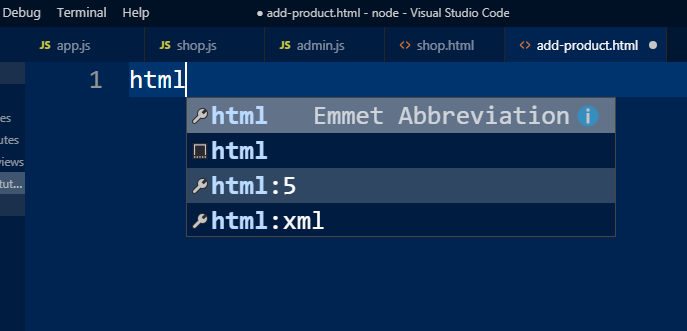 So, we'll start by creating a "Views" directory, since our app is going to follow the MVC architecture format, and then we'll create an "add-product.html" page and a "shop.html" page.
One thing that Express does which is kind of nice is pictured to the right. As soon as your "html," you get a pulldown and you can select the "html-5" option which will automatically create an HTML 5 template.
Once we have that template in place, we'll write some basic HTML which looks like this:
So, we'll start by creating a "Views" directory, since our app is going to follow the MVC architecture format, and then we'll create an "add-product.html" page and a "shop.html" page.
One thing that Express does which is kind of nice is pictured to the right. As soon as your "html," you get a pulldown and you can select the "html-5" option which will automatically create an HTML 5 template.
Once we have that template in place, we'll write some basic HTML which looks like this:
<!DOCTYPE html>
<html lang="en">
<head>
<meta charset="UTF-8">
<meta name="viewport" content="width=device-width, initial-scale=1.0">
<meta http-equiv="X-UA-Compatible" content="ie=edge">
<title>Add Product</title>
</head>
<body>
<header>
<nav>
<ul>
<li><a href="/">Shop</a></li>
<li><a href="/add-product">Add Product</a></li>
</ul>
</nav>
</header>
<main>
<form action="/add-product" method="Post">
<input type="text" name="title">
<button type="submit">Add Product</button>
</form>
</main>
</body>
</html>
❶ const path = require("path");
const express = require("express");
const router = express.Router();
router.get("/", (req, res, next) => {
❷ res.sendFile(path.join(__dirname, "../", "views", "shop.html"));
});
module.exports = router;
❶ const path = require("path");
const express = require("express");
const bodyParser = require("body-parser");
const app = express();
const adminRoutes = require("./routes/admin");
const shopRoutes = require("./routes/shop");
app.use(bodyParser.urlencoded());
app.use("/admin", adminRoutes);
app.use(shopRoutes);
app.use((req, res, next) => {
❷ res.status(404).sendFile(path.join(__dirname, "views", "404.html"));
});
app.listen(3000);
Just as an aside, Node.js is a library in and of itself. Express is a framework that allows you to write code that constitutes a more streamlined approach to the syntax than what you would have to write otherwise. So, when you write const path = require('path');, you're calling a function from within the Node.js library. Express isn't even a part of the picture at that point...
This works:
router.get("/", (req, res, next) => {
res.sendFile(path.join(__dirname, "../", "views", "shop.html"));
});
...but the path dynamic is a little cumbersome.
To streamline that, we'll use the "path" helper which is available through Express.
It looks like this:
First of all, set up a "routes.js" page in a directory we'll called "utility." On that page we'll write this:
❶ const path = require("path");
❷ module.exports = path.dirname(process.mainModule.filename);
1
2
const path = require("path");
const express = require("express");
const rootDir = require("../utility/path");
const router = express.Router();
// /admin/add-product => GET
router.get("/add-product", (req, res, next) => {
res.sendFile(path.join(rootDir, "views", "add-product.html"));
});
// /admin/add-product => POST
router.post("/add-product", (req, res, next) => {
console.log(req.body);
res.redirect("/");
});
module.exports = router;
const path = require("path");
const express = require("express");
const rootDir = require("../utility/path");
const router = express.Router();
❶ const products = [];
router.get("/add-product", (req, res, next) => {
res.sendFile(path.join(rootDir, "views", "add-product.html"));
});
router.post("/add-product", (req, res, next) => {
❷ products.push({ title: req.body.title });
res.redirect("/");
});
//module.exports = router;
❸ exports.routes = router;
❹ exports.products = products;
const path = require("path");
const express = require("express");
const rootDir = require("../utility/path");
❶ const adminData = require("./admin");
const router = express.Router();
router.get("/", (req, res, next) => {
❷ console.log(adminData.products);
res.sendFile(path.join(rootDir, "views", "shop.html"));
});
module.exports = router;
$ npm install --save ejs pug express-handlebars
We're going to start with Pug, so the next thing we're going to do is adjust our code so it's looking for a Pug template rather than a HTML page. Here we go...
app.js
Add this to your app.js file so your system knows to be looking for the Pug template engine.
app.set("view engine", "pug");
app.set("views", "views");
"set" is used to establish a global dynamic. You'll notice with "const," we've got to call some "const" values every time we start a new page. With "set," you're "once and done!"
Notice, the "view engine" dynamic. That means every "view" is going to be processed as something that's going to be processed via Pug.
app.set is "views" by default. We're going it here for the sake of drill.
That being the case, you now have to set up a Pug file in your Views directory.
Bear in mind that every "view" is now looking for a Pug file. You don't have to change anything in your routing...
2) Pug Code and Dynamic Content (back to top...)
Here's the original HTML compared to your new Pug template.
HTML (shop.html)
❶ <!DOCTYPE html>
<html lang="en">
<head>
<meta charset="UTF-8">
<meta name="viewport" content="width=device-width, initial-scale=1.0">
<meta http-equiv="X-UA-Compatible" content="ie=edge">
<title>Add Product</title>
<link rel="stylesheet" href="/css/main.css">
<link rel="stylesheet" href="/css/product.css">
</head>
<body>
<header class="main-header">
<nav class="main-header__nav">
<ul class="main-header__item-list">
<li class="main-header__item"><a class="active" href="/">Shop</a></li>
<li class="main-header__item"><a href="/admin/add-product">Add Product</a></li>
</ul>
</nav>
</header>
<main>
<h1>My Products</h1>
<p>List of all the products...</p>
<!-- <div class="grid">
<article class="card product-item">
<header class="card__header">
<h1 class="product__title">Great Book</h1>
</header>
<div class="card__image">
<img src="https://cdn.pixabay.com/photo/2016/03/31/20/51/book-1296045_960_720.png" alt="A Book">
</div>
<div class="card__content">
<h2 class="product__price">$19.99</h2>
<p class="product__description">A very interesting book about so many even more interesting things!</p>
</div>
<div class="card__actions">
<button class="btn">Add to Cart</button>
</div>
</article>
</div> -->
</main>
</body> Pug (shop.pug)
❶ <!DOCTYPE html>
html(lang="en")
head
meta(charset="UTF-8")
meta(name="viewport", content="width=device-width, initial-scale=1.0")
meta(http-equiv="X-UA-Compatible", content="ie=edge")
❷ title #{docTitle}
link(rel="stylesheet", href="/css/main.css")
link(rel="stylesheet", href="/css/product.css")
body
header.main-header
nav.main-header__nav
ul.main-header__item-list
li.main-header__item
a.active(href="/" style="color:#fff;") Shop
li.main-header__item
a.active(href="/admin/add-product" style="color:#fff;") Add Product
❸ main
❹ if prods.length >0
.grid
❺ each product in prods
article.card.product-item
header.card__header
h1.product__title #{product.title}
div.card__image
img(src="https://cdn.pixabay.com/photo/2016/03/31/20/51/book-1296045_960_720.png", alt="A Book")
div.card__content
h2.product__price $19.99
p.product__description A very interesting book about so many even more interesting things!
.card__actions
button.btn Add to Cart
❻ else
h1 No Products1
2
3
What's a const? It's an empty digital container until you put something in it. In this case, it's an empty array we're calling "products."
1
2
3
1
2
3
4
5
1
2
3
4
5
4
<!DOCTYPE html>
html(lang="en")
head
meta(charset="UTF-8")
meta(name="viewport", content="width=device-width, initial-scale=1.0")
meta(http-equiv="X-UA-Compatible", content="ie=edge")
title #{pageTitle}
link(rel="stylesheet", href="/css/main.css")
link(rel="stylesheet", href="/css/forms.css")
link(rel="stylesheet", href="/css/product.css")
body
header.main-header
nav.main-header__nav
ul.main-header__item-list
li.main-header__item
a(href="/" style="color:#fff;") Shop
li.main-header__item
a.active(href="/admin/add-product" style="color:#fff;") Add Product
main
form.product-form(action="/admin/add-product", method="POST")
.form-control
label(for="title") Title
input(type="text", name="title")#title
button.btn(type="submit") Add Product
<!DOCTYPE html>
html(lang="en")
head
meta(charset="UTF-8")
meta(name="viewport", content="width=device-width, initial-scale=1.0")
meta(http-equiv="X-UA-Compatible", content="ie=edge")
title Page Not Found
link(rel="stylesheet", href="/css/main.css")
body
header.main-header
nav.main-header__nav
ul.main-header__item-list
li.main-header__item
a(href="/" style="color:#fff;") Shop
li.main-header__item
a.active(href="/admin/add-product" style="color:#fff;") Add Product
h1 Page Not Found
const path = require("path");
const express = require("express");
const bodyParser = require("body-parser");
const app = express();
app.set("view engine", "pug");
app.set("views", "views");
const adminData = require("./routes/admin");
const shopRoutes = require("./routes/shop");
app.use(bodyParser.urlencoded());
app.use(express.static(path.join(__dirname, "public")));
app.use("/admin", adminData.routes);
app.use(shopRoutes);
app.use((req, res, next) => {
//res.status(404).sendFile(path.join(__dirname, "views", "404.html"));
❶ res.status(404).render("404", { pageTitle: "Page Not Found" });
});
app.listen(3000);
<!DOCTYPE html>
html(lang="en")
head
meta(charset="UTF-8")
meta(name="viewport", content="width=device-width, initial-scale=1.0")
meta(http-equiv="X-UA-Compatible", content="ie=edge")
title #{pageTitle}
link(rel="stylesheet", href="/css/main.css")
❷ block styles
body
header.main-header
nav.main-header__nav
ul.main-header__item-list
li.main-header__item
❸ a(href="/" class=(path==="/" ? 'active' : '') style="color:#fff;") Shop
li.main-header__item
❹ a(href="/admin/add-product", class=(path==="/admin/add-product" ? 'active' : '') style="color:#fff;") Add Product
❺ block content
❻ extends layouts/main-layout.pug
❼ block styles
link(rel="stylesheet", href="/css/forms.css")
link(rel="stylesheet", href="/css/product.css")
❽ block content
main
if prods.length >0
.grid
each product in prods
article.card.product-item
header.card__header
h1.product__title #{product.title}
div.card__image
img(src="https://cdn.pixabay.com/photo/2016/03/31/20/51/book-1296045_960_720.png", alt="A Book")
div.card__content
h2.product__price $19.99
p.product__description A very interesting book about so many even more interesting things!
.card__actions
button.btn Add to Cart
else
h1 No Products
extends layouts/main-layout.pug
block styles
link(rel="stylesheet", href="/css/forms.css")
link(rel="stylesheet", href="/css/product.css")
block content
main
form.product-form(action="/admin/add-product", method="POST")
.form-control
label(for="title") Title
input(type="text", name="title")#title
button.btn(type="submit") Add Product
const path = require("path");
const express = require("express");
const bodyParser = require("body-parser");
❶ const expressHbs = require("express-handlebars"); // you've got to first import it into your app
const app = express();
❷ app.engine("hbs", expressHbs());
❸ app.set("view engine", "hbs");
app.set("views", "views");
const adminData = require("./routes/admin");
const shopRoutes = require("./routes/shop");
app.use(bodyParser.urlencoded());
app.use(express.static(path.join(__dirname, "public")));
app.use("/admin", adminData.routes);
app.use(shopRoutes);
app.use((req, res, next) => {
//res.status(404).sendFile(path.join(__dirname, "views", "404.html"));
res.status(404).render("404", { pageTitle: "Page Not Found" });
});
app.listen(3000);
Just for the sake of review / clarification: An object in computer language is something you can actually use and measure. In PHP, when you instantiate a Class, you are creating an "instance" of that class. You call that "instance" an object. Up until that point, while the Class might exist, it's like a greyed-out button. It has the capacity to perform and function, but until you create an instance of it and make it into something you can "click on" and utilize all of the functionality it represents - until it's an "object" - it just sits there.
In this case, when you import Express into your app, you do so by assigning it to a constant. At that point, you've got a greyed-out button. It's when you make it "clickable" by assigning what you've imported to the "app" object, now you've got something you can use! And, once it's useable, you can tap anyone of number of different methods contained within that collection of functionalities.
❶ while Pug is automatically installed with Express, Handlebars is not and that's why you have to import it even after you install it
❷ now that the Handlebars engine has been imported, you still have to let Express know that it exists. You do that using the "engine" method that's a part of the "app" object.
You're doing this a little bit differently than you did before.
With Pug, you did this:
app.set("view engine", "pug");
You did it that way because Pug comes with Express. With Handlebars, you've got specify it by using the "engine" method within the "app" (Express) object.
The sytnax that you're using takes "expressHbs()," which Express understands to be the Handlebars library, and associates it with the first variable you specify in the line of code which, in this case is "hbs." That's going to be the extension of your "Handlebar" docs.
❸ Once you've got access to the Handlebars paradigm and you've got pointed it to the characters you're going to use to identify your "Handlebars" doc type, you set your global view dynamic to be such that it's looking for "hbs" file types.
4) Convert Project to Handlebars (back to top...)
To convert our project to a Handlebars paradigm, we're going to do make the following changes...
i) add-products.hbs (back to top...)
To the "Add-Products" page, you're just going to uncomment what you had in terms of pure HTML and let that be your "add-product.hbs" page. Like this:
<!DOCTYPE html>
<html lang="en">
<head>
<meta charset="UTF-8">
<meta name="viewport" content="width=device-width, initial-scale=1.0">
<meta http-equiv="X-UA-Compatible" content="ie=edge">
<title>{{ pageTitle }}</title>
<link rel="stylesheet" href="/css/main.css">
<link rel="stylesheet" href="/css/forms.css">
<link rel="stylesheet" href="/css/product.css">
</head>
<body>
<header class="main-header">
<nav class="main-header__nav">
<ul class="main-header__item-list">
<li class="main-header__item"><a href="/">Shop</a></li>
<li class="main-header__item"><a class="active" href="/admin/add-product">Add Product</a></li>
</ul>
</nav>
</header>
<main>
<form class="product-form" action="/admin/add-product" method="POST">
<div class="form-control">
<label for="title">Title</label>
<input type="text" name="title" id="title">
</div>
<button class="btn" type="submit">Add Product</button>
</form>
</main>
</body>
</html>
const path = require("path");
const express = require("express");
const rootDir = require("../utility/path");
const adminData = require("./admin");
const router = express.Router();
router.get("/", (req, res, next) => {
const products = adminData.products;
res.render("shop", {
prods: products,
pageTitle: "Shop",
path: "/",
❹ hasProducts: products.length > 0
});
//res.sendFile(path.join(rootDir, "views", "shop.html"));
});
module.exports = router;
<!DOCTYPE html>
<html lang="en">
<head>
<meta charset="UTF-8">
<meta name="viewport" content="width=device-width, initial-scale=1.0">
<meta http-equiv="X-UA-Compatible" content="ie=edge">
<title>❺ {{ pageTitle }} </title>
<link rel="stylesheet" href="/css/main.css">
<link rel="stylesheet" href="/css/product.css">
</head>
<body>
<header class="main-header">
<nav class="main-header__nav">
<ul class="main-header__item-list">
<li class="main-header__item"><a class="active" href="/">Shop</a></li>
<li class="main-header__item"><a href="/admin/add-product">Add Product</a></li>
</ul>
</nav>
</header>
<main>
❻ {{#if hasProducts }}
<div class="grid">
❼ {{#each prods}}
<article class="card product-item">
<header class="card__header">
<h1 class="product__title">{{ this.title }}</h1>
</header>
<div class="card__image">
<img src="https://cdn.pixabay.com/photo/2016/03/31/20/51/book-1296045_960_720.png" alt="A Book">
</div>
<div class="card__content">
<h2 class="product__price">$19.99</h2>
<p class="product__description">A very interesting book about so many even more interesting things!</p>
</div>
<div class="card__actions">
<button class="btn">Add to Cart</button>
</div>
</article>
❽ {{/each}}
</div>
❾ {{else}}
<h1>No Products Found</h1>
❿ {{/if}}
</div>
</main>
</body>
</html>
<!DOCTYPE html>
<html lang="en">
<head>
<meta charset="UTF-8">
<meta name="viewport" content="width=device-width, initial-scale=1.0">
<meta http-equiv="X-UA-Compatible" content="ie=edge">
❶ <title>{{ pageTitle }}</title>
<link rel="stylesheet" href="/css/main.css">
❷ {{#if formsCSS}}
<link rel="stylesheet" href="/css/forms.css">
{{/if}}
{{#if productCSS}}
<link rel="stylesheet" href="/css/product.css">
{{/if}}
</head>
<body>
<header class="main-header">
<nav class="main-header__nav">
<ul class="main-header__item-list">
❸ <li class="main-header__item"><a class="{{#if activeShop }}active{{/if}}" href="/">Shop</a></li>
<li class="main-header__item"><a class="{{#if activeAddProduct }}active{{/if}}" href="/admin/add-product">Add
Product</a></li>
</ul>
</nav>
</header>
{{{ body }}}
</body>
</html>
router.get("/add-product", (req, res, next) => {
res.render("add-product", {
pageTitle: "Add Product",
path: "/admin/add-product",
formsCSS: true,
productCSS: true,
activeAddProduct: true
});
});
router.get("/", (req, res, next) => {
const products = adminData.products;
res.render("shop", {
prods: products,
pageTitle: "Shop",
path: "/",
hasProducts: products.length > 0,
activeShop: true,
productCSS: true
});
<main>
<form class="product-form" action="/admin/add-product" method="POST">
<div class="form-control">
<label for="title">Title</label>
<input type="text" name="title" id="title">
</div>
<button class="btn" type="submit">Add Product</button>
</form>
</main>
❶ <%- include('includes/head.ejs') %>
</head>
<body>
❷ <%-include('includes/navigation.ejs') %>
<h1>Page Not Found!</h1>
❸ <%-include('includes/end.ejs') %>
<!DOCTYPE html>
<html lang="en">
<head>
<meta charset="UTF-8" />
<meta name="viewport" content="width=device-width, initial-scale=1.0" />
<meta http-equiv="X-UA-Compatible" content="ie=edge" />
<title><%= pageTitle %></title>
<link rel="stylesheet" href="/css/main.css" />
</head>
</html>
1
1
<header class="main-header">
<nav class="main-header__nav">
<ul class="main-header__item-list">
<li class="main-header__item"><a class="<%= path === '/' ? 'active' : ''%>" href="/">Shop</a></li>
<li class="main-header__item">
<li class="main-header__item"><a class="<%= path === '/admin/add-product' ? 'active' : '' %>" href="/admin/add-product">Add Product</a></li>
</li>
</ul>
</nav>
</header>
1
1
<%- include('includes/head.ejs') %>
<link rel="stylesheet" href="/css/forms.css" />
<link rel="stylesheet" href="/css/product.css" />
</head>
<body>
<%- include('includes/navigation.ejs') %>
<main>
<form class="product-form" action="/admin/add-product" method="POST">
<div class="form-control">
<label for="title">Title</label>
<input type="text" name="title" id="title" />
</div>
<button class="btn" type="submit">Add Product</button>
</form>
</main>
<%- include('includes/end.ejs') %>
<%- include('includes/head.ejs') %>
<link rel="stylesheet" href="/css/product.css" />
</head>
<body>
<%- include('includes/navigation.ejs') %>
<main>
<h1>My Products</h1>
<p>List of all the products...</p>
❶ <% if(prods.length>0) { %>
<div class="grid">
❷ <% for (let product of prods) { %>
<article class="card product-item">
<header class="card__header">
<h1 class="product__title"><%= product.title %></h1>
</header>
<div class="card__image">
<img
src="https://cdn.pixabay.com/photo/2016/03/31/20/51/book-1296045_960_720.png"
alt="A Book"
/>
</div>
<div class="card__content">
<h2 class="product__price">$19.99</h2>
<p class="product__description">
A very interesting book about so many even more interesting
things!
</p>
</div>
<div class="card__actions">
<button class="btn">Add to Cart</button>
</div>
</article>
❸ <% } %>
</div>
❹ <% } else { %>
<h1>No Products Found</h1>
<% } %>
</main>
<%- include('includes/end.ejs') %>
const path = require("path");
const express = require("express");
const rootDir = require("../utility/path");
const router = express.Router();
const products = [];
router.get("/add-product", (req, res, next) => {
res.render("add-product", {
pageTitle: "Add Product",
path: "/admin/add-product",
formsCSS: true,
productCSS: true,
activeAddProduct: true
});
});
router.post("/add-product", (req, res, next) => {
products.push({ title: req.body.title });
res.redirect("/");
});
//module.exports = router;
exports.routes = router;
exports.products = products;
6
7
8
9
10
11
12
13
14
15
- in order for your app to understand and process routes, you've got to import the "path" module from Node. You'll put that piece of syntax at the top of your code. That line looks like this: const path = require("path");
const express=require('express');
After you set up your "path" dynamic, import Express.
const bodyParser = require('body-parser');
"body-parser" is processing your incoming data and making it readable to your app.
const app = express();
You've imported Express, now you're going to register it and be able to access all of its functionality by packaging it in the "app" constant.
view engine
- here is where you define your Templating Engine. In this case, we're using "EJS." You use "set as part of Express' way to establish a dynamic that affects the server and not just the app. You can think of it as a "global" setting.
app.set("view engine", "ejs");
app.set("views", "views");
create routes
Notice how up to this point you've not written one snippet of HTML code. That's getting ready to change. But before we do that, we need to define our routes.
Your "routes" are made possible by the "path" helper we imported earlier. That's what allows Node to make sense of any kind of reference facilitated by a URL.
- set up a new directory called "routes." You'll have two new files in there. One will be called "admin.js" and the other will be called "display.js." On your "app.js" page, you'll write this:
const adminData = require('./routes/admin');
const displayData = require('./routes/display');
What you're doing at this point is you're establishing on your app.js page - the page that's going to be accessed by your app by default - the content that's coming from these two "routes."
app.use(bodyParser.urlencoded());
IMPORTANT! You're importing these pieces of code. In other words, you're making sure they're on the shelves of your library but you haven't actually checked them out yet. That's coming in just a moment.
app.use(bodyParser.urlencoded()); - with this, you're registering the "body-parser" you imported earlier.
express.static(path.join(__dirname, 'public'))
BTW: app.use is what you're coding in order to utilize a piece of Express that you've imported earlier. You can access a really good description of the "app.use" method by clicking here. What's especially relevant about this little piece of syntax is the way in which you can access the "request and "response" objects!
You're going to see this from here on out. "app" is what's holding your "Express" paradigm. Anytime you use "app.use," you're identifying either something you've imported or something that's a part of the Express dynamic by default and "activating" that functionality.app.use(express.static(path.join(__dirname, 'public'))) is what you're using for Node to be able to recognize static files, like <link rel="stylesheet" href="/css/main.css"> for example. Click here for more information.
app.use("/admin", adminData.routes);
app.use("/admin", adminData.routes); - here is where you're registering the route dynamic you imported a few lines ago. In this instance, you're "activating" the "adminData" dynamic.
404 page
Like what has been described before, up to this point, as your app is being read top to bottom, the only routes that are being defined as legitimate is the "admin" and the "display" route. Anything else, and your app doesn't know what to do.
This...
app.use((req, res, next) => {
//res.status(404).sendFile(path.join(__dirname, "views", "404.html"));
res.status(404).render("404", { pageTitle: "Page Not Found" });
});
...fixes that. Now, your app will know to advance your user to the "404" page if something goes south and there's no route that matches what the user has selected.
Click here for a refresher.
C) routes/admin.js (back to top...)
The "routes" dynamic is what controls your content. Much like the "model" aspect of the MVC architecture, you're going to use this part of your app to dictate what is being displayed on your page.
It's not just a URL. This has got some content and flow to it.
Here we go...
1
2
3
4
5
6
7
8
9
- the first thing you're going to do is import the "path" module from Node. This is what allows your app to understand the various paths to routes, pages and functionality
const express = require('express');
- import Express. Remember, this is what allows you to write a lot of code with minimal sytax. That's the whole point of Express.
const rootDir = require('../utility/path');
- you've imported the "path" object from Node. Now you can use it to reference your "path.js" file in the "utility" directory. This is just a shorthand script to reference what represents your "home" directory.
We'll write that piece of code / page in just a little bit.
const router = express.Router
- the Router object is the Express piece that allows you to interpret and use form data (POST, GET etc) as well as your page's data in general.
For more info about that, click here.
const products = []
- empty products array...
here you're setting up the page content when you first access it. Here's how the code looks:
router.get("/add-product", (req, res, next) => {
res.render("add-product", {
pageTitle: "Add Product",
path: "/admin/add-product",
formsCSS: true,
productCSS: true,
activeAddProduct: true
});
});
Just as a reminder:
res.render: this is for what's going to be your EJS file. This renders a view and sends it to the EJS client
pageTitle: this is a variable you're sending to your EJS client. It's the dynamic content that we'll have on all our pages.
path: this is the actual path the user will access to get to this page
formsCSS, productCSS and activeAddProduct are CSS files and the variable that governs the "active" condition of the page that is active
here's how you're "posting" your data into the array that will be seen on your display page
router.post("/add-product", (req, res, next) => {
products.push({title:req.body.title});
res.redirect("/");
});
Again, as a reminder:
router.post: - this is your "post" command that's handling your form data.
products.push: - we're "pushing" the form content into the "products" array
res.redirect: - we're redirecting the user after we're done processing the form back to the index page
export.routes = router;
Where "path" is about URL, "router" is more about content. That's a good way to envision it in order to prevent confusion when you're looking at the term "route."
In this case, we're looking at what is being "posted" by the form and how that is to be handled. Here, it's going to be maintained in an array called, "products."
export.products = products;
This is the other piece that's being "exported" from this page and being made available to the system in general. In this case, it's the "products" array.
D) routes/display.js (back to top...)
Again, this is the "model" aspect of the app and this one is disseminating content to the "display" view that you're going to be creating in a minute. Let's take it apart:
1
2
3
4
5
6
7
- the first thing you're going to do is import the "path" module from Node. This is what allows your app to understand the various paths to routes, pages and functionality
const express = require('express');
- import Express. Remember, this is what allows you to write a lot of code with minimal sytax. That's the whole point of Express.
const rootDir = require('../utility/path');
- you've imported the "path" object from Node. Now you can use it to reference your "path.js" file in the "utility" directory. This is just a shorthand script to reference what represents your "home" directory.
We'll write that piece of code / page in just a little bit.
const adminData = require('./admin');
There are two things being exported from the "admin.js" file in your "routes" directory and that's your "POST-ed" data as well as the data in your "products" array. With this piece of code, we're getting access to everything and we'll be more specific with what we want in a minute...
const router = express.Router
- the Router object is the Express piece that allows you to interpret and use form data (POST, GET etc).
For more info about that, click here.
here is where you're "getting" your content and then exporting at the end of your page
router.get("/", (req, res, next) => {
const products = adminData.products = adminData.products;
res.render("shop", {
prods: products,
pageTitle: "Shop",
path: "/",
hasProducts: products.length > 0,
activeShop: true,
productCSS: true
});
});
here is where you're "getting" your content and then exporting at the end of your page
In this tutorial, you started off by writing straight HTML. In order to render that via Node, you had to use res.sendFile. That's what Node uses to "deliver" any kind of file. The syntax used to facilitate all of that is:
router.get("/", (req, res, next) => {
res.sendFile(path.join(__dirname, "../", "views", "shop.html"));
});
When you use EJS, you're not going to need the "res.sendFile" dynamic at all. Instead, you'll used "res.render."
Most of the above elements have been already discussed, but there's one piece that's worth a second look and that's the "hasProducts" variable. That is an "IF" statement that looks for the length of the "products" array. If there's some content, then the "activeShop" variable is set to true as well as the "productCSS" variable.BTW: "module" is something that's a part of the Node.js library. It's a variable that refers to the current "module." When you use it in conjuction with another object like, in this instance, "exports," you're saying, "Whatever variable called "exports" that exists in the context of this application module, bring that to the table!" You can read more about that syntax by clicking here
module.exports=router; - this is exporting everything that's been assigned to your "router" variable above.
E) utility/path.js (back to top...)
On your two "routes" pages (admin and display), we introduced a little shortcut for the "root" directory, remember?
It looks like this: const rootDir = require("../utility/path");
To review this concept, click here. Bascially, what you're doing is using the "path" module that's a part of Node and then using the "dirname" function to represent what represents the "home" directory for your app.
So, after you've created your "utility" directory, you'll write this for your "path.js" page:
const path = require("path");
module.exports = path.dirname (process.mainModule.filename);
F) header.ejs (back to top...)
Now we're getting into our "Views." The first thing we're going to build is something that every page is going to share and that is the, "header."
First, set up your "views" directory and then in that folder create an "includes" directory. In that directory, we'll put our "header.ejs" file.
Remember, you can set up a "stunt" html file and use a function that "Express" offers, as far as being able to type "html" and "Express" will provide all the header code you need for an HTML 5 page. Click here for a refresher. Some of your content is going to be dynamic, so let's take a look at what your code is going to be:
<!DOCTYPE html>
<html lang="en">
<head>
<meta charset="UTF-8" />
<meta name="viewport" content="width=device-width, initial-scale=1.0" />
<meta http-equiv="X-UA-Compatible" content="ie=edge" />
<title><%= pageTitle %></title> dynamic content that will provide our "pageTitle" which we'll pass on as a variable
<link rel="stylesheet" href="/css/main.css" />
</head>
</html>
G) footer.ejs (back to top...)
Nothing especially noteworthy here. This is just the "caboose" for every page:
</body>
</html>
H) navigation.ejs (back to top...)
This is your third and last "include." This is the "navigation" bar. The one thing you want to be sensitive to here is the way in which the code dynamically asserts the "active" dynamic for the links...
<header class="main-header">
<nav class="main-header__nav">
<ul class="main-header__item-list">
<li class="main-header__item"><a class="<%= path === '/' ? 'active' : ''%>" href="/">Shop</a></li>
<li class="main-header__item">
<li class="main-header__item"><a class="<%= path === '/admin/add-product' ? 'active' : '' %>" href="/admin/add-product">Add Product</a></li>
</li>
</ul>
</nav>
</header>
Navigation "IF Statement for "Index" Page
1
2
What's happening here, and it's actually pretty clever, you're looking at path and using that to dictate whether or not the link is going to be stylized as an "active" link.
<a class="<%= path === '/' ? 'active' : ''%>" href="/">Shop</a>
Navigation "IF Statement for "Admin" Page
Same thing as above in that you're looking at the path and using that to dictate whether or not the link is going to be stylized as an "active" link.
<a class="<%= path === '/admin/add-product' ? 'active' : '' %>" href="/admin/add-product">Add Product</a>
I) public / css (back to top...)
Not a whole lot to figure out here. You're just setting up a "public" folder in your main directory and putting your three CSS files in there.
J) add-name.ejs (back to top...)
<%- include('includes/header.ejs') %>
<link rel="stylesheet" href="/css/forms.css" />
<link rel="stylesheet" href="/css/product.css" />
</head>
<body>
<%- include('includes/navigation.ejs') %>
<main>
<form class="product-form" action="/admin/add-name" method="POST">
<div class="form-control">
<label for="title">Title</label>
<input type="text" name="title" id="title" />
</div>
<button class="btn" type="submit">Add Name</button>
</form>
</main>
<%- include('includes/footer.ejs') %>
Most of the above syntax has already been explained. Your "pageTitle" is dynamic content that's going to be coming from your "route" file, and we'll see that in just a minute.
K) admin.js (back to top...)
admin.js is the code that's publishing your names to the "display.js" page. Here's how it breaks down:
1
2
3
4
5
6
7
8
9
Again, this is review. But it's good review! Click here to see the section where this was initially discussed.
The first thing you're going to do is grab your "path" module from Node and assign it to the "path" constant. This is ensuring that your app understands the various routes that are going to be ascertained from the various URL's that comprise your application.
const express = require("express");
Now, you're importing Express.
const rootDir = require("../utility/path");
Establishing your root directory so you can establish the directory from which all URLs are going to be relative to. Specifically, it's shorthand so you can reference your "utility" directory.
const router= express.Router();
Here's the module that allows you to process form data as well as disseminate data to your various pages in general.
const products=[];
Setting up your empty array.
router.get...
This piece of the code is what's populating your "add-name" page - the form that allows users to add names to the "products" array.
router.post...
This section is "posting" the "title" variable to your "products" array and keeps adding to it in the context of the "push" dynamic.
exports.routes=router;
As was mentioned previously, "path" is about URL, "router" is about content. This particular "router" is about your page's content and is reaching for the "add-name" view in your "views" directory.
exports.products=products;
This is your "products" array.
And that's a working app!
BTW: On this assignment, I had to install EJS and "body-parser" separately...
Up to now, we haven't taken the time to organize things according to what is referred to as a "separation of concerns." This is where you're separating your database functionality from your display functionality etc.
A) The Controller (back to top...)
By definition, the Controller is serving as the intermediary logic between the data and the view. Given that definition, you can see how we've been doing that very thing in the context of our routes. That's where we'll be grabbing some of the code and putting that into our new "controllers" directory.
Also, while we've got a "shop.js" file and an "admin.js" file, the files overlap with one another in the way they interact with the "products" table. That's why you'll see "shop" and "admin" functionality on the one, new "products.js" file in the "controller" directory.
Here we go...
1) admin.js (back to top...)
This is the "admin.js" file as it currently exists:
admin.js is the code that's publishing your names to the "display.js" page. Here's how it breaks down:
const path = require("path");
const express = require("express");
const rootDir = require("../utility/path");
const router = express.Router();
const products = [];
router.get("/add-name", (req, res, next) => {
res.render("add-name", {
pageTitle: "Add Name",
path: "/admin/add-name",
formsCSS: true,
productsCSS: true,
activeAddProduct: true
});
});
router.post("/add-name", (req, res, next) => {
products.push({ title: req.body.title });
res.redirect("/");
});
exports.routes = router;
exports.products = products;
Pause for a moment and reflect on the "content" of what you're looking at. Basically, you've got only two different scenarios to contend with: Your "get" and your "post."
1
2
3
4
1
Your user has just accessed the "add-name" URL. This code is defining the content of that page. We're going to move that to our "products" controller by writing this:
First, we'll define our "productsController" by writing this at the top of the page:
const productsController = requre('../controller/products');
Then we'll write our "new and improved" code by writing this. Notice how we're now invoking the "productsController" page now.
router.get('/add-product', productsController.getAddProduct);
2
And this mess is going to be replaced with this:
router.post("/add-product", productsController.postAddProduct);
3
Theoretically, you've now "packed" both your "post" and your "get" functionality into one "route" variable and that's what you're exporting.
4
The "products" you had originally is relevant now only in the context of the "productsController" page, which we'll look at in a minute.
Everything except the numbered lines are getting ready to change. Here's how it looks now (sans the "exports.products = products" line):
const path = require("path");
const express = require("express");
const productsController = requre('../controller/products'); // here's your new ProductsController
const router = express.Router();
router.get('/add-product', productsController.getAddProduct);
router.post("/add-product", productsController.postAddProduct);
module.exports = router;
1
2
3
1
2
3
old admin.js
- const path = require("path");
- const express = require("express");
- const rootDir = require("../utility/path");
- const router = express.Router();
- const products = [];
- router.get("/add-name", (req, res, next) => {
- res.render("add-name", {
- pageTitle: "Add Name",
- path: "/admin/add-name",
- formsCSS: true,
- productsCSS: true,
- activeAddProduct: true
- });
- });
- router.post("/add-name", (req, res, next) => {
- products.push({ title: req.body.title });
- res.redirect("/");
- });
- exports.routes = router;
- exports.products = products;
new admin.js file
- const path = require("path");
- const express = require("express");
- const productsController = requre('../controller/products'); // here's your new ProductsController
- const router = express.Router();
- router.get('/add-product', productsController.getAddProduct);
- router.post("/add-product", productsController.postAddProduct);
- module.exports = router;
const path = require("path");
const express = require("express");
const rootDir = require("../utility/path");
const adminData = require("./admin");
const router = express.Router();
router.get("/", (req, res, next) => {
const products = adminData.products;
res.render("shop", {
prods: products,
pageTitle: "Shop",
path: "/",
hasProducts: products.length > 0,
activeShop: true,
productCSS: true
});
});
module.exports = router;
1
2
3
1
You were needing this before in order to be able to properly resolve the "path" that was going to connect you to your CSS file. You don't need that anymore.
2
You were only going to need this if you're going to be processing that data on this page. Now you're not.
3
This is the syntax responsible for retrieving everything form the array stored in the "arrayData.products" variable. Now, you're referring to all that code that will be housed in the "products" Controller. Let's have a look...
const path = require("path");
const express = require("express");
const productsController = require('../controllers/products');
const router = express.Router();
router.get("/", productsController.getProducts);
module.exports = router;
3
3
old shop.js
- const path = require("path");
- const express = require("express");
- const rootDir = require("../utility/path");
- const adminData = require("./admin");
- const router = express.Router();
- router.get("/", (req, res, next) => {
- const products = adminData.products;
- res.render("shop", {
- prods: products,
- pageTitle: "Shop",
- path: "/",
- hasProducts: products.length > 0,
- activeShop: true,
- productCSS: true
- });
- });
- module.exports = router;
new shop.js file
- const path = require("path");
- const express = require("express");
- const productsController = require('../controllers/products');
- const router = express.Router();
- router.get("/", productsController.getProducts);
- module.exports = router;
const products = [];
exports.getAddProduct = (req, res, next) => {
res.render("add-product", {
pageTitle: "Add Product",
path: "/admin/add-product",
formsCSS: true,
productCSS: true,
activeAddProduct: true
});
};
exports.postAddProduct = (req, res, next) => {
products.push({ title: req.body.title });
res.redirect("/")
};
exports.getProducts=(req, res, next) => {
res.render("shop", {
prods: products,
pageTitle: "Shop",
path: "/",
hasProducts: products.length > 0,
activeShop: true,
productCSS: true
});
};
Most of the code should look familiar to you with the exception of how everything is being prefaced with the "exports" code.
Here's the first "change" that we want to consider:
1
2
3
1
2
3
Remember, you didn't have a "products.js" file before we reconfigured our app to be based on an MVC architecture. That's why there's no "before / after" scenario here!
Just for the sake of establishing a sound line in the sand as far as the fact that right now we're looking at 100% accurate code, here's what we've got:
app.js - this is your starting point. The change we made here was the way in which your "404" page was referred to.
const path = require("path");
const express = require("express");
const bodyParser = require("body-parser");
const app = express();
app.set("view engine", "ejs");
app.set("views", "views");
const adminData = require("./routes/admin");
const shopRoutes = require("./routes/shop");
const errorController = require("./controllers/error");
app.use(bodyParser.urlencoded());
app.use(express.static(path.join(__dirname, "public")));
app.use("/admin", adminData.routes);
app.use(shopRoutes);
app.use(errorController.get404);
app.listen(3000);
const path = require("path");
const express = require("express");
const rootDir = require("../utility/path");
const productController = require("../controllers/product");
const router = express.Router();
router.get("/add-product", productController.getAddProduct);
router.post("/add-product", productController.postAddProduct);
exports.routes = router;
const path = require("path");
const express = require("express");
const rootDir = require("../utility/path");
const adminData = require("./admin");
const productController = require("../controllers/product");
const router = express.Router();
router.get("/", productController.getProducts);
module.exports = router;
const products = [];
exports.getAddProduct = (req, res, next) => { // this is what shows up when you first access the pag
res.render("add-product", {
pageTitle: "Add Product",
path: "/admin/add-product",
formsCSS: true,
productCSS: true,
activeAddProduct: true
});
};
exports.postAddProduct = (req, res, next) => { // this adds whatever you just added to the "products" array
products.push({ title: req.body.title });
res.redirect("/");
};
exports.getProducts = (req, res, next) => { //this is the code that displays everything on your "shop.js" page
res.render("shop", {
prods: products,
pageTitle: "Shop",
path: "/",
hasProducts: products.length > 0,
activeShop: true,
productCSS: true
});
};
exports.get404 = (req, res, next) => {
res.status(404).render("404", {
pageTitle: "Page Not Found",
path: ""
});
};
const Product = require("../models/product"); // import your product model
exports.getAddProduct = (req, res, next) => {
res.render("add-product", {
pageTitle: "Add Product",
path: "/admin/add-product",
formsCSS: true,
productCSS: true,
activeAddProduct: true
});
};
exports.postAddProduct = (req, res, next) => {
❶ const product = new Product(req.body.title);
❷ product.save();
res.redirect("/");
};
exports.getProducts = (req, res, next) => {
❸ const products = Product.fetchAll();
res.render("shop", {
prods: products,
pageTitle: "Shop",
path: "/",
hasProducts: products.length > 0,
activeShop: true,
productCSS: true
});
};
You're going to start this sequence by establishing a new instance of your Product class called, "product." You're passing the "title" variable into the Class which is going to be processed here in just a little bit.
A quick aside, the above code brought to mind the way in which Classes are called and methods are invoked in PHP. While variables aren't always passed into a Class declaration, it does happen and it's not a bad thing to review that real quick just to better reinforce what we're doing here in Node. Click here to expand the area below to reveal and example of a PHP Class where there are variables being passed into it.
<?php
class Applied {
public $word; ❷
public function __construct($greeting) { ❸
$this->word=$greeting; } public function speak() { return $this->word; ❹ } } ❶ $buddy = new Applied("hello"); $yell = $buddy->speak(); echo $yell; ❺
?> - creating a new instance of the "Applied" class and passing the word "hello" as a variable
- creating the $word property
- you're now populating the $word property with $greeting variable which is assumed to be the first variable you passed into the Class
- returning the $word variable which has been populated with the $greeting value - the first value you passed into the Class.
- "echoing" what is going to be the word, "hello"
$this->word=$greeting; } public function speak() { return $this->word; ❹ } } ❶ $buddy = new Applied("hello"); $yell = $buddy->speak(); echo $yell; ❺
?>
1
2
3
4
5
2
You're calling the specific function within the "product.js" Controller and adding the title to your "product" array.
3
Notice you don't have to create a new instance of the Product class. Reason being is because "fetchAll" is a static class so you don't have create an instance of the Class and then call the method. You can do it just like it's coded above.
2) product.js (model) (back to top...)
Here's your "product" Model.
const products = []; // this was in our "controllers" file. Now, we've got it here in our Models. We're setting up an empty array.
module.exports = class Product { // we're exporting this whole class
constructor(title) { // we're using the constructor to define our incoming "title" string
this.title = title;
}
save() {
products.push(this); // we've got to grab the whole object and not just the "title" piece
}
static fetchAll() { // convenient "static" function that we can grab without having to declare an instance of the class
return products;
}
};
products.js (controller and model)
- const products = [];
- exports.getAddProduct = (req, res, next) => {
- res.render("add-product", {
- pageTitle: "Add Product",
- path: "/admin/add-product",
- formsCSS: true,
- productCSS: true,
- activeAddProduct: true
- });
- };
- exports.postAddProduct = (req, res, next) => {
- products.push({ title: req.body.title });
- res.redirect("/")
- };
- exports.getProducts=(req, res, next) => {
- res.render("shop", {
- prods: products,
- pageTitle: "Shop",
- path: "/",
- hasProducts: products.length > 0,
- activeShop: true,
- productCSS: true
- });
- };
products.js (controller only)
- const Product = require("../models/product"); // import your product model
- exports.getAddProduct = (req, res, next) => {
- res.render("add-product", {
- pageTitle: "Add Product",
- path: "/admin/add-product",
- formsCSS: true,
- productCSS: true,
- activeAddProduct: true
- });
- };
- exports.postAddProduct = (req, res, next) => {
- const product = new Product(req.body.title);
- product.save();
- res.redirect("/");
- };
- exports.getProducts = (req, res, next) => {
- const products = Product.fetchAll();
- res.render("shop", {
- prods: products,
- pageTitle: "Shop",
- path: "/",
- hasProducts: products.length > 0,
- activeShop: true,
- productCSS: true
- });
- };
The File System (fs) is an integral part of the Node dynamic. It give you access to the physical files on your system and is defined as being responsible for all asynchronous or synchronous file I/O (input / output) operations.
Up to now, we've been storing our data in the "products" array. Now we're going to take whatever data has been inputted and writing it to a file on our desktop. This is going to involve the "fs" or "file system" module that comes with Node.
Let's pop the hood on this thing and see how it works.
A) How You're Going to Change the Model (back to top...)
1) File System (fs) (back to top...)
❶ const fs = require("fs");
const path = require("path");
const products = [];
module.exports = class Product {
constructor(title) {
this.title = title;
}
save() {
❷ const p = path.join(
path.dirname(process.mainModule.filename),
"data",
"products.json"
);
❸ fs.readFile(p, (err, fileContent) => {
let products = [];
if (!err) {
products = JSON.parse(fileContent);
}
❹ products.push(this);
❺ fs.writeFile(p, JSON.stringify(products), err => {
console.log(err);
});
});
}
}
1
2
At one point, the tutorial references how "this" is accurately identified by the system / code because of the "fat arrow" function that's being used.
At first brush that might seem a little bizarre. But when you pop the hood on the documentation pertaining to the "fat arrow" function, it becomes very clear.
3) readFile (back to top...)
- First of all, the "fat arrow" function represents a wonderful form of shorthand so you can write more syntax with less code
- Secondly, with that format comes a definitive way to define this
- this is usually defined by the context it's written in, although it can be defined explicity (bound) with "bind," "call" and "apply"
- sfat arrow functions don't bind this. Instead, it's bound according to the function it's written in (lexically).
3
4
5
products.js (model [storing data in array])
- li>const products = []; // this was in our "controllers" file. Now, we've got it here in our Models. We're setting up an empty array.
- module.exports = class Product { // we're exporting this whole class
- constructor(title) { // we're using the constructor to define our incoming "title" string
- this.title = title;
- }
- save() {
- products.push(this); // we've got to grab the whole object and not just the "title" piece
- }
- static fetchAll() { // convenient "static" function that we can grab without having to declare an instance of the class
- return products;
- }
- };
products.js (model [storing data in products.json])
- const fs = require("fs");
- const path = require("path");
- const products = [];
- module.exports = class Product {
- constructor(title) {
- this.title = title;
- }
- save() {
- const p = path.join(
- path.dirname(process.mainModule.filename),
- "data",
- "products.json"
- );
- fs.readFile(p, (err, fileContent) => {
- let products = [];
- if (!err) {
- products = JSON.parse(fileContent);
- }
- products.push(this);
- fs.writeFile(p, JSON.stringify(products), err => {
- console.log(err);
- });
- });
❶ static fetchAll() {
❷ const p = path.join(
❸ path.dirname(process.mainModule.filename),
"data",
"products.json"
);
❹ fs.readFile(p, (err, fileContent) => {
if (err) {
return[];
}
❺ return JSON.parse(fileContent);
});
}
1
2
3
Among the data types that exist, you have strings, integers, booleans etc. JSON, by default, is a string in that it's text. You use this functionality to convert it to a JSON Object that you can then retrieve as an array. Click here for an example.
3) readFile (back to top...)
4
5
Right now, if we run this code, we get a message that says, "Cannot read property 'length' of undefined." Reason for this is that, true to form, Node (JavaScript) being the asynchronous beast that it is, will plow through all of the functions that are on its plate and not wait for one method to finish before starting on the next. This is what's happening here. The "products.json" file is represented by the "prods" variable in your Controller and that's going out the door before the system has a chance to access the "products.json" file on your Model. It's here where the utility of a "callback" becomes both necessary and glorious.
By definition, a Callback" is an argument that you pass into a function. At least, that's as far as we've gone with it up till now. First, however, for the sake of review, let's revisit the difference between Classes, Methods and Instances...

PHP Classes | Objects | Instances
Javascript Callbacks, Hoisting and Anonymous Functions
- Callbacks in JavaScript are functions that are passed as arguments to other functions.
- Callbacks enforce the order of how a particular piece of syntax operates
- You will hear people refer to a function as a "callback" if it's something that will obviously take a moment to finish.
Here is where we need to take a little tangent and talk about Event Emitters.
Node is defined as being an "event driven" architecture. An "Event" is simply a signal that something has happened. It's actually a class within Node that has a substantial amount of functionality attached to it.
We've already seen this in action, although the actual code was replaced with some Express syntax.
When we first started, we did this:
const server = http.createServer(app);
When we invoked this, Node recognizes this as an "Event" - there's a request that necessitates a response. This is where you get the "Event driven" dynamic from in Node's definition.
Pause here for a moment and recognize that you've been doing Event Driven programming your entire career. In the context of a Web Browser a "click" is an event. When you press a key, you're triggering a "keydown" event. By default, at its most basic level, Event Driven Programming is based on the idea that an Event Handler (something that's clicked or pressed, for example), is a call back function that will be called when an event is triggered.
If you go to the Node documentation and take a look, you'll set that "Events" is a module with a entire block of functionality attached to it. One of those pieces of functionality is something called an "Event Emitter."
An "Event Emitter" is basically something that's making a noise - it's an alert that something is happening. It doesn't do anything in response to that noise, for that you need a Listener. But that's what an Event Emitter is.
1) inner function (back to top...)
Here's what we had and what we're going to use now:
static fetchAll() {
const p = path.join(
path.dirname(process.mainModule.filename),
"data",
"products.json"
);
fs.readFile(p, (err, fileContent) => {
if (err) {
return[];
}
return JSON.parse(fileContent);
});
}
There are two things going on here that are worth mentioning.
First, fs.readFile is, by default a "callback."
Remember, fs is the "File System" module within Node. readFile is a function within that module that's going to take some time to process, hence it is a "callback."
In addition, fs.readFile is a function within a function and is therefore referred to as an "inner function."
Having an "inner function" is not a big deal, but in this case it's problematic because everything that's being returned is coming from the inner function. That's fine, but we're calling fetchAll and because you don't have a "return" that corresponds to that particular part of the function, nothing's being returned.
So, here's how we fix all of this...
What we started with is on the left and what we have now with the callback is on the right.
products.js (model [before cb])
static fetchAll() {
const p = path.join(
path.dirname(process.mainModule.filename),
'data',
'products.json'
);
fs.readFile(p, (err, fileContent) => {
if(err) {
return[];
}
return JSON.parse(fileContent);
});
}products.js (model [with cb])
static fetchAll(cb) {
const p = path.join(
path.dirname(process.mainModule.filename),
'data',
'products.json'
);
fs.readFile(p, (err, fileContent) => {
if(err) {
cb([]);
}
cb(JSON.parse(fileContent));
});
}products.js (controller [before cb])
exports.getProducts = (req, res, next) => {
const products = Product.fetchAll();
res.render('shop, {
prods: products,
pageTitle: "Shop",
path: "/",
hasProducts: products.length > 0,
activeShop: true,
productCSS: true
});
}products.js (controller [with cb])
exports.getProducts = (req, res, next) => {
Product.fetchAll(products => {
res.render('shop', {
prods: products,
pageTitle: 'Shop',
path: '/',
hasProducts: products.length > 0,
activeShop: true,
productCSS: true
});
});
}<script>
function helper(number) {
return help(number+5);
}
function help(digit) {
console.log(digit)
}
helper(5);
</script>
products.js (model [before helper function]
const fs = require("fs");
const path = require("path");
module.exports = class Product {
constructor(t) {
this.title = t;
}
save() {
const p = path.join(
path.dirname(process.mainModule.filename),
"data",
"products.json"
);
fs.readFile(p, (err, fileContent) => {
let products = [];
if (!err) {
products = JSON.parse(fileContent);
}
products.push(this);
fs.writeFile(p, JSON.stringify(products), err => {
console.log(err);
});
});
}
static fetchAll(cb) {
const p = path.join(
path.dirname(process.mainModule.filename),
"data",
"products.json"
);
fs.readFile(p, (err, fileContent) => {
if (err) {
return [];
}
cb(JSON.parse(fileContent));
});
}
};products.js (model [with helper])
const fs = require("fs");
const path = require("path");
❶ const p = path.join(
path.dirname(process.mainModule.filename),
"data",
"products.json"
);
❷ const getProductsFromFile = cb => {
fs.readFile(p, (err, fileContent) => {
if (err) {
return cb([]);
}
cb(JSON.parse(fileContent));
});
};
module.exports = class Product {
constructor(t) {
this.title = t;
}
save() {
❸ getProductsFromFile(products => {
products.push(this);
fs.writeFile(p, JSON.stringify(products), err => {
console.log(err);
});
});
}
static fetchAll(cb) {
getProductsFromFile(cb);
}
};1
Helper Functions
2
3
expression for "push"
products => {
products.push(this);
fs.writeFile(p, JSON.stringify(products), err => {
console.log(err);
});
}
...and that's the expression being passed in as a callback to "getProductsFromFile"... const getProductsFromFile = cb => { fs.readFile(p, (err, fileContent) => { if (err) { return cb([]); } cb(JSON.parse(fileContent)); }); };
expression for fetchAll
products => {
res.render("shop", {
prods: products,
pageTitle: "Shop",
path: "/",
hasProducts: products.length > 0,
activeShop: true,
productCSS: true
});
}
...and that's the expression we're passing in to "getProductsFromFile" when we're just retrieving the list of products in our "products.json" file... const getProductsFromFile = cb => { fs.readFile(p, (err, fileContent) => { if (err) { return cb([]); } cb(JSON.parse(fileContent)); }); };
exports.getOrders = (req, res, next) => {
res.render("shop/orders", {
path: "/orders",
pageTitle: "Your Orders"
});
};
"products" is a variable! The expression is distinct from the variable. Everything from the fat arrow on represents something distinct from that variable.
Our fetchAll method is passing that function into the getProductsFromFile method.
const getProductsFromFile = cb => {
fs.readFile(p, (err, fileContent) => {
if (err) {
return cb([]);
}
cb(JSON.parse(fileContent));
});
};
What's in bold is the (products) variable.
b) View (back to top...)
Here's where it really starts making sense:
Thanks to this:
function(products) => {
res.render("shop/product-list", {
prods: products,
pageTitle: "All Products",
path: "/products"
});
}
...and the way that it was positioned as a callback, "products" is now a bonafide value that is now being read into the "shop/product-list" view file...
<%- include('../includes/head.ejs') %>
<link rel="stylesheet" href="/css/product.css" />
</head>
<body>
<%- include('../includes/navigation.ejs') %>
<main>
<h1>My Products</h1>
<p>List of all the products...</p>
<% if(prods.length>0) { %>
<div class="grid">
<% for (let product of prods) { %>
<article class="card product-item">
<header class="card__header">
<h1 class="product__title"><%= product.title %></h1>
</header>
<div class="card__image">
<img
src="https://cdn.pixabay.com/photo/2016/03/31/20/51/book-1296045_960_720.png"
alt="A Book"
/>
</div>
<div class="card__content">
<h2 class="product__price">$19.99</h2>
<p class="product__description">
A very interesting book about so many even more interesting
things!
</p>
</div>
<div class="card__actions">
<button class="btn">Add to Cart</button>
</div>
</article>
<% } %>
</div>
<% } else { %>
<h1>No Products Found</h1>
<% } %>
</main>
<%- include('../includes/end.ejs') %>
<a href="/products/<%=product.id %>" class="btn">Details</a>
<form action="/add-to-cart" method="POST">
<button class="btn">Add to Cart</button>
</form>
module.exports = class Product {
constructor(title, imageUrl, description, price) {
this.title = title;
this.imageUrl = imageUrl;
this.description = description;
this.price = price;
}
save() {
this.id = Math.random().toString();
getProductsFromFile(products => {
products.push(this);
fs.writeFile(p, JSON.stringify(products), err => {
console.log(err);
});
});
}
static fetchAll(cb) {
getProductsFromFile(cb);
}
};
- one where you're including the "add to cart" button as part of a list of products
- the other where you're on the product detail page and you're only looking at one product
<%- include('../includes/head.ejs') %>
<link rel="stylesheet" href="/css/product.css">
</head>
<body>
<%- include('../includes/navigation.ejs') %>
<main>
<% if (prods.length > 0) { %>
<div class="grid">
<% for (let product of prods) { %>
<article class="card product-item">
<header class="card__header">
<h1 class="product__title">
<%= product.title %>
</h1>
</header>
<div class="card__image">
<img src="<%= product.imageUrl %>" alt="<%= product.title %>">
</div>
<div class="card__content">
<h2 class="product__price">$
<%= product.price %>
</h2>
<p class="product__description">
<%= product.description %>
</p>
</div>
<div class="card__actions">
<a href="/products/<%=product.id %>" class="btn">Details</a>
<form action="/cart" method="POST">
<button class="btn">Add to Cart</button>
<input type="hidden" name="productId" value="<%=product.id %>" />
</form>
</div>
</article>
<% } %>
</div>
<% } else { %>
<h1>No Products Found!</h1>
<% } %>
</main>
<%- include('../includes/end.ejs') %>
<%- include('../includes/head.ejs') %>
<link rel="stylesheet" href="/css/product.css">
</head>
<body>
<%- include('../includes/navigation.ejs') %>
<main>
<% if (prods.length > 0) { %>
<div class="grid">
<% for (let product of prods) { %>
<article class="card product-item">
<header class="card__header">
<h1 class="product__title">
<%= product.title %>
</h1>
</header>
<div class="card__image">
<img src="<%= product.imageUrl %>" alt="<%= product.title %>">
</div>
<div class="card__content">
<h2 class="product__price">$
<%= product.price %>
</h2>
<p class="product__description">
<%= product.description %>
</p>
</div>
<div class="card__actions">
<a href="/products/<%=product.id %>" class="btn">Details</a>
<%- include('../includes/add-to-cart')%>
</div>
</article>
<% } %>
</div>
<% } else { %>
<h1>No Products Found!</h1>
<% } %>
</main>
<%- include('../includes/end.ejs') %>
static addProduct(id, productPrice) {
//fetch the previous cart
❶ fs.readFile(p, (err, fileContent) => {
let cart = { products: [], totalPrice: 0 };
if (!err) {
cart = JSON.parse(fileContent);
}
//analyze the cart => find existing product
❷ const existingProductIndex = cart.products.findIndex(
prod => prod.id === id
);
❸ const existingProduct = cart.products[existingProductIndex];
❹ let updatedProduct;
//add new product / increase quantity
if (existingProduct) {
❺ updatedProduct = { ...existingProduct };
❻ updatedProduct.qty = updatedProduct.qty + 1;
❼ cart.products = [...cart.products];
cart.products[existingProductIndex] = updatedProduct;
} else {
❽ updatedProduct = { id: id, qty: 1 };
cart.products = [...cart.products, updatedProduct];
}
❾ cart.totalPrice = cart.totalPrice + +productPrice;
fs.writeFile(p, JSON.stringify(cart), err => {
console.log(err);
});
});
}
The following is a phenomenal explanation of the difference between "var," "let" and "const." "var" reigned as king until the advent of ES6. Now, you've got access to "let" and "const" which remedy some of the shortcomings of "var." Click here to read the whole article...
Scope essentially means where these variables are available for use. var declarations are globally scoped or function/locally scoped. It is globally scoped when a var variable is declared outside a function. This means that any variable that is declared with var outside a function block is available for use in the whole window. var is function scoped when it is declared within a function. This means that it is available and can be accessed only within that function. To understand further, look at the example below... (click here to read more)
Scope essentially means where these variables are available for use. var declarations are globally scoped or function/locally scoped. It is globally scoped when a var variable is declared outside a function. This means that any variable that is declared with var outside a function block is available for use in the whole window. var is function scoped when it is declared within a function. This means that it is available and can be accessed only within that function. To understand further, look at the example below... (click here to read more)
1
BTW: "cart" is an object. "let" is used to defined variables, but an "object" can be a variable to with multiple values. Click here to read more.
findIndex()
2
3
4
Spread Operator
5
6
7
8
9
exports.getEditProduct = (req, res, next) => {
❶ const editMode = req.query.edit;
❷ if (!editMode) {
return res.redirect("/");
}
res.render("admin/edit-product", {
pageTitle: "Edit Product",
path: "/admin/edit-product",
editing: editMode
});
};
1
- "query" is an object that we have available to us through Express
- "edit" is our key. That's the piece that we're actually looking for and the value corresponding to that key is what will determine how things will be processed
2
exports.getEditProduct = (req, res, next) => {
const editMode = req.query.edit;
if (!editMode) {
return res.redirect("/");
}
❶ const prodId = req.params.productId;
❷ Product.findById(prodId, product => {
if(!product) {
return res.redirect('/');
}
res.render("admin/edit-product", {
pageTitle: "Edit Product",
path: "/admin/edit-product",
editing: editMode,
product: product
});
});
};
1
2
<%- include('../includes/head.ejs') %>
<link rel="stylesheet" href="/css/forms.css">
<link rel="stylesheet" href="/css/product.css">
</head>
<body>
<%- include('../includes/navigation.ejs') %>
<main>
❶ <form class="product-form" action="/admin/<% if (editing) { %>edit-product<% } else { %>add-product<% } %>" method="POST">
<div class="form-control">
<label for="title">Title</label>
<input type="text" name="title" id="title"
❷ value="<% if (editing) { %><%=product.title%><% } %>">
</div>
<div class="form-control">
<label for="imageUrl">Image URL</label>
<input type="text" name="imageUrl" id="imageUrl"
value="<% if (editing) { %><%=product.imageUrl%><% } %>">
</div>
<div class="form-control">
<label for="price">Price</label>
<input type="number" name="price" id="price" step="0.01"
value="<% if (editing) { %><%=product.price%><% } %>">
</div>
<div class="form-control">
<label for="description">Description</label>
<textarea name="description" id="description" rows="5"><% if (editing) { %><%=product.description%><% } %>
</textarea>
</div>
❸ <button class="btn" type="submit"><% if (editing) { %> Update Product<% } else { %> Add Product <% } %></button>
</form>
</main>
<%- include('../includes/end.ejs') %>
1
2
3
❶ exports.postEditProduct = (req, res, next) => {
const prodId = req.body.productId;
const updatedTitle = req.body.title;
const updatedimageUrl = req.body.imageUrl;
const updatedDesc = req.body.description;
const updatedPrice = req.body.price;
❷ const updatedProduct = new Product(
prodId,
updatedTitle,
updatedimageUrl,
updatedDesc,
updatedPrice
);
❸ updatedProduct.save();
❹ res.redirect("/admin/products");
};
1
2
3
4
❶ module.exports = class Product {
❷ constructor(id, title, imageUrl, description, price) {
this.id = id;
this.title = title;
this.imageUrl = imageUrl;
this.description = description;
this.price = price;
}
save() {
❸ getProductsFromFile(products => {
❹ if (this.id) {
❺ const existingProductIndex = products.findIndex(
prod => prod.id === this.id
);
❻ const updatedProducts = [...products];
❼ updatedProducts[existingProductIndex] = this;
fs.writeFile(p, JSON.stringify(updatedProducts), err => {
console.log(err);
});
} else {
this.id = Math.random().toString();
products.push(this);
fs.writeFile(p, JSON.stringify(products), err => {
console.log(err);
});
}
});
}
static fetchAll(cb) {
getProductsFromFile(cb);
}
static findById(id, cb) {
getProductsFromFile(products => {
const product = products.find(p => p.id === id);
cb(product);
});
}
};
1
function __constructor
2
3
getProductsFromFile(products => {
if (this.id) {
const existingProductIndex = products.findIndex(
prod => prod.id === this.id
);
const updatedProducts = [...products];
updatedProducts[existingProductIndex] = this;
fs.writeFile(p, JSON.stringify(updatedProducts), err => {
console.log(err);
});
} else {
// this is only going to be triggered if you're adding a product
this.id = Math.random().toString();
products.push(this);
fs.writeFile(p, JSON.stringify(products), err => {
console.log(err);
});
}
});
4
5
6
7
❶ static deleteById(id) {
❷ getProductsFromFile(products => {
❸ const product = products.find(prod => prod.id === id);
❹ const updatedProducts = products.filter(prod => prod.id !== id);
❺ fs.writeFile(p, JSON.stringify(updatedProducts), err => {
if (!err) {
❻ Cart.deleteProduct(id, product.price);
}
});
});
}
1
exports.postEditProduct = (req, res, next) => {
const prodId = req.body.productId;
const updatedTitle = req.body.title;
const updatedimageUrl = req.body.imageUrl;
const updatedDesc = req.body.description;
const updatedPrice = req.body.price;
const updatedProduct = new Product(
prodId,
updatedTitle,
updatedimageUrl,
updatedDesc,
updatedPrice
);
updatedProduct.save();
res.redirect("/admin/products");
};
2
"find" -> will return the first value that matches the specified criteria
"filter" -> returns everything that matches the specified criteria
"findIndex" -> will grab the index of the first key value pair that matches the specified criteria
3
4
5
6
static deleteProduct(id) {
fs.readFile(p, (err, fileContent) => {
if (err) {
return;
}
❶ const updatedCart = { ...JSON.parse(fileContent) };
const productIndex = updatedCart.products.find(prod => prod.id === id);
const productQty = product.qty;
❷ updatedCart.products = updatedCart.products.filter(
prod => prod.id !== id
);
updatedCart.totalPrice =
updatedCart.totalPrice - productPrice * productQty;
fs.writeFile(p, JSON.stringify(updatedCart), err => {
console.log(err);
});
});
}
};
1
2
exports.getCart = (req, res, next) => {
❶ Cart.getCart(cart => {
❷ Product.fetchAll(products => {
❸ const cartProducts = [];
❹ for (product of products) {
❺ const cartProductData = cart.products.find(
prod => prod.id === product.id
);
❻ if (cart.products.find(prod => prod.id === product.id)) {
cartProducts.push({ productData: product, qty: cartProductData.qty });
}
}
res.render("shop/cart", {
path: "/cart",
pageTitle: "Your Cart",
products: cartProducts
});
});
});
};
1
2
3
4
5
{"products":[{"id":"7747","qty":4},{"id":"0.22422680191225441","qty":2},{"id":"0.9570675800576787","qty":1}],"totalPrice":64.98}
6
we don't have to worry about the Model in this case just because we're using functionality that's already been created
A) Router (back to top...)
router.post("cart/delete-item", shopControler.postCartDeleteProduct);
B) Controller (back to top...)
exports.postCartDeleteProduct = (req, res, next) => {
❶ const prodId = req.body.productId;
❷ Product.findById(prodId, product => {
Cart.deleteProduct(prodId, product.price);
res.redirect("/cart");
});
};
1
2
static deleteProduct(id) {
fs.readFile(p, (err, fileContent) => {
if (err) {
return;
}
const updatedCart = { ...JSON.parse(fileContent) };
const product = updatedCart.products.find(prod => prod.id === id);
if(!product){
return;
}
const productQty = product.qty;
updatedCart.products = updatedCart.products.filter(
prod => prod.id !== id
);
updatedCart.totalPrice =
updatedCart.totalPrice - productPrice * productQty;
fs.writeFile(p, JSON.stringify(updatedCart), err => {
console.log(err);
});
});
}
- SQL - stands for Structured Query Language
- tables are set up in a way where there is a "relational" dynamic between them in terms of
- one to one
- one to many
- many to many
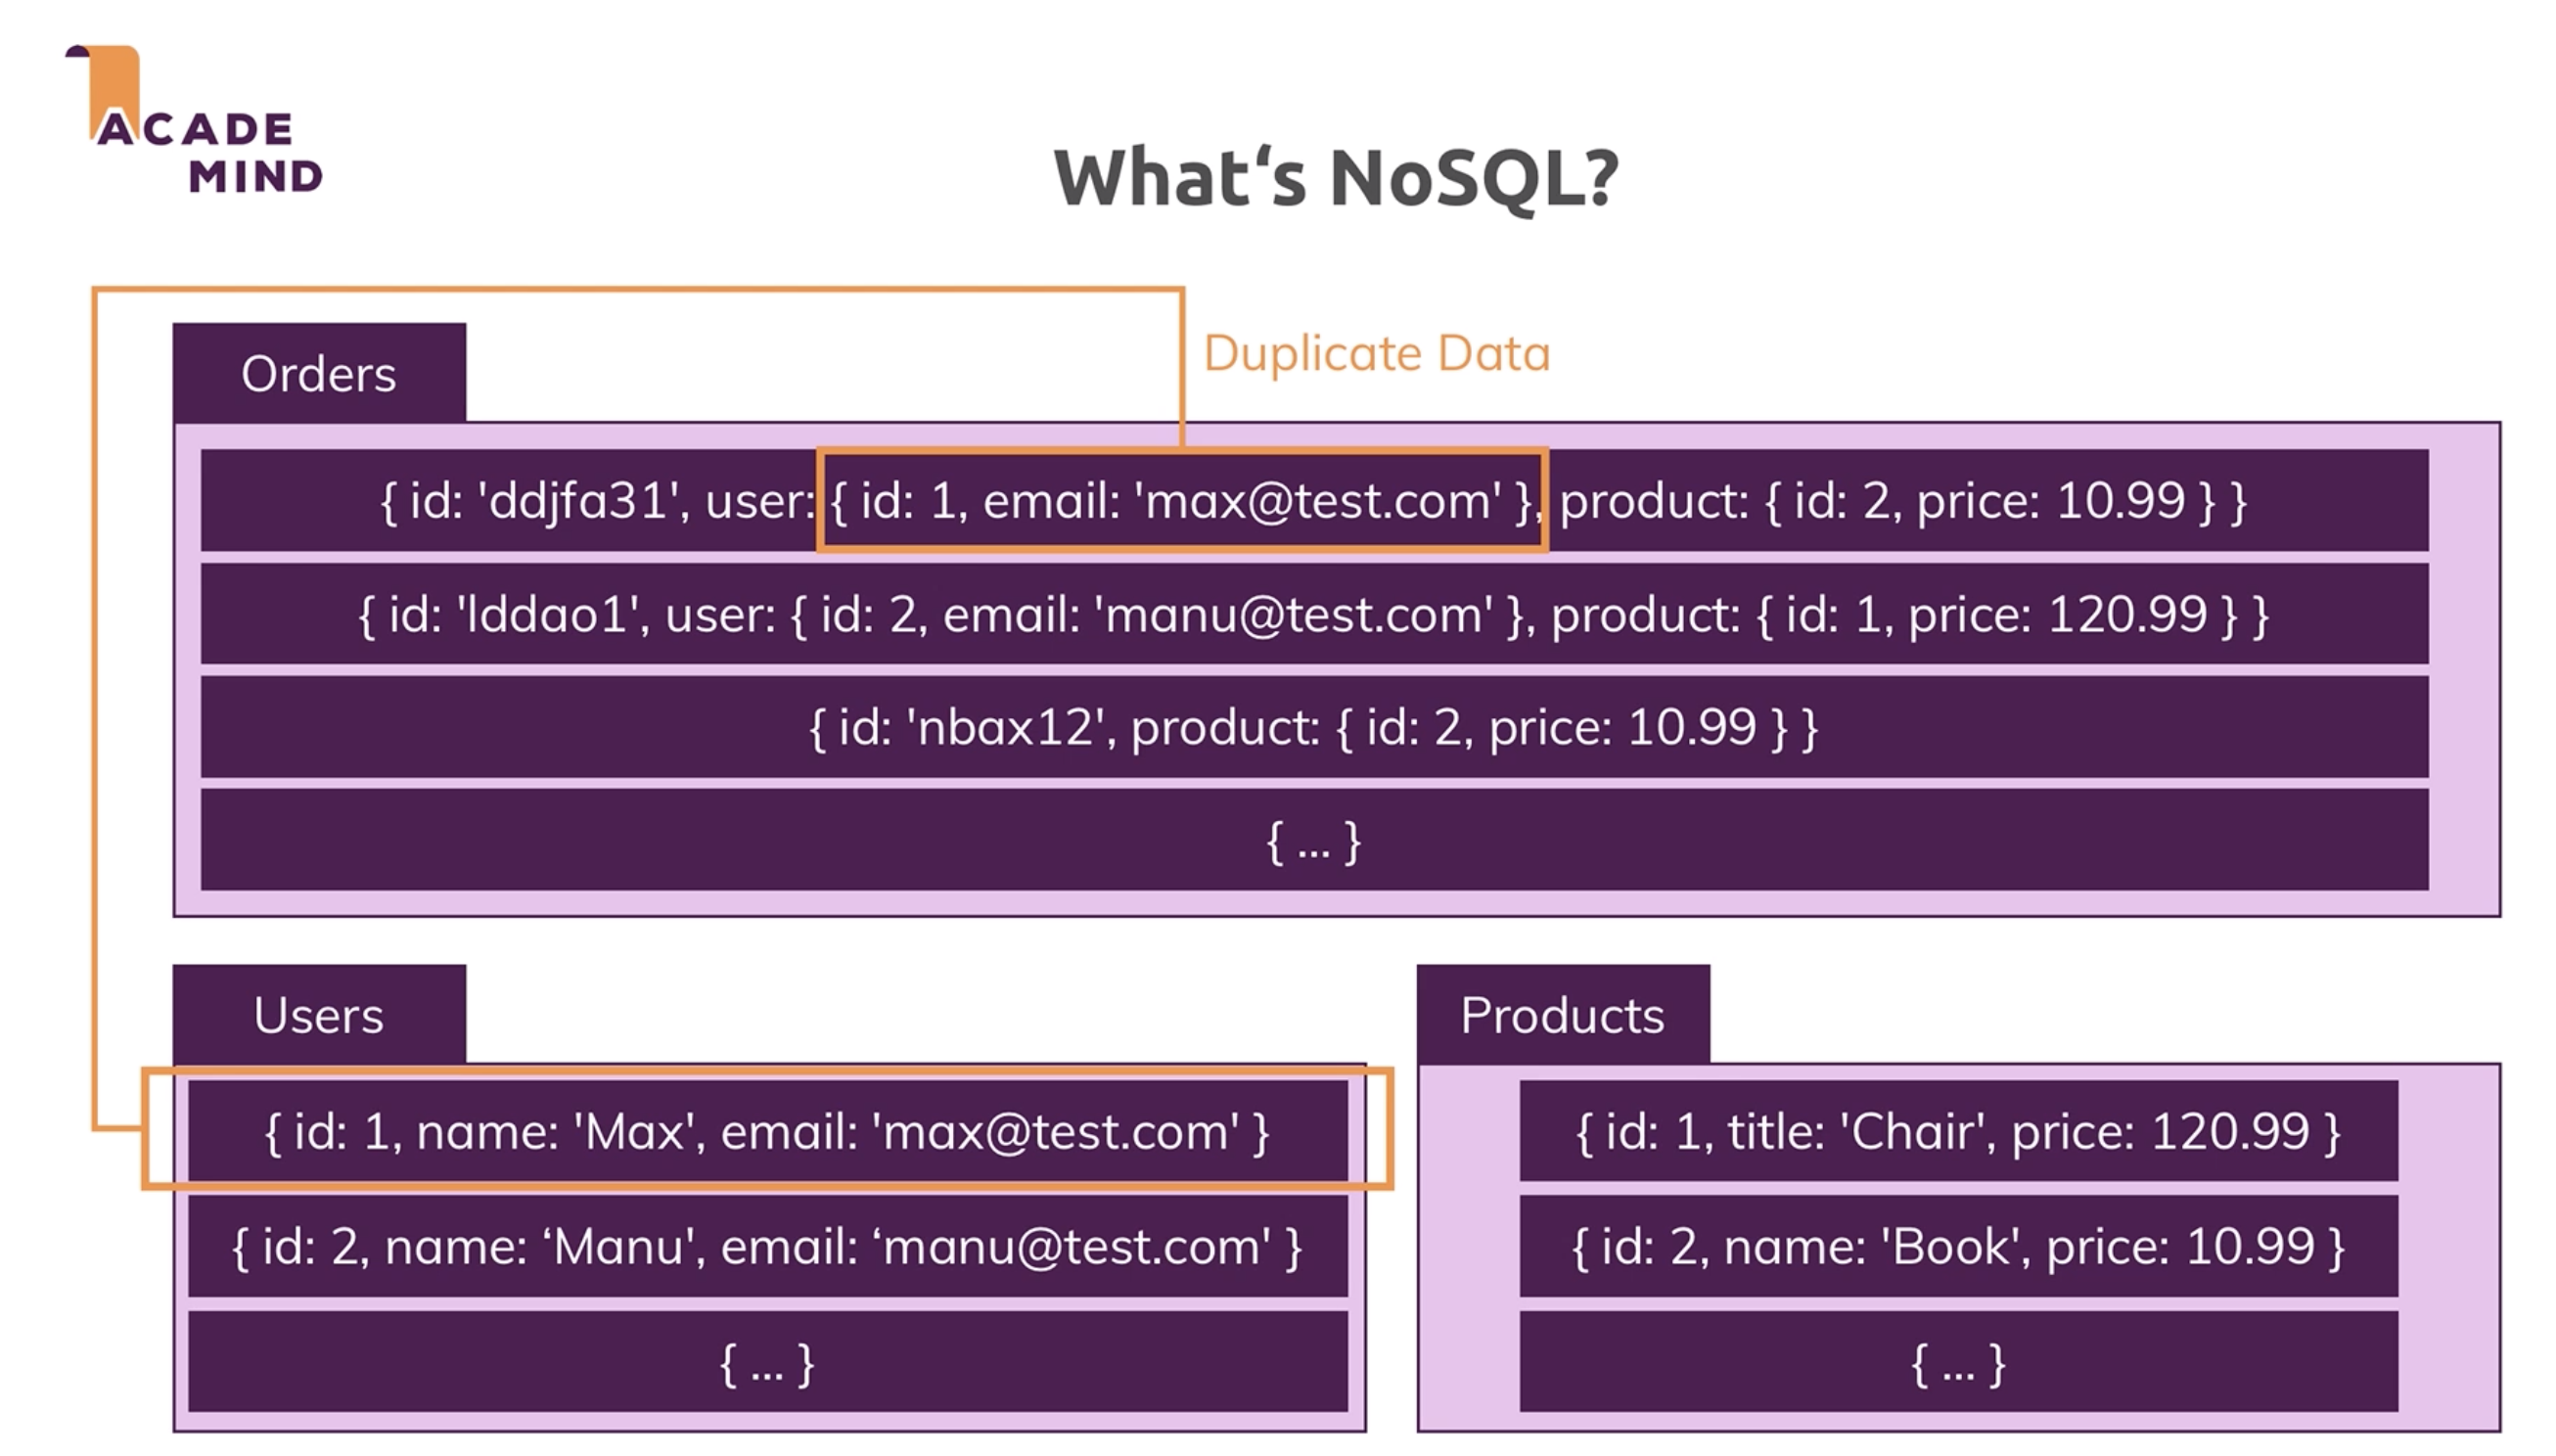
- different terminology
- "tables" are called "collections"
- "records" (rows) are called "documents"
- no consistent schema - if you look at the graphic above, you'll notice that you have don't have the same "column names" for every document. It can, and often does, vary.
- not relational - whereas in SQL, you'll have a "foreign key" that you an use to connect different tables based on a shared characteristic, with NoSql, you simply have duplicate data

ACID is a set of properties that you would like to apply when modifying a database.
Atomicity
Consistency
Isolation
Durability
A transaction is a set of related changes which is used to achieve some of the ACID properties. Transactions are tools to achieve the ACID properties.
Atomicity means that you can guarantee that all of a transaction happens, or none of it does; you can do complex operations as one single unit, all or nothing, and a crash, power failure, error, or anything else won't allow you to be in a state in which only some of the related changes have happened.
Consistency means that you guarantee that your data will be consistent; none of the constraints you have on related data will ever be violated.
Isolation means that one transaction cannot read data from another transaction that is not yet completed. If two transactions are executing concurrently, each one will see the world as if they were executing sequentially, and if one needs to read data that is written by another, it will have to wait until the other is finished.
Durability means that once a transaction is complete, it is guaranteed that all of the changes have been recorded to a durable medium (such as a hard disk), and the fact that the transaction has been completed is likewise recorded.
So, transactions are a mechanism for guaranteeing these properties; they are a way of grouping related actions together such that as a whole, a group of operations can be atomic, produce consistent results, be isolated from other operations, and be durably recorded.
If you could take all of that and boil it down to one sentence it would be "all or nothing." Your query is going to work completely for fail entirely.
NoSql tends to be a little more flexible because you've got duplicate data and the absence of relationships that have to be intact in order for you query to succeed.
2) Scalability (back to top...)
In addition, you have the issue of scalability.
An table in an open source SQL database can handle (roughly) one million rows. An enterprise level SQL server can handle (roughly) fifty million rows. A NoSql database can handle hundreds of millions of rows and the reason for that is scalability.
"Scalability" is the process by which your server is expanded to handle more traffic / data. Imagine a truck hauling a trailer. As that trailer gets bigger and heavier, with SQL server, you're going to make your engine bigger. With NoSql, you're going to add another truck.
Here's a "graphic" summary of the differences:
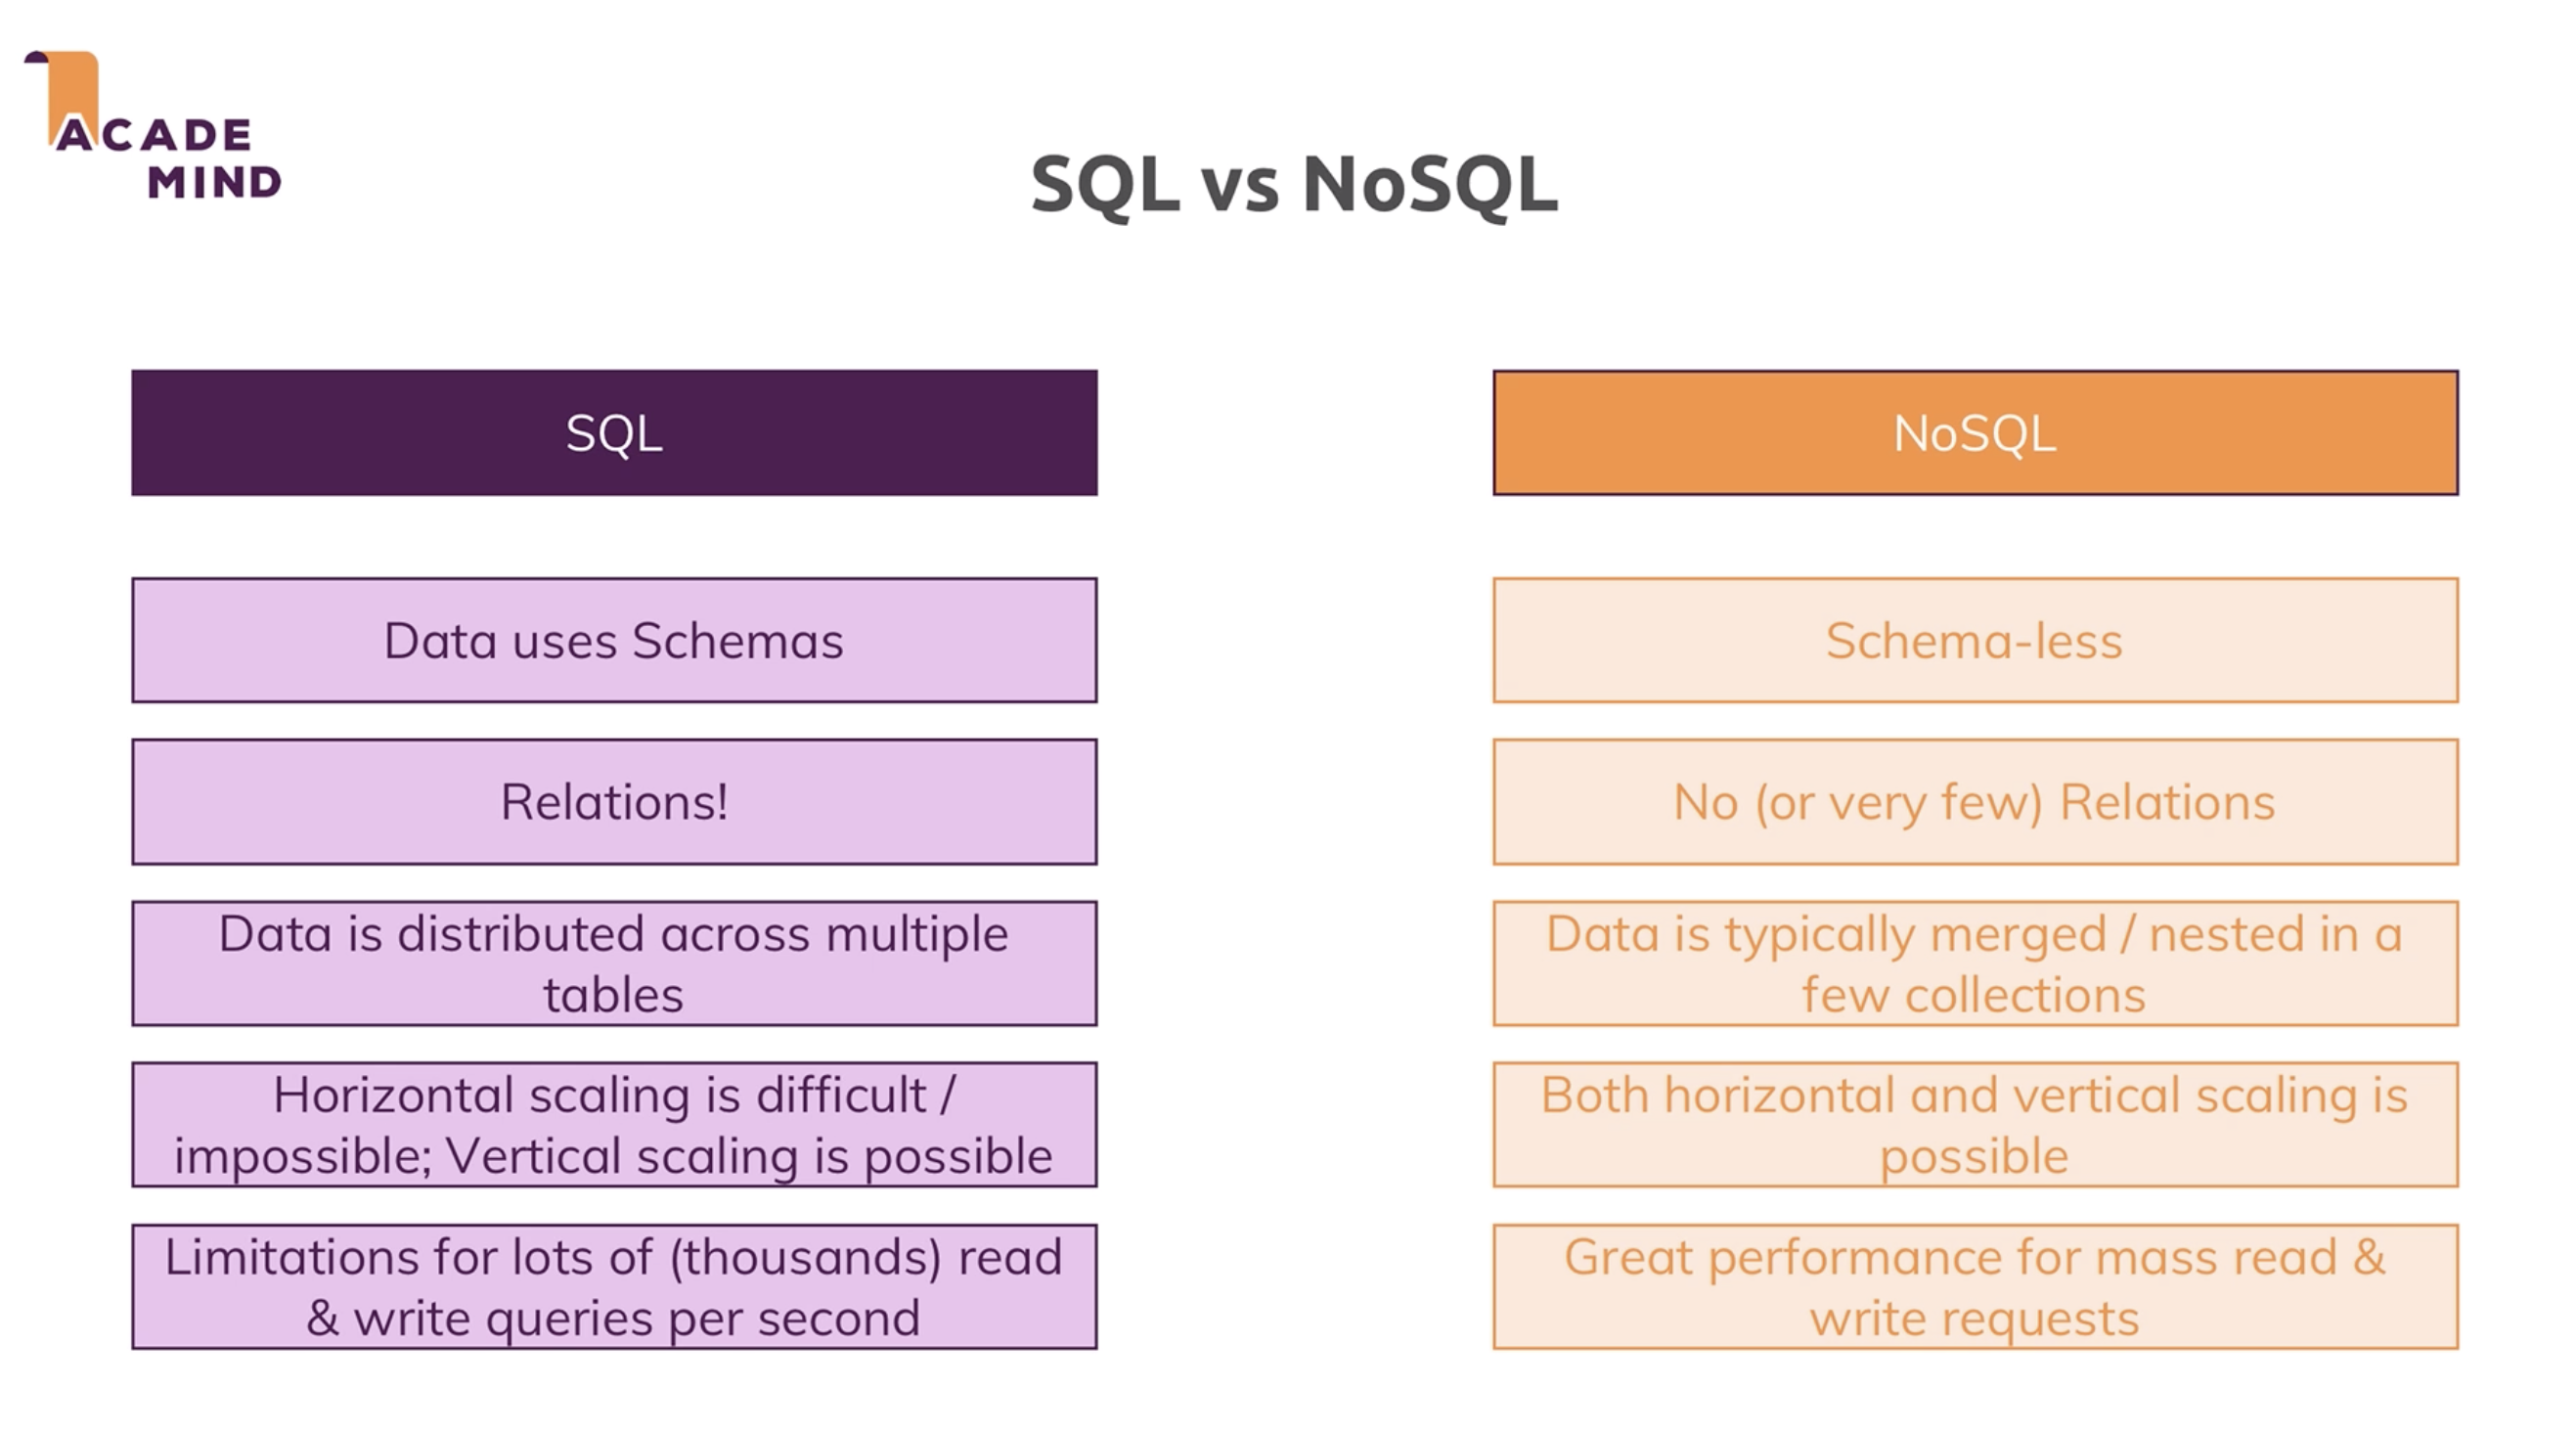
npm install --save mysql2
Now your app can use and understand a MySql paradigm!
1) MySql Workbench Notes (back to top...)
Downloading MySql Workbench is pretty intuitive.- you don't need an account. When you get to that place that asks you to either login or set up an account, just click on the link that says, "No thanks, just start my download.
- you'll want the "custom" installation where you can select just the server and the workbench. Should you go with some of the other options, you'll inevitably get a version that's designed to work in conjuction with Visual Studio and that can be a problem if you don't have the correct version of VS. Just go with the server and the workbench
❶ const mysql = require("mysql2");
❷ const pool = mysql.createPool({
host: "localhost",
user: "root",
database: "node-complete",
password: ""
});
❸ module.exports = pool.promise();
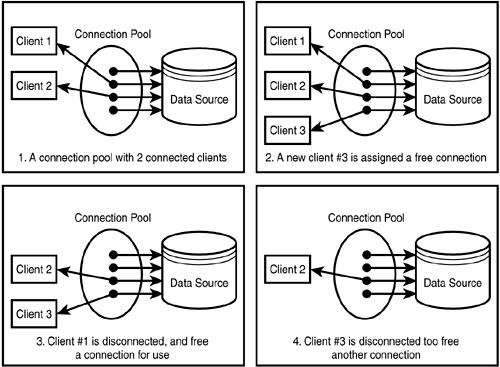
1
2
3

[ BinaryRow {
id: 1,
title: 'Muscular Christianity',
price: 10.99,
description: 'A great book!',
imageUrl:
'http://muscularchristianityonline.com/forum/wp-content/uploads/2017/04/book_display.jpg' } ]
[ { catalog: 'def',
schema: 'node-complete',
name: 'id',
orgName: 'id',
table: 'products',
orgTable: 'products',
characterSet: 63,
columnLength: 10,
columnType: 3,
flags: 16935,
decimals: 0 },
{ catalog: 'def',
schema: 'node-complete',
name: 'title',
orgName: 'title',
table: 'products',
orgTable: 'products',
characterSet: 224,
columnLength: 1020,
columnType: 253,
flags: 4097,
decimals: 0 },
{ catalog: 'def',
schema: 'node-complete',
name: 'price',
orgName: 'price',
table: 'products',
orgTable: 'products',
characterSet: 63,
columnLength: 22,
columnType: 5,
fl flags: 4097,
decimals: 31 },
{ catalog: 'def',
schema: 'node-complete',
name: 'description',
orgName: 'description',
table: 'products',
orgTable: 'products',
characterSet: 224,
columnLength: 262140,
columnType: 252,
flags: 4113,
decimals: 0 },
{ catalog: 'def',
schema: 'node-complete',
name: 'imageUrl',
orgName: 'imageUrl',
table: 'products',
orgTable: 'products',
characterSet: 224,
columnLength: 1020,
columnType: 253,
flags: 4097,
decimals: 0 } ]


npm install --save sequelize
BTW: MySql needs to be installed. In this case, we've already done that, but note to self!
Sequelize is going to do a lot of what we did with our initial MySql connection setup, but it will do it automatically. For example, it will set up the connection pool. Again, it's less code, yet you're writing more syntax.
Here's the code for the connection:
const Sequelize = require('sequelize');
const sequelize = new Sequelize('node-complete', 'root', '', {
dialect: 'mysql',
host: 'localhost'
});
module.exports = sequelize;
C) Defining a Model (back to top...)
We're in our "product.js" model file and we're going to write this:
const Sequelize = require('sequelize');// import Sequelize itself
const sequelize = require('../utility/database'); // establish our connection
const Product = sequelize.define('product', {
id: {
type: Sequelize.INTEGER,
autoIncrement: true,
allowNull: false,
primaryKey: true
},
title: Sequelize.STRING,
price: {
type:Sequelize.DOUBLE,
allowNull: false
},
imageUrl: {
type: Sequelize.STRING,
allowNull: false
},
description: {
type: Sequelize.STRING,
allowNull: false
}
});
module.exports = Product;
Executing (default): CREATE TABLE IF NOT EXISTS `products` (`id` INTEGER NOT NULL , `title` VARCHAR(255), `price` DOUBLE PRECISION NOT NULL, `imageUrl` VARCHAR(255) NOT NULL, `description` VARCHAR(255) NOT NULL, `createdAt` DATETIME NOT NULL, `updatedAt` DATETIME NOT NULL, PRIMARY KEY (`id`)) ENGINE=InnoDB;
Notice the additional columns: "createdAt" and "updatedAt" that we get by default. Pretty cool...
D) Creating and Inserting a Product (back to top...)
On our "admin.js" file, here's the "before" and "after" code for adding a product given the fact that we're not using Sequelize as opposed to straight MySql.
products.js (MySql)
- exports.postAddProduct = (req, res, next) => {
- const title = req.body.title;
- const description = req.body.description;
- const imageUrl = req.body.imageUrl;
- const price = req.body.price;
- const product = new Product(null, title, imageUrl, description, price);
- product
- .save()
- .then(() => {
- res.redirect("/");
- })
- .catch(err => console.log(err));
- };
products.js (model [storing data in products.json])
- exports.postAddProduct = (req, res, next) => {
- const title = req.body.title;
- const description = req.body.description;
- const imageUrl = req.body.imageUrl;
- const price = req.body.price;
- Product.create({
- title: title,
- price: price,
- imageUrl: imageUrl,
- description: description
- })
- .then(result => {
- //console.log(result);
- console.log("Created Product!");
- })
- .catch(err => {
- console.log(err);
- });
- };
exports.postEditProduct = (req, res, next) => {
const prodId = req.body.productId;
const updatedTitle = req.body.title;
const updatedImageUrl = req.body.imageUrl;
const updatedDesc = req.body.description;
const updatedPrice = req.body.price;
Product.findByPk(prodId) // find your product
.then(product => { // here's your first "promise"
product.title = updatedTitle;
product.price = updatedPrice;
product.description = updatedDesc;
product.price = updatedPrice;
product.imageUrl = updatedImageUrl;
return product.save(); // rather than attach another "then" to what is, by default a promise because it's a callback, we're going to "return" the result of a successful "then"
})
.then(result => { // this "then" covers both the "findByPk" and the "product.save"
console.log("Updated Product!");
res.redirect("/admin/products"); // put your redirect here as a part of your "then" dynamic so it reflects the changes made
})
.catch(err => {
console.log(err);
});
};
exports.postDeleteProduct = (req, res, next) => {
const prodId = req.body.productId;
Product.findByPk(prodId)
.then(product => {
return product.destroy();
})
.then(result => {
console.log("product is deleted");
res.redirect("/admin/products");
})
.catch(err => {
console.log(err);
});
};
const path = require("path");
const express = require("express");
const bodyParser = require("body-parser");
const app = express();
app.set("view engine", "ejs");
app.set("views", "views");
const adminData = require("./routes/admin");
const shopRoutes = require("./routes/shop");
const errorController = require("./controllers/error");
const sequelize = require("./utility/database");
❶ const Product = require("./models/product");
const User = require("./models/user");
app.use(bodyParser.urlencoded());
app.use(express.static(path.join(__dirname, "public")));
app.use("/admin", adminData.routes);
app.use(shopRoutes);
app.use(errorController.get404);
❷ Product.belongsTo(User, { constraints: true, onDelete: "CASCADE" });
User.hasMany(Product);
sequelize
❸ .sync({ force: true })
.then(result => {
//console.listen(3000);
})
.catch(err => {
console.log(err);
});
app.listen(3000);
1
2
3
const fs = require("fs");
const path = require("path");
const p = path.join(
path.dirname(process.mainModule.filename),
"data",
"cart.json"
);
module.exports = class Cart {
static addProduct(id, productPrice) {
//fetch the previous cart
fs.readFile(p, (err, fileContent) => {
let cart = { products: [], totalPrice: 0 };
if (!err) {
cart = JSON.parse(fileContent);
}
//analyze the cart => find existing product
const existingProductIndex = cart.products.findIndex(
prod => prod.id === id
);
const existingProduct = cart.products[existingProductIndex];
let updatedProduct;
//add new product / increase quantity
if (existingProduct) {
updatedProduct = { ...existingProduct };
updatedProduct.qty = updatedProduct.qty + 1;
cart.products = [...cart.products];
cart.products[existingProductIndex] = updatedProduct;
} else {
updatedProduct = { id: id, qty: 1 };
cart.products = [...cart.products, updatedProduct];
}
cart.totalPrice = cart.totalPrice + +productPrice;
fs.writeFile(p, JSON.stringify(cart), err => {
console.log(err);
});
});
}
static deleteProduct(id) {
fs.readFile(p, (err, fileContent) => {
if (err) {
return;
}
const updatedCart = { ...JSON.parse(fileContent) };
const product = updatedCart.products.find(prod => prod.id === id);
if (!product) {
return;
}
const productQty = product.qty;
updatedCart.products = updatedCart.products.filter(
prod => prod.id !== id
);
updatedCart.totalPrice =
updatedCart.totalPrice - product.price * productQty;
fs.writeFile(p, JSON.stringify(updatedCart), err => {
console.log(err);
});
});
}
static getCart(cb) {
fs.readFile(p, (err, fileContent) => {
const cart = JSON.parse(fileContent);
if (err) {
cb(null);
} else {
cb(cart);
}
});
}
};
const path = require("path");
const express = require("express");
const bodyParser = require("body-parser");
const app = express();
app.set("view engine", "ejs");
app.set("views", "views");
const adminData = require("./routes/admin");
const shopRoutes = require("./routes/shop");
const errorController = require("./controllers/error");
const sequelize = require("./utility/database");
const Product = require("./models/product");
❶ const User = require("./models/user");
const Cart = require("./models/cart");
const CartItem = require("./models/cart-item");
app.use(bodyParser.urlencoded());
app.use(express.static(path.join(__dirname, "public")));
app.use((req, res, next) => {
User.findByPk(1)
.then(user => {
req.user = user;
next();
})
.catch(err => {
console.log(err);
});
});
app.use("/admin", adminData.routes);
app.use(shopRoutes);
app.use(errorController.get404);
Product.belongsTo(User, { constraints: true, onDelete: "CASCADE" });
User.hasMany(Product);
❷ User.hasOne(Cart);
Cart.belongsTo(User);
Cart.belongsToMany(Product, { through: CartItem });
Product.belongsToMany(Cart, { through: CartItem });
sequelize
.sync({ force: true })
//.sync()
.then(result => {
return User.findByPk(1);
//console.listen(3000);
})
.then(user => {
if (!user) {
User.create({ name: "Bruce", email: "bruce@brucegust.com" });
}
return user;
})
.then(user => {
console.log(user);
app.listen(3000);
})
.catch(err => {
console.log(err);
});
A single product can show up in multiple carts and a single cart can have multiple products. To link these two tables together, you establish a "through" dynamic that identifies the model that holds data from both tables and, in so doing, links them together. In this instance, that table is the "cartitems" table which is the "CartItem" model.
What you're doing her is adding a couple new tables and defining the relationship between them.
1
2
sequelize
//.sync({ force: true })
.sync()
.then(result => {
return User.findByPk(1);
//console.listen(3000);
})
.then(user => {
if (!user) {
return User.create({ name: "Bruce", email: "bruce@brucegust.com" });
}
return user;
})
.then(user => {
//console.log(user);
return user.createCart();
})
.then(cart => {
app.listen(3000);
})
.catch(err => {
console.log(err);
})
exports.getCart = (req, res, next) => { // this first "getCart" piece of the code is what your router is looking for. It's not a "sequelize" syntax
❶ req.user.getCart().then(cart => {
return cart
❷ .getProducts()
.then(products => {
res.render("shop/cart", {
path: "/cart",
pageTitle: "Your Cart",
products: products
});
})
.catch(err => console.log(err));
});
1
2
exports.postCart = (req, res, next) => {
const prodId = req.body.productId;
❶ let fetchedCart;
req.user
.getCart()
.then(cart => {
❷ fetchedCart = cart;
❸ return cart.getProducts({ where: { id: prodId } });
})
❹ .then(products => {
let product;
if (products.length > 0) {
❺ product = products[0];
}
let newQuantity = 1;
if (product) {
//...
}
❻ return Product.findByPk(prodId)
❼ .then(product => {
❽ return fetchedCart.addProduct(product, {
❾ through: { quantity: newQuantity }
});
})
.catch(err => console.log(err));
})
.then(() => {
res.redirect('/cart');
});
};
1
2
3
4
5
6
7
8
9
<%- include('../includes/head.ejs') %>
</head>
<body>
<%- include('../includes/navigation.ejs') %>
<main>
<% if(products.length >0) { %>
<ul>
<% products.forEach(p => { %>
<li>
<p></p><%=p.productData.title %> (<%=p.qty%>)</p>
<form action="/cart-delete-item" method="Post">
<input type="hidden" name="productId" value="<%=p.productData.id %>">
<button class="btn" type="submit">Delete</button>
</form>
</li>
<% }) %>
</ul>
<% } else { %>
<h1>No Products in Cart!</h1>
<% } %>
</main>
<%- include('../includes/end.ejs') %>
exports.postCart = (req, res, next) => {
const prodId = req.body.productId;
let fetchedCart;
let newQuantity = 1;
req.user
.getCart()
.then(cart => {
fetchedCart = cart;
❶ return cart.getProducts({ where: { id: prodId } }); // right here is where we're doing a SELECT between the "cart" and the "products" table. And remember the relationship or the, "through" dynamic which means that the table "cartitems" is included by default.
})
❷ .then(stuff => {
let product;
❸ if (stuff.length > 0) {
product = stuff[0];
}
❹ if (product) {
const oldQuantity = product.cartItem.quantity;
newQuantity = oldQuantity+1;
return product;
}
❺ return Product.findByPk(prodId);
})
❻ .then(product => {
return fetchedCart.addProduct(product, {
through: { quantity: newQuantity }
});
})
.then(() => {
res.redirect("/cart");
});
};
1

2
3
4
ORM stands for Object Relational Mapping and refers to the relationships between tables.
5
6
exports.postCartDeleteProduct = (req, res, next) => {
❶ const prodId = req.body.productId;
❷ req.user
.getCart()
.then(cart => {
❸ return cart.getProducts({ where: { id: prodId } });
})
.then(products => {
const product = products[0];
return product.cartItem.destroy();
})
.then(result => {
res.redirect("/cart");
})
.catch(err => console.log(err));
};
1
2
3
4
const Sequelize = require("sequelize");
const sequelize = require("../utility/database");
const Order = sequelize.define("order", {
id: {
type: Sequelize.INTEGER,
autoIncrement: true,
allowNull: false,
primaryKey: true
}
});
module.exports = Order;
const Sequelize = require("sequelize");
const sequelize = require("../utility/database");
const OrderItem = sequelize.define("orderItem", {
id: {
type: Sequelize.INTEGER,
autoIncrement: true,
allowNull: false,
primaryKey: true
},
quantity: Sequelize.INTEGER
});
module.exports = OrderItem;
exports.postOrder = (req, res, next) => {
❶ req.user
.getCart()
.then(cart => {
return cart.getProducts();
})
❷ .then(products => {
return req.user
❸ .createOrder()
.then(order => {
return order.addProducts(
❹ products.map(product => {
❺ product.orderItem = { quantity: product.cartItem.quantity };
return product;
})
);
})
.catch(err => console.log(err));
})
.then(result => {
res.redirect("/orders");
})
.catch(err => console.log(err));
};
1
2
3
4
id: 1,
title: '90 Day Tour of the Bible',
price: 4.5,
imageUrl:
'https://images-na.ssl-images-amazon.com/images/I/51i7RDuPgGL._SX322_BO1,204,203,200_.jpg',
description: ' Bible Study ',
createdAt: 2019-05-02T19:55:55.000Z,
updatedAt: 2019-05-02T19:55:55.000Z,
userId: 1,
cartItem: [cartItem] },
Notice that the "quantity" field then we're needing in the "cart-item" field is referenced as "cart-item" and not the actual quantity value. Because of that we need to do a little calculation for every value in our array. For that, we'll use map - a function we have available to us in JavaScript.
5
C:\wamp\www\adm\node\express_tutorial\node_modules\express\lib\router\route.js:202
throw new Error(msg);
^
Error: Route.get() requires a callback function but got a [object Undefined]
It was referring to a route that didn't have a corresponding Controller. I had deleted a superflous route in the Controller, but left the same route in the router. That will throw an error! Once I delete the route in the route.js file, it was all good!
3) Outputting Orders (back to top...)
exports.getOrders = (req, res, next) => {
req.user
.getOrders({ include: ['products'] })
.then(orders => {
console.log(orders.products);
res.render("shop/orders", {
path: "/orders",
pageTitle: "Your Orders",
orders: orders
});
})
.catch(err => console.log(err));
};
[ order {
dataValues:
{ id: 1,
createdAt: 2019-05-03T15:00:30.000Z,
updatedAt: 2019-05-03T15:00:30.000Z,
userId: 1,
products: [Array] },
_previousDataValues:
{ id: 1,
createdAt: 2019-05-03T15:00:30.000Z,
updatedAt: 2019-05-03T15:00:30.000Z,
userId: 1,
products: [Array] },
_changed: {},
_modelOptions:
{ timestamps: true,
validate: {},
freezeTableName: false,
underscored: false,
paranoid: false,
rejectOnEmpty: false,
whereCollection: [Object],
schema: null,
schemaDelimiter: '',
defaultScope: {},
scopes: {},
indexes: [],
name: [Object],
omitNull: false,
sequelize: [Sequelize],
hooks: {} },
_options:
{ isNewRecord: false,
_schema: null,
_schemaDelimiter: '',
include: [Array],
includeNames: [Array],
includeMap: [Object],
includeValidated: true,
attributes: [Array],
raw: true },
isNewRecord: false,
products: [ [product] ] } ]
Sometimes you have two entities and there's a relationship between them. For example, you might have an entity called University and another entity called Student.
The University entity might have some basic properties such as id, name, address, etc. as well as a property called students:
public class University {
private String id;
private String name;
private String address;
private List<Student> students;
// setters and getters
}
Now when you load a University from the database, JPA loads its id, name, and address fields for you. But you have two options for students: to load it together with the rest of the fields (i.e. eagerly) or to load it on-demand (i.e. lazily) when you call the university's getStudents() method.
When a university has many students it is not efficient to load all of its students with it when they are not needed. So in suchlike cases, you can declare that you want students to be loaded when they are actually needed. This is called lazy loading.
In this case, "eager loading" is going to be looping through every "products" array that occurs. And that's what you have with "orders.ejs:"
<main>
<% if(orders.length <= 0) { %>
<h1>Nothing there!</h1>
<% } else { %>
<ul>
<% orders.forEach(order => { %>
<li>
<h1># <%= order.id %></h1>
<ul>
<% order.products.forEach(product => { %>
<li><%= product.title %> (<%= product.orderItem.quantity %>)</li>
<% }); %>
</ul>
</li>
<% }); %>
</ul>
<% } %>
</main>
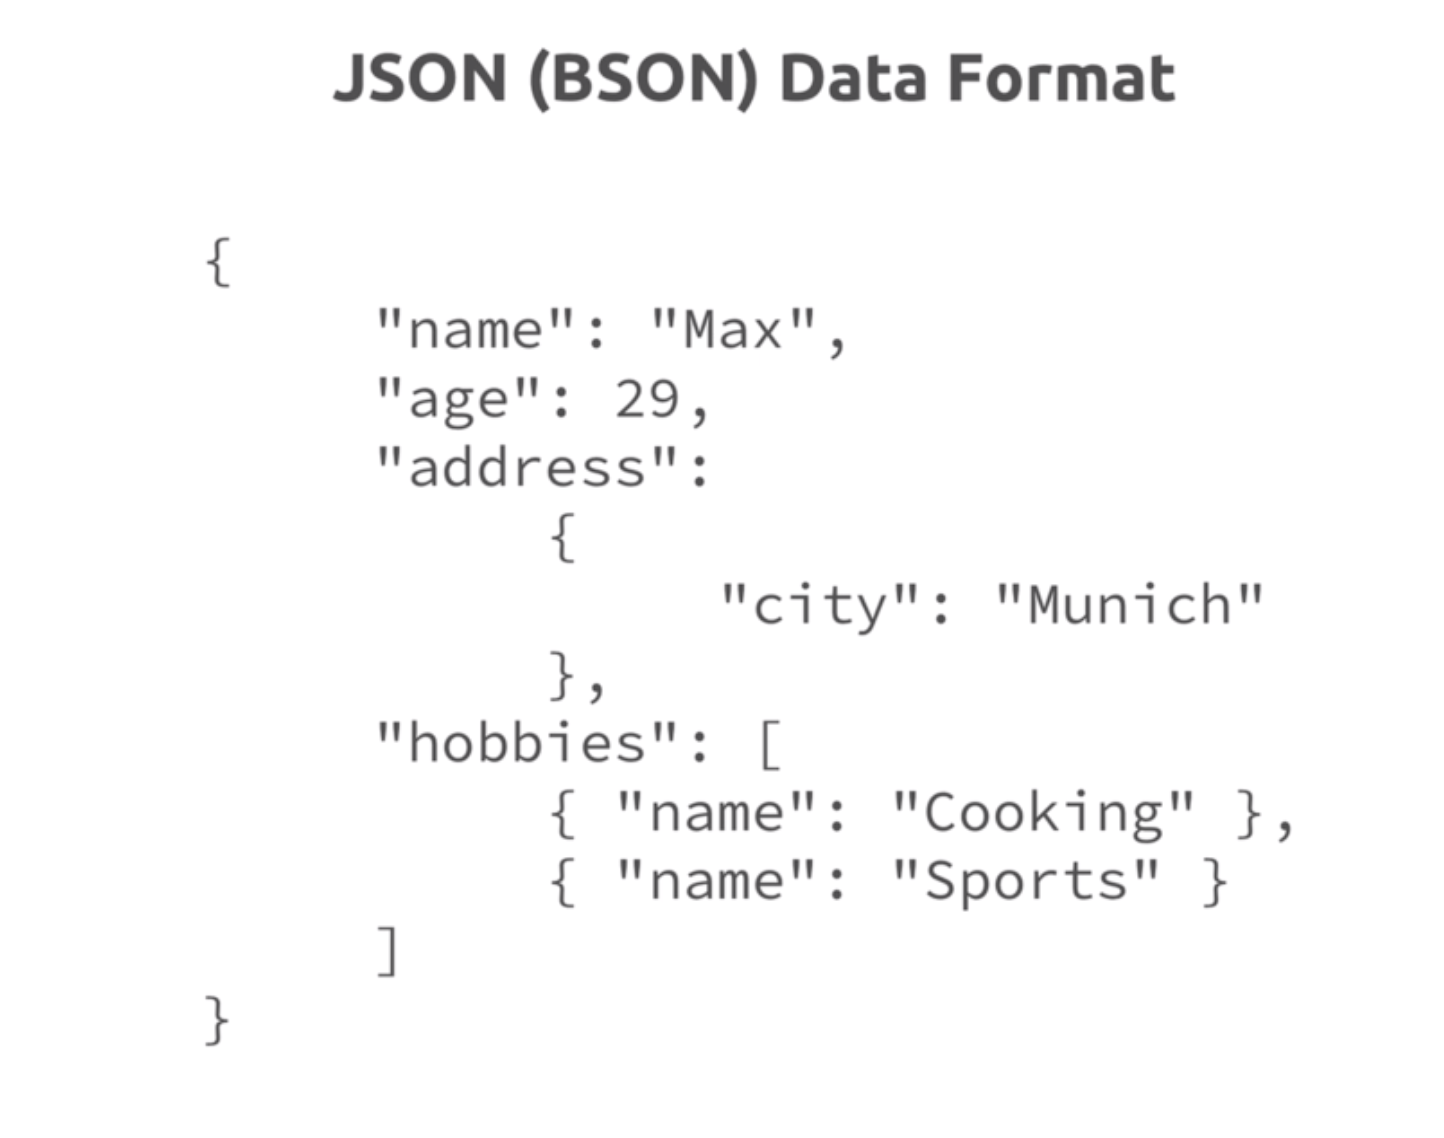
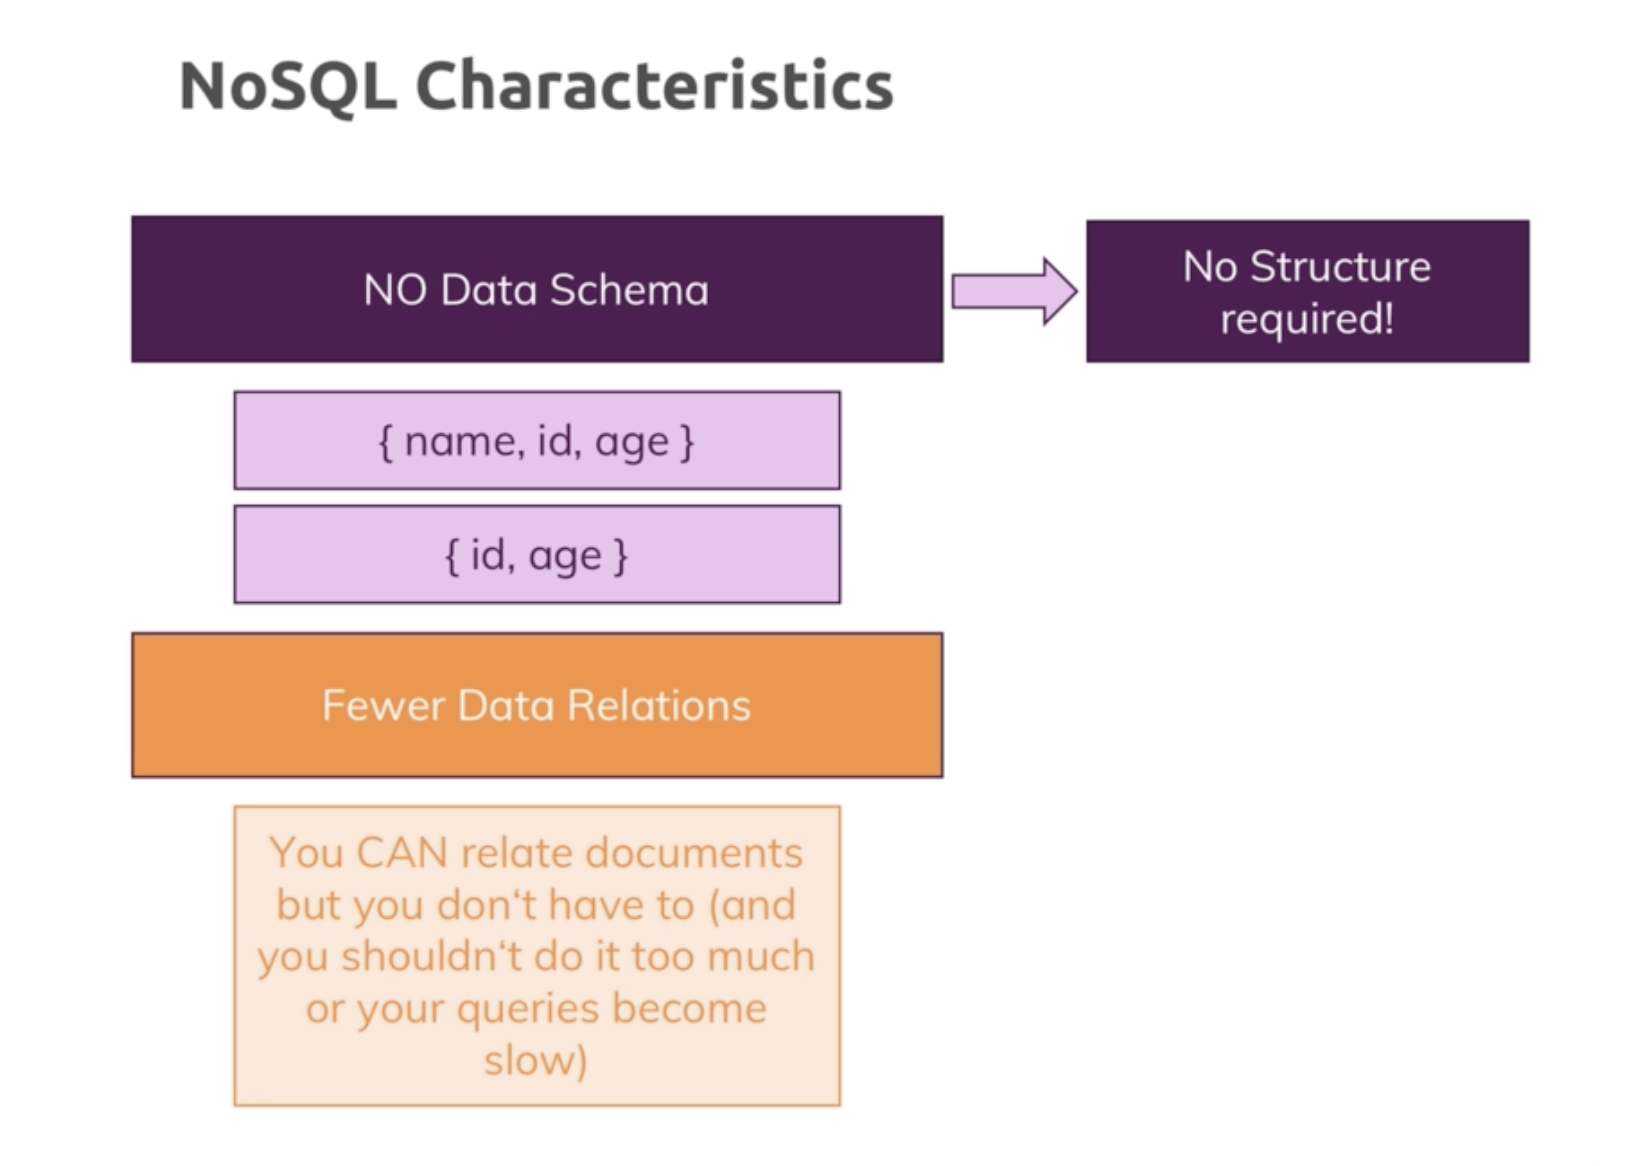
Mongo Callback
- sign up for a free account
- sign up for a free "Atlas" database
- add a user that can read and write to the database. You won't sign up for a database administrator, you'll just want to read and write to your tables
- add an IP address, make it your local IP address since you're just working on a local application
- once it's finished setting up, now you'll install your driver
❶ const mongodb = require("mongodb");
❷ const MongoClient = mongodb.MongoClient;
❸ const mongoConnect = callback => {
MongoClient.connect(
❹ "mongodb+srv://brucegust:Mu5cular!@brucegust-qhxnz.mongodb.net/test?retryWrites=true"
)
.then(client => {
console.log("Connected");
callback(client);
})
.catch(err => {
console.log(err);
});
};
module.exports = mongoConnect;
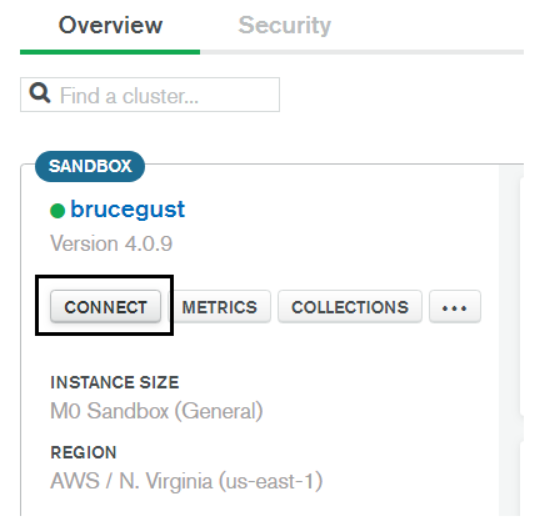
1
2
3
4
Be aware that your "IP Whitelist" is crucial in that if you're working on your site from various locations, your IP address will change and that will affect your connectivity. Also, avoid special characters in your password as those will be processed as HTML entities.
i) Connection Pool (back to top...)
We're going to alter things a bit in order to accommodate something called the "Connection Pool." You've seen this before with MySql and Sequelize.
Here's the altered "database.js" code:
const mongodb = require("mongodb");
const MongoClient = mongodb.MongoClient;
❶ let _db;
const mongoConnect = callback => {
MongoClient.connect(
"mongodb+srv://brucegust:Mu5cular!@brucegust-qhxnz.mongodb.net/shop?retryWrites=true"
)
.then(client => {
console.log("Connected");
❷ _db = client.db()
❸ callback();
})
.catch(err => {
console.log(err);
❹ throw.err;
});
};
❺ const getDb = () => {
if (_db) {
return _db;
}
❻ throw 'No database found';
};
module.exports = mongoConnect;
❼ exports.getDb = getDb;
//this is from your app.js file...
mongoConnect(() => {
app.listen(3000);
});
1
2
3
Error Messages
4
5
6
7
const getDb = require("../utility/database").getDb;
class Product {
constructor(title, price, description, imageUrl) {
this.title = title;
this.price = price;
this.description = description;
this.imageUrl = imageUrl;
}
save() {
const db = getDb(); //grab your connection
return db
.collection("products") //choose / establish your collection
.insertOne(this)
.then(result => {
console.log(result);
})
.catch(err => {
console.log(err);
});
}
}
module.exports = Product;
const Product = require("../models/product");
exports.getAddProduct = (req, res, next) => {
console.log("here");
res.render("admin/edit-product", {
pageTitle: "Add Product",
path: "/admin/add-product",
editing: false
});
};
exports.postAddProduct = (req, res, next) => {
❶ const title = req.body.title;
const price = req.body.price;
const description = req.body.description;
const imageUrl = req.body.imageUrl;
const product = new Product(title, price, description, imageUrl);
product
❷ .save()
.then(result => {
console.log("Created Product!");
res.redirect("/admin/products");
})
.catch(err => {
console.log(err);
});
};
1
CRUD stands for "Create, Read, Update and Delete
To read all of the documentation / options where interacting with a Mongo Database is concerned, click here.
2
CommandResult {
result:
{ n: 1,
opTime: { ts: [Timestamp], t: 1 },
electionId: 7fffffff0000000000000001,
ok: 1,
operationTime:
Timestamp { _bsontype: 'Timestamp', low_: 2, high_: 1557235827 },
'$clusterTime': { clusterTime: [Timestamp], signature: [Object] } },
connection:
Connection {
_events:
{ error: [Function],
close: [Function],
timeout: [Function],
parseError: [Function],
message: [Function] },
_eventsCount: 5,
_maxListeners: undefined,
id: 1,
options:
{ host: 'brucegust-shard-00-00-qhxnz.mongodb.net',
port: 27017,
size: 5,
minSize: 0,
connectionTimeout: 30000,
socketTimeout: 360000,
keepAlive: true,
keepAliveInitialDelay: 300000,
noDelay: true,
ssl: true,
checkServerIdentity: true,
ca: null,
crl: null,
cert: null,
key: null,
passPhrase: null,
rejectUnauthorized: false,
promoteLongs: true,
promoteValues: true,
promoteBuffers: false,
reconnect: false,
reconnectInterval: 1000,
reconnectTries: 30,
domainsEnabled: false,
disconnectHandler: [Store],
cursorFactory: [Function],
emitError: true,
monitorCommands: false,
socketOptions: {},
setName: 'brucegust-shard-0',
promiseLibrary: [Function: Promise],
clientInfo: [Object],
user: 'brucegust',
password: 'M1ch3ll3',
read_preference_tags: null,
retryWrites: true,
authSource: 'admin',
readPreference: [ReadPreference],
rs_name: 'brucegust-shard-0',
dbName: 'test',
servers: [Array],
auth: [Object],
server_options: [Object],
db_options: [Object],
rs_options: [Object],
mongos_options: [Object],
socketTimeoutMS: 360000,
connectTimeoutMS: 30000,
credentials: [MongoCredentials],
monitoring: false,
parent: [ReplSet],
bson: BSON {} },
logger: Logger { className: 'Connection' },
bson: BSON {},
tag: undefined,
maxBsonMessageSize: 67108864,
port: 27017,
host: 'brucegust-shard-00-00-qhxnz.mongodb.net',
socketTimeout: 360000,
keepAlive: true,
keepAliveInitialDelay: 300000,
connectionTimeout: 30000,
responseOptions:
{ promoteLongs: true,
promoteValues: true,
promoteBuffers: false },
flushing: false,
queue: [],
writeStream: null,
destroyed: false,
hashedName: '586bf2335ac81ff4bbeea3baa7d6c991338ee2cf',
workItems: [],
socket:
TLSSocket {
_tlsOptions: [Object],
_secureEstablished: true,
_securePending: false,
_newSessionPending: false,
_controlReleased: true,
_SNICallback: null,
servername: 'brucegust-shard-00-00-qhxnz.mongodb.net',
alpnProtocol: false,
authorized: true,
authorizationError: null,
encrypted: true,
_events: [Object],
_eventsCount: 6,
connecting: false,
_hadError: false,
_handle: [TLSWrap],
_parent: null,
_host: 'brucegust-shard-00-00-qhxnz.mongodb.net',
_readableState: [ReadableState],
readable: true,
_maxListeners: undefined,
_writableState: [WritableState],
writable: true,
allowHalfOpen: false,
_sockname: null,
_pendingData: null,
_pendingEncoding: '',
server: undefined,
_server: null,
ssl: [TLSWrap],
_requestCert: true,
_rejectUnauthorized: false,
timeout: 360000,
[Symbol(res)]: [TLSWrap],
[Symbol(asyncId)]: 35,
[Symbol(lastWriteQueueSize)]: 0,
[Symbol(timeout)]:
Timeout {
_called: false,
_idleTimeout: 360000,
_idlePrev: [TimersList],
_idleNext: [Timeout],
_idleStart: 28184,
_onTimeout: [Function: bound ],
_timerArgs: undefined,
_repeat: null,
_destroyed: false,
[Symbol(unrefed)]: true,
[Symbol(asyncId)]: 176,
[Symbol(triggerId)]: 35 },
[Symbol(kBytesRead)]: 0,
[Symbol(kBytesWritten)]: 0,
[Symbol(connect-options)]: [Object],
[Symbol(disable-renegotiation)]: true },
buffer: null,
sizeOfMessage: 0,
bytesRead: 0,
stubBuffer: null,
ismaster:
{ hosts: [Array],
setName: 'brucegust-shard-0',
setVersion: 1,
ismaster: true,
secondary: false,
primary: 'brucegust-shard-00-00-qhxnz.mongodb.net:27017',
tags: [Object],
me: 'brucegust-shard-00-00-qhxnz.mongodb.net:27017',
electionId: 7fffffff0000000000000001,
lastWrite: [Object],
maxBsonObjectSize: 16777216,
maxMessageSizeBytes: 48000000,
maxWriteBatchSize: 100000,
localTime: 2019-05-07T13:30:00.578Z,
logicalSessionTimeoutMinutes: 30,
minWireVersion: 0,
maxWireVersion: 7,
readOnly: false,
ok: 1,
operationTime: [Timestamp],
'$clusterTime': [Object] },
lastIsMasterMS: 117 },
message:
BinMsg {
parsed: true,
raw:
<Buffer e6 00 00 00 45 0b 92 01 07 00 00 00 dd 07 00 00 00 00 00 00 00 d1 00 00 00 10 6e 00 01 00 00 00 03 6f 70 54 69 6d 65 00 1c 00 00 00 11 74 73 00 02 00 ... >,
data:
<Buffer 00 00 00 00 00 d1 00 00 00 10 6e 00 01 00 00 00 03 6f 70 54 69 6d 65 00 1c 00 00 00 11 74 73 00 02 00 00 00 73 88 d1 5c 12 74 00 01 00 00 00 00 00 00 ... >,
bson: BSON {},
opts:
{ promoteLongs: true,
promoteValues: true,
promoteBuffers: false },
length: 230,
requestId: 26348357,
responseTo: 7,
opCode: 2013,
fromCompressed: undefined,
responseFlags: 0,
checksumPresent: false,
moreToCome: false,
exhaustAllowed: false,
promoteLongs: true,
promoteValues: true,
promoteBuffers: false,
documents: [ [Object] ],
index: 214,
hashedName: '586bf2335ac81ff4bbeea3baa7d6c991338ee2cf' },
ops:
[ Product {
title: 'Muscular Christianity',
price: '10.00',
description: ' A great resource ',
imageUrl:
'https://images-na.ssl-images-amazon.com/images/I/51jBtyIt5tL._SX331_BO1,204,203,200_.jpg',
_id: 5cd18872df9d142bf4f64653 } ],
insertedCount: 1,
insertedId: 5cd18872df9d142bf4f64653 }
C) Mongo DB Compass (back to top...)
Download Mongo Compass by heading out to https://www.mongodb.com/download-center/compass?jmp=hero
 Once the installer has finished downloading, you'll find the actual ".exe" file in the "C:\Program Files (x86)\MongoDB Compass Installer" directory.
Once you've got the app open, you'll now need to connect to your database. To do that, you'll go out to the Mongo webpage where you have your Clusters and click on "Connect." At that point, you'll then click on "Connect with MongoDB Compass" (see image to the right). Answer the questions and then click on the link they provide.
If your Compass app is open when you do this, you'll get a prompt that says it "senses" a connnection. Click "yes" and several fields will be populated automatically. Enter your password and then you'll be able to see your database. Click on the "products" collection and you'll see the product you just entered.
Cool!
D) Retrieving Products (back to top...)
1) Model
static fetchAll() {
const db = getDb(); //grab your connection
return db
.collection("products")
.find() // you can add parameters like {title: "A great title"} to qualify your search
.toArray() // reserved for smaller bits of information
.then(products => {
console.log(products);
return products;
})
.catch(err => {
console.log(err);
});
}
...and here's your Controller:
2) Controller
exports.getProducts = (req, res, next) => {
Product.fetchAll() // make sure you're referring to the proper method (fetchAll)
.then(products => {
res.render("shop/product-list", {
prods: products,
pageTitle: "All Products",
path: "/products"
});
})
.catch(err => {
console.log(err);
});
};
Adjust your routes and you're good to go! This works because you didn't change any property names.
E) Fetching a Single Product (back to top...)
1) Cursor (back to top...)
A cursor is a starting point in a database. A regular SELECT is going to retrieve all of your results and throw it in a table. A cursor is going to "point" to your results and wait for the system to ask for them before they make them available for display. Of course, that's a little inefficient so Mongo makes a compromise and offers the first 101 results by default.
In this example, you're going to want to reign in the whole "cursor" dynamic by letting it know you only want one row. We do that with the "next" functionality. All that's going to do is advance the cursor one row and stop. In this case, that's the one and only row that we want. Not that there's any more rows to consider, but that's how you hone in on the one row that's needed in the case of wanting to retrieve a single row.
2) ObjectId (back to top...)
Mongo's Id field (_id) - the "Primary Key," so to speak - is represented by the ObjectId. In order to compare that to other variables, you need to introduce the "mongodb" package that will transform your strings into something that can be "understood."
For example...
In this part of our Controller, we've got this:
.find({ _id: prodId })
This won't work because the "_id" field is part of the "ObjectId" dynamic and won't be processed as a string. Hence, the "prodId," doesn't have a chance of being accurately compared to any value in the database. To solve that malady, we do this:
.find({ _id: new mongodb.ObjectId(prodId) })
Now, we have a winner!
Here's our Model:
3) Model (back to top...)
Once the installer has finished downloading, you'll find the actual ".exe" file in the "C:\Program Files (x86)\MongoDB Compass Installer" directory.
Once you've got the app open, you'll now need to connect to your database. To do that, you'll go out to the Mongo webpage where you have your Clusters and click on "Connect." At that point, you'll then click on "Connect with MongoDB Compass" (see image to the right). Answer the questions and then click on the link they provide.
If your Compass app is open when you do this, you'll get a prompt that says it "senses" a connnection. Click "yes" and several fields will be populated automatically. Enter your password and then you'll be able to see your database. Click on the "products" collection and you'll see the product you just entered.
Cool!
D) Retrieving Products (back to top...)
1) Model
static fetchAll() {
const db = getDb(); //grab your connection
return db
.collection("products")
.find() // you can add parameters like {title: "A great title"} to qualify your search
.toArray() // reserved for smaller bits of information
.then(products => {
console.log(products);
return products;
})
.catch(err => {
console.log(err);
});
}
...and here's your Controller:
2) Controller
exports.getProducts = (req, res, next) => {
Product.fetchAll() // make sure you're referring to the proper method (fetchAll)
.then(products => {
res.render("shop/product-list", {
prods: products,
pageTitle: "All Products",
path: "/products"
});
})
.catch(err => {
console.log(err);
});
};
Adjust your routes and you're good to go! This works because you didn't change any property names.
E) Fetching a Single Product (back to top...)
1) Cursor (back to top...)
A cursor is a starting point in a database. A regular SELECT is going to retrieve all of your results and throw it in a table. A cursor is going to "point" to your results and wait for the system to ask for them before they make them available for display. Of course, that's a little inefficient so Mongo makes a compromise and offers the first 101 results by default.
In this example, you're going to want to reign in the whole "cursor" dynamic by letting it know you only want one row. We do that with the "next" functionality. All that's going to do is advance the cursor one row and stop. In this case, that's the one and only row that we want. Not that there's any more rows to consider, but that's how you hone in on the one row that's needed in the case of wanting to retrieve a single row.
2) ObjectId (back to top...)
Mongo's Id field (_id) - the "Primary Key," so to speak - is represented by the ObjectId. In order to compare that to other variables, you need to introduce the "mongodb" package that will transform your strings into something that can be "understood."
For example...
In this part of our Controller, we've got this:
.find({ _id: prodId })
This won't work because the "_id" field is part of the "ObjectId" dynamic and won't be processed as a string. Hence, the "prodId," doesn't have a chance of being accurately compared to any value in the database. To solve that malady, we do this:
.find({ _id: new mongodb.ObjectId(prodId) })
Now, we have a winner!
Here's our Model:
3) Model (back to top...)
static findById(prodId) {
const db = getDb();
return db
.collection("products")
.find({ _id: new mongodb.ObjectId(prodId) })
.next()
.then(product => {
console.log(product);
return product;
})
.catch(err => {
console.log(err);
});
}
Product.findById(prodId)
.then(product => {
res.render("shop/product-detail", {
product: product,
pageTitle: product.title,
path: "/products"
});
})
.catch(err => console.log(err));
};
exports.getEditProduct = (req, res, next) => {
const editMode = req.query.edit;
if (!editMode) {
return res.redirect("/");
}
const prodId = req.params.productId;
Product.findById(prodId)
.then(product => {
if (!product) {
return res.redirect("/");
}
res.render("admin/edit-product", {
pageTitle: "Edit Product",
path: "/admin/edit-product",
editing: editMode,
product: product
});
})
.catch(err => {
console.log(err);
});
};
exports.postEditProduct = (req, res, next) => {
❶ const prodId = req.body.productId;
const updatedTitle = req.body.title;
const updatedPrice = req.body.price;
const updatedDesc = req.body.description;
const updatedImageUrl = req.body.imageUrl;
const product = new Product(
❷ updatedTitle,
updatedPrice,
updatedDesc,
updatedImageUrl,
❸ prodId
);
product
.save()
.then(result => {
console.log("Updated Product!");
res.redirect("/admin/products");
})
.catch(err => {
console.log(err);
});
res.redirect("/admin/products");
};
1
2
3
❶ const mongodb = require("mongodb");
const getDb = require("../utility/database").getDb;
class Product {
❷ constructor(title, price, description, imageUrl, id) {
this.title = title;
this.price = price;
this.description = description;
this.imageUrl = imageUrl;
❸ this._id = new mongodb.ObjectId(id);
}
save() {
const db = getDb(); //grab your connection
let dbOp;
❹ if (this._id) {
console.log("bring it");
//update the product
dbOp = db
.collection("products")
❺ .updateOne({ _id: this._id }, { $set: this })
} else {
dbOp = db
.collection("products") //choose / establish your collection
.insertOne(this)
.then(result => {
console.log(result);
})
.catch(err => {
console.log(err);
});
}
return dbOp
.then(result => {
console.log(result);
})
.catch(err => {
console.log(err);
});
}
1
2
3
4
5
static deleteById(prodId) {
❶ const db = getDb();
return db
.collection("products")
❷ .deleteOne({ _id: new mongodb.ObjectId(prodId) })
.then(result => {
console.log("deleted!");
})
.catch(err => {
console.log(err);
});
}
1
2
class Product {
constructor(title, price, description, imageUrl, id) {
this.title = title;
this.price = price;
this.description = description;
this.imageUrl = imageUrl;
this._id = id ? new mongodb.ObjectId(id) : null;
this._id=new mongodb.Object(id); //original code
}
save() {
const db = getDb(); //grab your connection
let dbOp;
if (this._id) {
console.log("bring it");
//update the product
dbOp = db
.collection("products")
.updateOne({ _id: this._id }, { $set: this });
} else {
dbOp = db
.collection("products") //choose / establish your collection
.insertOne(this)
.then(result => {
console.log(result);
})
.catch(err => {
console.log(err);
});
}
return dbOp
.then(result => {
console.log(result);
})
.catch(err => {
console.log(err);
});
}
const mongodb = require("mongodb");
const getDb = require("../utility/database").getDb;
const ObjectId = mongodb.ObjectId;
class User {
constructor(username, email) {
this.name = username;
this.email = email;
❶ this._id = id ? new mongodb.ObjectId(id) : null;
}
save() {
const db = getDb();
return db.collection("users").insertOne(this);
}
static findById(userId) {
const db = getDb();
return db
.collection("users")
❷ return db.collection("users").findOne({ _id: new ObjectId(userId) });
}
}
module.exports = User;
1
2
exports.postAddProduct = (req, res, next) => {
const title = req.body.title;
const price = req.body.price;
const description = req.body.description;
const imageUrl = req.body.imageUrl;
const product = new Product(
title,
price,
description,
imageUrl,
null,
req.user._id
);
product
.save()
.then(result => {
console.log("Created Product!");
res.redirect("/admin/products");
})
.catch(err => {
console.log(err);
});
};
addToCart(product) {
❶ const updatedCart = {items: [ {...product, quantity:1 }]};
❷ const db = getDb();
return db
.collection('users')
.updateOne(
{_id: new ObjectId(this._id)},
{ $set: {cart: updatedCart } }
);
}
1
2
{ _id: 5cd4670dd87e8f06e4411b6d,
name: 'Bruce',
email: 'bruce@brucegust.com' }
That's exactly what you should be getting,
However, if you were to pump that data as arguments to our "user" class, you could get more database than just the name and the email address.
So, now we've got this:
app.use((req, res, next) => {
User.findById("5cd4670dd87e8f06e4411b6d")
.then(user => {
//req.user = user;
req.user = new User(user.name, user.email, user.cart, user._id);
/*the reason this is different is because you're invoking the User class which is going to respond with ALL of the info that
it is going to retrieve rather than just the info coming from "findById"*/
console.log(req.user.email);
next();
})
.catch(err => {
console.log(err);
});
});
 This works! Although, when you take a look at the document that's now in our "users" collection, you'll see all of the product data which is somewhat redundant.
To do that, we'll change this:
const updatedCart = { items: [{ ...product, quantity: 1 }] };
...to this:
items: [{ productId: new ObjectId(product._id), quantity: 1 }]
So, instead of bringing the all of the properties belonging to the "product" object to bear, we'll just grab the "_id."
L) Storing Multiple Items in the Cart (back to top...)
Here's our code now:
This works! Although, when you take a look at the document that's now in our "users" collection, you'll see all of the product data which is somewhat redundant.
To do that, we'll change this:
const updatedCart = { items: [{ ...product, quantity: 1 }] };
...to this:
items: [{ productId: new ObjectId(product._id), quantity: 1 }]
So, instead of bringing the all of the properties belonging to the "product" object to bear, we'll just grab the "_id."
L) Storing Multiple Items in the Cart (back to top...)
Here's our code now:
addToCart(product) {
❶ const cartProductIndex = this.cart.items.findIndex(cp => {
❷ return cp.productId.toString() === product._id.toString();
});
❸ let newQuantity = 1;
❹ const updatedCartItems = [...this.cart.items];
❺ if (cartProductIndex >= 0) {
❻ newQuantity = this.cart.items[cartProductIndex].quantity + 1;
❼ updatedCartItems[cartProductIndex].quantity = newQuantity;
} else {
❽ updatedCartItems.push({
productId: new ObjectId(product._id),
quantity: newQuantity
});
}
const updatedCart = {
items: updatedCartItems
};
const db = getDb();
return db
.collection("users")
❾ .updateOne(
{ _id: new ObjectId(this._id) },
{ $set: { cart: updatedCart } }
);
}
1
2
3
4
5
6
7
8
9
getCart() {
const db = getDb();
❶ const productIds =this.cart.items.map(i => {
return i.productId;
})
❷ return db.collection('products').find({_id: {$in: productIds}}).toArray()
❸ .then(products => {
❹ return products.map(p => {
return {
...p,
quantity: this.cart.items.find(i => {
return i.productId.toString() === p._id.toString();
}).quantity
};
})
});
}
1
2
3
4
exports.postCart = (req, res, next) => {
const prodId = req.body.productId;
Product.findById(prodId)
.then(product => {
return req.user.addToCart(product);
})
.then(result => {
//console.log(result);
res.redirect("/cart");
});
};
deleteItemFromCart(productId) {
❶ const updatedCartItems = this.cart.items.filter(item => {
return item.productId.toString() !== productId.toString();
});
const db = getDb();
return db
.collection("users")
.updateOne(
❷ { _id: new ObjectId(this._id) },
❸ { $set: { cart: { items: updatedCartItems } } }
);
}
1
2
3
addOrder() {
❶ const db = getDb();
return this.getCart()
.then(products => {
const order = {
items: products,
user: {
_id: new ObjectId(this._id),
name: this.name,
email: this.email
}
};
❸ return db.collection("orders").insertOne(order);
})
❹ .then(result => {
this.cart = { items: [] };
return db
.collection("users")
.updateOne(
{ _id: new ObjectId(this._id) },
{ $set: { cart: { items: [] } } }
);
});
}
2
1
2
3
1
4
npm install --save mongoose
2) Using Mongoose to Connect to the Database (back to top...)
Mongoose takes care of your connection in a very convenient way! This is the code you use in your "app.js" file!
mongoose
.connect(
'"mongodb+srv://brucegust:M1ch3ll3@brucegust-qhxnz.mongodb.net/test?retryWrites=true'
)
.then(result => {
app.listen(3000);
})
.catch(err => {
console.log(err);
});
C) Creating the Schema (back to top...)
Mongo is "schema-less!" So why do we kick things off with a schema? Because it's a good starting point. Plus, it can be overriden, although in the example below you'll see how we made all of our fields required. That can't be overriden. Still, we get some flexibility that's worth a mild compromise that we're making by establishing these fields as required.
This is the "product.js" model...
const mongoose = require('mongoose');
const Schema = mongoose.Schema;
const productSchema = new Schema({
title: {
type: String,
required: true
},
price: {
type: Number,
required: true
},
description: {
type: String,
required: true
},
imageUrl: {
type: String,
required: true
}
});
2
exports.postAddProduct = (req, res, next) => {
const title = req.body.title;
const price = req.body.price;
const description = req.body.description;
const imageUrl = req.body.imageUrl;
❶ const product = new Product({
title: title,
price: price,
description: description,
imageUrl: imageUrl
});
product
❷ .save()
.then(result => {
console.log("Created Product!");
res.redirect("/admin/products");
})
.catch(err => {
console.log(err);
});
};
1
2
exports.getProducts = (req, res, next) => {
Product.find() //mongoose method
.then(products => {
console.log(products);
res.render("shop/product-list", {
prods: products,
pageTitle: "All Products",
path: "/products"
});
})
.catch(err => {
console.log(err);
});
};
exports.postEditProduct = (req, res, next) => {
const prodId = req.body.productId;
const updatedTitle = req.body.title;
const updatedPrice = req.body.price;
const updatedDesc = req.body.description;
const updatedImageUrl = req.body.imageUrl;
Product.findById(prodId)
.then(product => {
product.title = updatedTitle;
product.price = updatedPrice;
product.description = updatedDesc;
product.imageUrl = updatedImageUrl;
return product.save();
})
.then(result => {
console.log("Updated Product!");
res.redirect("/admin/products");
})
.catch(err => {
console.log(err);
});
};
exports.postDeleteProduct = (req, res, next) => {
const prodId = req.body.productId;
Product.findByIdAndRemove(prodId)
.then(result => {
console.log("product is deleted");
res.redirect("/admin/products");
})
.catch(err => {
console.log(err);
});
};
const mongoose = require("mongoose");
const Schema = mongoose.Schema;
const userSchema = new Schema({
name: {
type: String,
required: true
},
email: {
type: String,
required: true
},
cart: {
items: [
{
productId: { type: Schema.Types.ObjectId, required: true },
quanity: { type: Number, required: true }
}
]
}
});
module.exports = mongoose.model("User", userSchema);
app.use((req, res, next) => {
User.findById("5cddf37ccb51de2c140c3638")
.then(user => {
req.user = user;
next();
})
.catch(err => {
console.log(err);
});
});
mongoose
.connect(
"mongodb+srv://brucegust:M1ch3ll3@brucegust-qhxnz.mongodb.net/test?retryWrites=true"
)
.then(result => {
❶ User.findOne().then(user => {
❷ if (!user) {
const user = new User({
name: "Bruce",
email: "bruce@brucegust.com",
cart: {
items: []
}
});
user.save();
}
});
app.listen(3000);
})
.catch(err => {
console.log(err);
});
1
2
const mongoose = require("mongoose");
const Schema = mongoose.Schema;
const productSchema = new Schema({
title: {
type: String,
required: true
},
price: {
type: Number,
required: true
},
description: {
type: String,
required: true
},
imageUrl: {
type: String,
required: true
},
userId: {
type: Schema.Types.ObjectId,
ref: "User",
required: true
}
});
module.exports = mongoose.model("Product", productSchema);
exports.postAddProduct = (req, res, next) => {
const title = req.body.title;
const price = req.body.price;
const description = req.body.description;
const imageUrl = req.body.imageUrl;
const product = new Product({
title: title,
price: price,
description: description,
imageUrl: imageUrl,
❶ userId: req.user
});
❷ product
.save()
.then(result => {
console.log("Created Product!");
res.redirect("/admin/products");
})
.catch(err => {
console.log(err);
});
};
1
Be aware that the code that fires up the connection etc only fires at "npm start." Your middleware function ("req," "res," "next") is what fires throughout the course of the application.
Also, know that "req.user" contains more information than just the userId, but Mongoose knows just to grab that value.
2
{ _id: 5cded351dd7833346cadaf65,
title: 'The Greatest Bible Study in the World',
price: 10.09,
description: 'A great Bible study ',
imageUrl:
'https://images-na.ssl-images-amazon.com/images/I/51OiIgcqMIL._SX331_BO1,204,203,200_.jpg',
userId: 5cddf37ccb51de2c140c3638,
__v: 0 } ]
Notice the "userId." That's the only piece of the "user" data that you're going to get because that's all that's included in the "products" collection.
However, if you wanted to get all of the "user" data, you could do this:
exports.getProducts = (req, res, next) => {
Product.find()
.populate("userId")
.then(products => {
console.log(products);
res.render("admin/products", {
prods: products,
pageTitle: "Admin Products",
path: "/admin/products"
});
})
.catch(err => {
console.log(err);
});
};
Now look at what you have:
{ _id: 5cded351dd7833346cadaf65,
title: 'The Greatest Bible Study in the World',
price: 10.09,
description: 'A great Bible study ',
imageUrl:
'https://images-na.ssl-images-amazon.com/images/I/51OiIgcqMIL._SX331_BO1,204,203,200_.jpg',
userId:
{ cart: [Object],
_id: 5cddf37ccb51de2c140c3638,
name: 'Bruce',
email: 'bruce@brucegust.com',
__v: 0 },
__v: 0 } ]
Now you've got all of the user data.
2) Specifying Which Data You Want to Retrieve (back to top...)
You can also specify which data you want to retrieve.
Like this:
exports.getProducts = (req, res, next) => {
Product.find()
❶ .select("title price -_id")
❷ .populate("userId", "name")
.then(products => {
console.log(products);
res.render("admin/products", {
prods: products,
pageTitle: "Admin Products",
path: "/admin/products"
});
})
.catch(err => {
console.log(err);
});
};
1
2
[ { title: 'Muscular Christianity', price: 10.01 },
{ title: 'The Greatest Bible Study in the World',
price: 10.09,
userId: { _id: 5cddf37ccb51de2c140c3638, name: 'Bruce' } } ]
BOOM!
L) Adding User Data to the Shopping Cart (back to top...)
Now we're going to add the user's information to the cart when they order something.
1) shop.js Controller (back to top...)
Here's the shop.js Controller:
exports.postCart = (req, res, next) => {
const prodId = req.body.productId;
Product.findById(prodId)
.then(product => {
❶ return req.user.addToCart(product);
})
.then(result => {
console.log(result);
res.redirect("/cart");
});
};
1
In Sequelize, we had something similar in that we set up the "req.user" value in the "app.js" file and when we did that we were automatically given a number of methods that we could execute with the "req.user" object. Reason being is that it was more than just a JavaScript object, it was a Sequelize object that was stuffed with all kinds of values and functionality.
Here we have something similiar in that we've got the "req.user" object and we can go through that object and execute any one of a number of methods.
❶ userSchema.methods.addToCart = function(product) {
❷ const cartProductIndex = this.cart.items.findIndex(cp => {
❸ return cp.productId.toString() === product._id.toString();
});
❹ let newQuantity = 1;
❺ const updatedCartItems = [...this.cart.items];
❻ if (cartProductIndex >= 0) {
newQuantity = this.cart.items[cartProductIndex].quantity + 1;
updatedCartItems[cartProductIndex].quantity = newQuantity;
} else {
❼ updatedCartItems.push({
productId: product._id,
quantity: newQuantity
});
}
❽ const updatedCart = {
items: updatedCartItems
};
this.cart = updatedCart;
return this.save();
};
1
2
3
4
5
6
7
8
exports.getCart = (req, res, next) => {
req.user
.populate("cart.items.productId")
.execPopulate()
.then(user => {
const products = user.cart.items;
res.render("shop/cart", {
path: "/cart",
pageTitle: "Your Cart",
products: products
});
})
.catch(err => console.log(err));
};
{ _id: 5cdf4f9fd5e2a83574c574f3,
productId:
{ _id: 5cded351dd7833346cadaf65,
title: 'The Greatest Bible Study in the World',
price: 10.09,
description: 'A great Bible study ',
imageUrl:
'https://images-na.ssl-images-amazon.com/images/I/51OiIgcqMIL._SX331_BO1,204,203,200_.jpg',
userId: 5cddf37ccb51de2c140c3638,
__v: 0 },
quantity: 3 },
Notice the "productId" object. See how we're getting all of our "product" information. You can see how "populate" is working.
That being the case, when we go out to our "cart.ejs" file, we've got a to make a couple of changes because of how the data is being stacked.
This is only part of the code. The changes have been highlighted:
<% if(products.length >0) { %>
<ul class="cart__item-list">
<% products.forEach(p => { %>
<li class="cart__item">
<p></p><%=p.productId.title %> (<%=p.quantity%>)</p>
<form action="/cart-delete-item" method="Post">
<input type="hidden" name="productId" value="<%=p.productId._id %>">
<button class="btn" type="submit">Delete</button>
</form>
</li>
<% }) %>
Now, it will fly because we've addressed the way that data is now "stacked" in the incoming recordset.
N) Delete Cart Item(back to top...)
Here's your code. This is going to be in the "user.js" Controller file:
userSchema.methods.removeFromCart = function(productId) {
const updatedCartItems = this.cart.items.filter(item => {
return item.productId.toString() !== productId.toString();
});
this.cart.items = updatedCartItems;
return this.save();
};
const mongoose = require("mongoose");
const Schema = mongoose.Schema;
const orderSchema = new Schema({
products: [
{
//an array of documents
product: { type: Object, required: true },
quantity: { type: Number, required: true }
}
],
user: {
name: {
type: String,
required: true
},
userId: {
type: Schema.Types.ObjectId,
require: true,
ref: "User"
}
}
});
module.exports = mongoose.model("Order", orderSchema);
exports.postOrder = (req, res, next) => {
req.user
❶ .populate("cart.items.product")
.execPopulate()
❷ .then(user => {
❸ const products = user.cart.items.map(i => {
return { quantity: i.quantity, product: { ...i.productId._doc };
});
const order = new Order({
//needs to be initialized
user: {
name: req.user.name,
userId: req.user
},
products: products
});
❺ return order.save();
})
❻ .then(result = {
req.user.clearCart();
}
.then(result => {
❼ res.redirect("/orders");
})
.catch(err => {
console.log(err);
});
};1
In the past, when we went to embed product information into the cart object in the "users" table, we grabbed the product information using "findById" and then inserting the result. It's intuitive, but with "popluate," you get all of that info with half the syntax. It's much like a "join," but with a whole lot less effort.
2
app.js
mongoose
.connect(
"mongodb+srv://brucegust:M1ch3ll3@brucegust-qhxnz.mongodb.net/test?retryWrites=true"
)
.then(result => {
User.findOne()
.then(user => {
if (!user) {
const user = new User({
name: "Bruce",
email: "bruce@brucegust.com",
cart: {
items: []
}
});
user.save();
}
});
app.listen(3000);
})
.catch(err => {
console.log(err);
});3

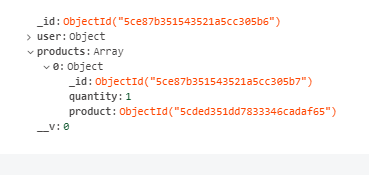 const products = user.cart.items.map(i => {
return { quantity: i.quantity, product: productId };
});
"productId" does, in fact, hold all of the data that's associated with that id in the user's table, but only because of the relationship that exists between the "user" and the "product" collection. When you go to the complete product profile, though, to store it into the "order" collection, you only get the productId like what you see to the right.
To get to the data that's embedded, you want to use "_doc." It's going to look like this:
const products = user.cart.items.map(i => {
return { quantity: i.quantity, product: { ...i.productId._doc } };
});
const products = user.cart.items.map(i => {
return { quantity: i.quantity, product: productId };
});
"productId" does, in fact, hold all of the data that's associated with that id in the user's table, but only because of the relationship that exists between the "user" and the "product" collection. When you go to the complete product profile, though, to store it into the "order" collection, you only get the productId like what you see to the right.
To get to the data that's embedded, you want to use "_doc." It's going to look like this:
const products = user.cart.items.map(i => {
return { quantity: i.quantity, product: { ...i.productId._doc } };
});
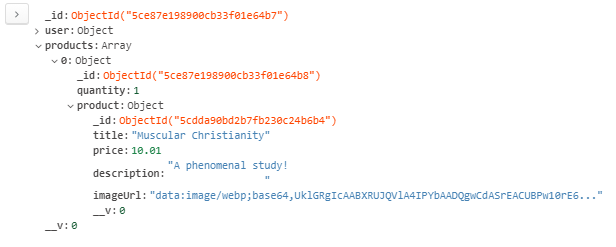 You turn the "i.productId" entity into a JavaScript object by using the spread operator and then the "_doc" method. Now, you're able to pop the hood on the table relationships that exist between the "user" and the "product" collection and get the data you want to insert into the "cart" collection. Compare the difference between the "products" array in the first example and what you have to the right.
4
5
6
7
Objects in JavaScript
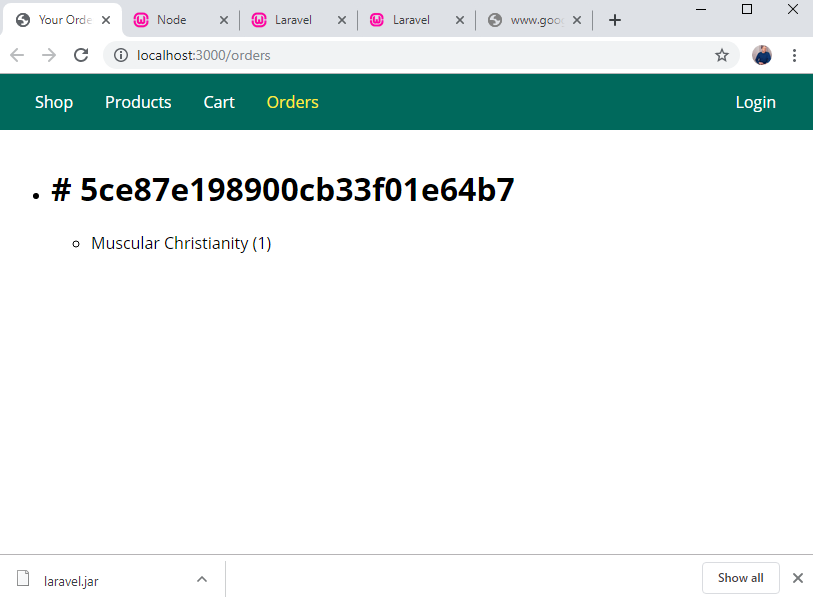 B) Add Login Button (back to top...)
This was something I wanted to document, just because it's a quick and easy way to position a button on the far right side of the screen while simultaneously having buttons on the left side (see image to the right).
Here's the CSS for the navbar:
.main-header__nav {
height: 100%;
width: 100%;
display: flex;
align-items: center;
justify-content: space-between;
}
Note the changes...
And then here's the actual "navbar.js" file:
B) Add Login Button (back to top...)
This was something I wanted to document, just because it's a quick and easy way to position a button on the far right side of the screen while simultaneously having buttons on the left side (see image to the right).
Here's the CSS for the navbar:
.main-header__nav {
height: 100%;
width: 100%;
display: flex;
align-items: center;
justify-content: space-between;
}
Note the changes...
And then here's the actual "navbar.js" file:
<div class="backdrop"></div>
<header class="main-header">
<button id="side-menu-toggle">Menu</button>
<nav class="main-header__nav">
<ul class="main-header__item-list">
<li class="main-header__item">
<a class="<%= path === '/' ? 'active' : '' %>" href="/">Shop</a>
</li>
<li class="main-header__item">
<a class="<%= path === '/products' ? 'active' : '' %>" href="/products"
>Products</a
>
</li>
<li class="main-header__item">
<a class="<%= path === '/cart' ? 'active' : '' %>" href="/cart">Cart</a>
</li>
<li class="main-header__item">
<a class="<%= path === '/orders' ? 'active' : '' %>" href="/orders"
>Orders</a
>
</li>
<!--<li class="main-header__item">
<a class="<%= path === '/admin/add-product' ? 'active' : '' %>" href="/admin/add-product">Add Product
</a>
</li>
<li class="main-header__item">
<a class="<%= path === '/admin/products' ? 'active' : '' %>" href="/admin/products">Admin Products
</a>
</li>-->
</ul>
<ul class="main-header__item-list">
<li class="main-header__item">
<a href="/login">Login</a>
</li>
</ul>
</nav>
</header>
<%- include('../includes/head.ejs') %>
<link rel="stylesheet" href="/css/auth.css">
</head>
<body>
<%- include('../includes/navigation.ejs') %>
<main>
<form class="login-form" action="/login" method="POST">
<div class="form-control">
<label for="title">Email</label>
<input type="email" name="email" id="email">
</div>
<div class="form-control">
<label for="password">Password</label>
<input type="password" name="password" id="password">
</div>
<button class="btn" type="submit">Login</button>
</form>
</main>
<%- include('../includes/end.ejs') %>
_ga=GA1.1.2029811492.1513464095; _gcl_au=1.1.1651456037.1551372552; kampyle_us erid=3621-f0d8-567d-47cf-953b-4b29-f67c-40c9; kampyleUserSession=1551372552335 ; kampyleUserSessionsCount=1; _mkto_trk=id:107-FMS-070&token:_mch-localhost-15 51372552354-60277; kampyleSessionPageCounter=2; fbm_462581780429154=base_domain=; loggedIn=true
Notice that you've got more than one Cookie we're needing, we have to streamline things a bit and we can do it like this...
First of all, let's take a look at our Headers. To do that, open up your Dev Tools in Chrome. Click on any page and then do an "inspect." Open up the "Network" tab and then click on the page that you just accessed.
Like this:
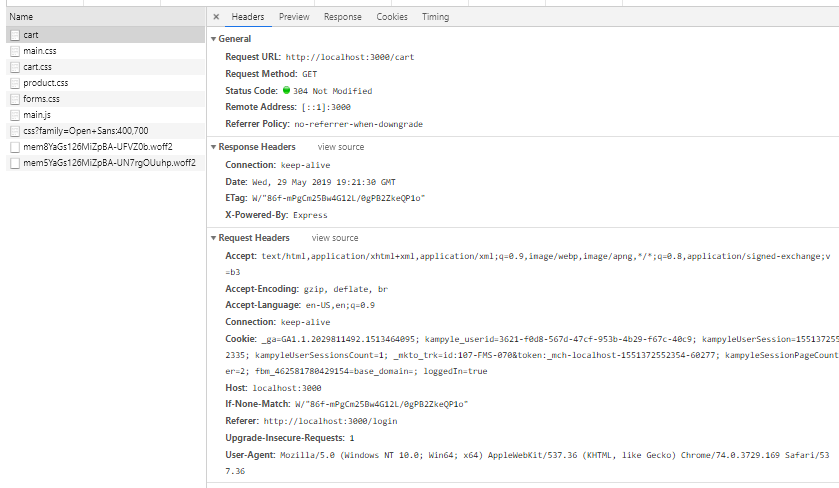
Cookie: _ga=GA1.1.2029811492.1513464095; kampyle_userid=3621-f0d8-567d-47cf-953b-4b29-f67c-40c9; kampyleUserSession=1551372552335; kampyleUserSessionsCount=1; _mkto_trk=id:107-FMS-070&token:_mch-localhost-1551372552354-60277; kampyleSessionPageCounter=2; fbm_462581780429154=base_domain=; loggedIn=true
To get to the value of our "loggedIn" cookie, we do this:
const isLoggedIn = req
.get("Cookie")
.split(";")[7]
.trim()
.split("=")[1];
It looks complicated, but we're basically just splitting the initial "pile" of cookies to get to the one we need and then we're splitting that key / value pair so we can get to the "true" value. Now, isLoggedIn is a const with a discernible value attached to it.
D) Manipulating a Cookie (Max-Age, Secure, HttpOnly) (back to top...)
You can also manipulate your cookies in some useful ways. For example, you can set an expiration date / time:
res.setHeader("Set-Cookie", "loggedIn=true; Max-Age=10");
You can also dictate whether or not a user can login based on if the server is secure:
res.setHeader("Set-Cookie", "loggedIn=true; Secure");
Another useful metrix is "HttpOnly."
res.setHeader("Set-Cookie", "loggedIn=true; HttpOnly");
This prevents any cookie info from being accessible from the browser. This is especially relevant to the prevention of "Cross Site Scripting." Click here to read more.
E) Sessions (back to top...)
The difference between Cookies and Sessions can be summed up by saying that your Cookies are stored in your Browser whereas your Session variables are going to be stored on the server side (backend).
Also, the Session ID will be exclusive to that user. Unlike a cookie that's stored on the browser that can be manipulated, server side variables can't be impacted in the same way.
We're still going to make use of the Cookie dynamic, but it will be encrypted so only the server can verify it as being authentic.
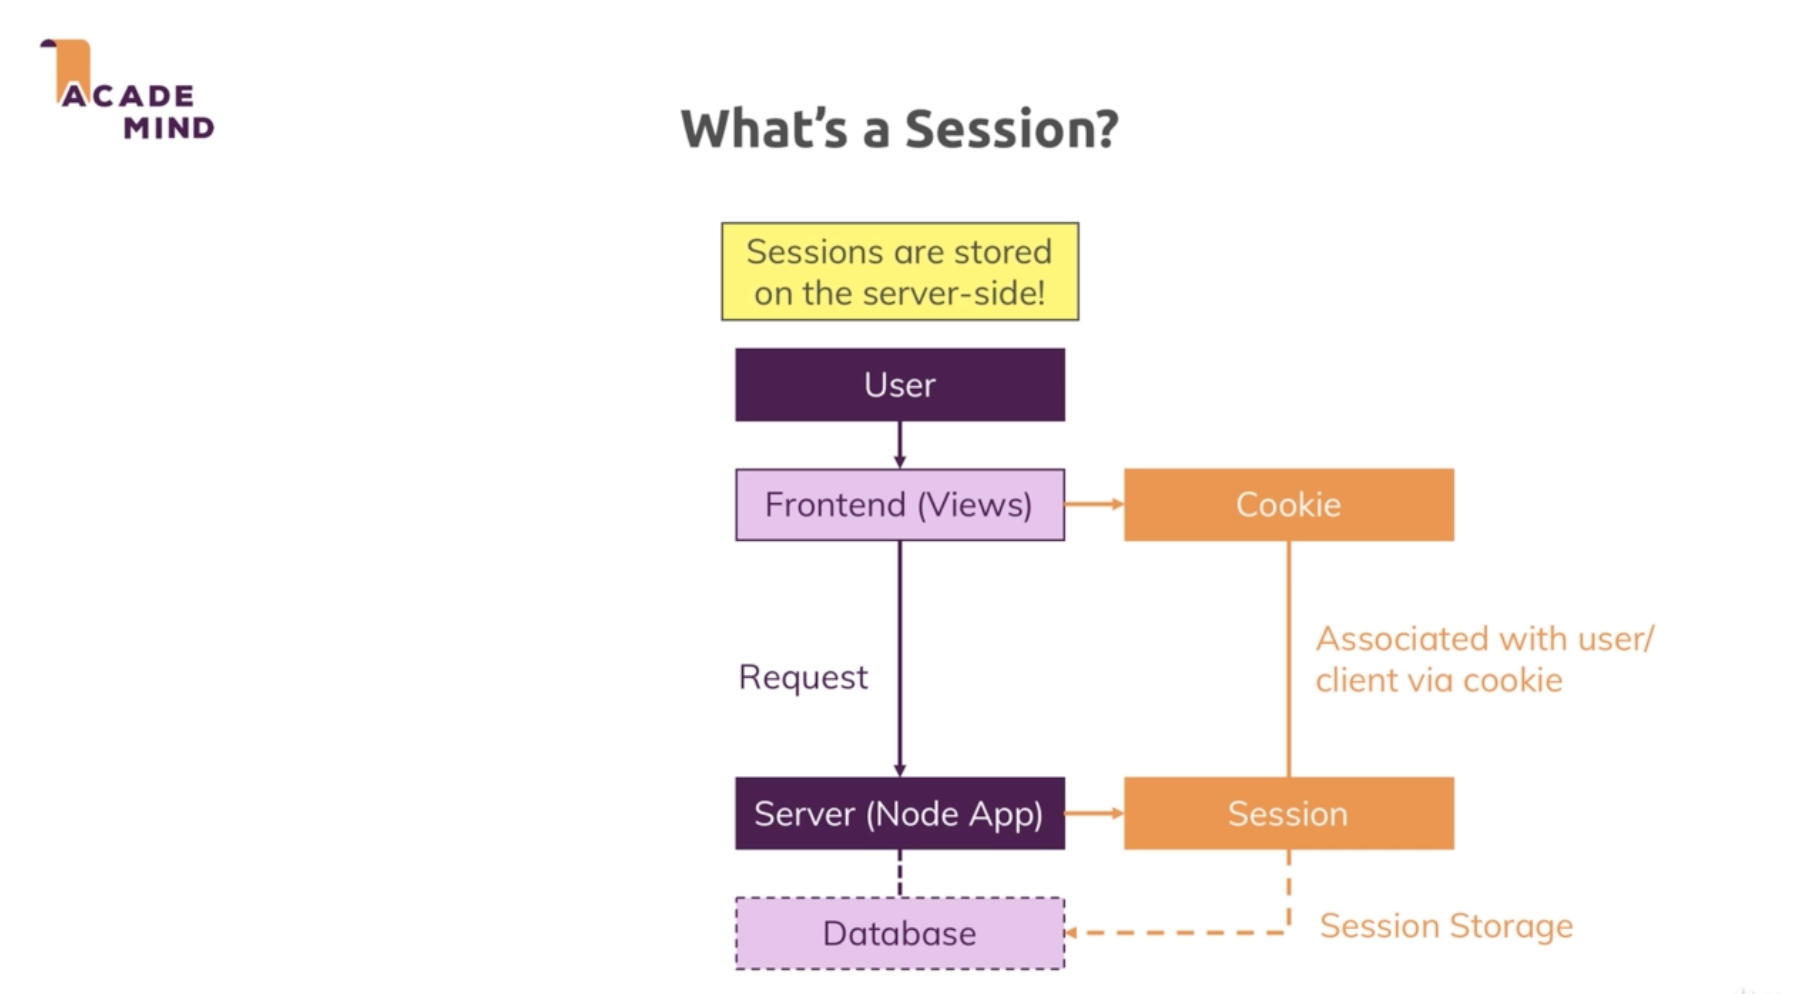
exports.getLogin = (req, res, next) => {
console.log(req.session.isLoggedIn);
res.render("auth/login", {
path: "/login",
pageTitle: "Login",
isAuthenticated: false
});
};
exports.postLogin = (req, res, next) => {
req.session.isLoggedIn = true;
res.redirect("/");
};
brucegust@BRUCEGUST59AC MINGW64 /c/wamp/www/adm/node/express_tutorial
$ npm install --save connect-mongodb-session
1) app.js (back to top...)
Once you're got it installed, you'll first import the "MongoDB Session" package into the "app.js" page and create a new constant that holds your Mongo database connection info.
Like this:
const path = require("path");
const express = require("express");
const bodyParser = require("body-parser");
const mongoose = require("mongoose");
❶ const session = require("express-session");
❷ const MongoDBStore = require("connect-mongodb-session")(session);
❸ const MONGODB_URI =
"mongodb+srv://brucegust:M1ch3ll3@brucegust-qhxnz.mongodb.net/test";
const app = express();
❹ const store = new MongoDBStore({
uri: MONGODB_URI,
collection: "sessions"
});
app.set("view engine", "ejs");
app.set("views", "views");
const adminData = require("./routes/admin");
const shopRoutes = require("./routes/shop");
const authRoutes = require("./routes/auth");
const errorController = require("./controllers/error");
const User = require("./models/user");
app.use(bodyParser.urlencoded());
app.use(express.static(path.join(__dirname, "public")));
app.use(
session({
secret: "my secret",
resave: false,
saveUninitialized: false,
❺ store: store
})
);
app.use((req, res, next) => {
User.findById("5cddf37ccb51de2c140c3638")
.then(user => {
//req.user = user;
req.user = user;
next();
})
.catch(err => {
console.log(err);
});
});
app.use("/admin", adminData.routes);
app.use(shopRoutes);
app.use(authRoutes);
app.use(errorController.get404);
mongoose
❻ .connect(MONGODB_URI)
.then(result => {
User.findOne().then(user => {
if (!user) {
const user = new User({
name: "Bruce",
email: "bruce@brucegust.com",
cart: {
items: []
}
});
user.save();
}
});
app.listen(3000);
})
.catch(err => {
console.log(err);
});
1
2
3
4
5
6
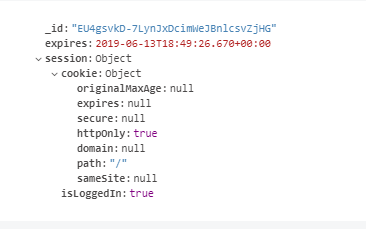 2) auth.js (back to top...)
Here's the code that allows you to see what's being stored in the database:
exports.getLogin = (req, res, next) => {
console.log(req.session.isLoggedIn);
res.render("auth/login", {
path: "/login",
pageTitle: "Login",
isAuthenticated: false
});
};
exports.postLogin = (req, res, next) => {
//res.setHeader("Set-Cookie", "loggedIn=true; Max-Age=10");
req.session.isLoggedIn = true;
res.redirect("/");
};
...and here's what it looks like in Compass (see image to the right):
BTW: The Cookie is established automatically by Express.
I) Deleting a Cookie (Logout) (back to top...)
To logout, you want to create a button that triggers the Express method that "destroys" your current session.
You'll do it like this...
1) nav.ejs (your button) (back to top...)
Here's your button:
<li class="main-header__item">
<form action="/logout" method="post">
<button type="submit">Logout</button>
</form>
</li>
2) auth.js (your route) (back to top...)
Here's your route:
router.post("/logout", authController.postLogout);
3) auth.js (your Controller) (back to top...)
...and here's your Controller:
exports.postLogout = (req, res, next) => {
req.session.destroy(err => {
console.log(err);
res.redirect("/");
});
};
J) Fixing Some Bugs (back to top...)
When you don't have a valid session, you're going to run into problems. Here's how we fixed that:
1) navigation.ejs (back to top...)
This is an incremental yet an important fix. We're going to limit the display of some links based on the presence of a valid session id. In other words, you have to be logged in before any of these links show up. Refer to the highlighted sections of the code below to see the changes.
2) auth.js (back to top...)
Here's the code that allows you to see what's being stored in the database:
exports.getLogin = (req, res, next) => {
console.log(req.session.isLoggedIn);
res.render("auth/login", {
path: "/login",
pageTitle: "Login",
isAuthenticated: false
});
};
exports.postLogin = (req, res, next) => {
//res.setHeader("Set-Cookie", "loggedIn=true; Max-Age=10");
req.session.isLoggedIn = true;
res.redirect("/");
};
...and here's what it looks like in Compass (see image to the right):
BTW: The Cookie is established automatically by Express.
I) Deleting a Cookie (Logout) (back to top...)
To logout, you want to create a button that triggers the Express method that "destroys" your current session.
You'll do it like this...
1) nav.ejs (your button) (back to top...)
Here's your button:
<li class="main-header__item">
<form action="/logout" method="post">
<button type="submit">Logout</button>
</form>
</li>
2) auth.js (your route) (back to top...)
Here's your route:
router.post("/logout", authController.postLogout);
3) auth.js (your Controller) (back to top...)
...and here's your Controller:
exports.postLogout = (req, res, next) => {
req.session.destroy(err => {
console.log(err);
res.redirect("/");
});
};
J) Fixing Some Bugs (back to top...)
When you don't have a valid session, you're going to run into problems. Here's how we fixed that:
1) navigation.ejs (back to top...)
This is an incremental yet an important fix. We're going to limit the display of some links based on the presence of a valid session id. In other words, you have to be logged in before any of these links show up. Refer to the highlighted sections of the code below to see the changes.
<div class="backdrop"></div>
<header class="main-header">
<button id="side-menu-toggle">Menu</button>
<nav class="main-header__nav">
<ul class="main-header__item-list">
<li class="main-header__item">
<a class="<%= path === '/' ? 'active' : '' %>" href="/">Shop</a>
</li>
<li class="main-header__item">
<a class="<%= path === '/products' ? 'active' : '' %>" href="/products"
>Products</a
>
</li>
<li class="main-header__item">
<a class="<%= path === '/cart' ? 'active' : '' %>" href="/cart">Cart</a>
</li>
<% if (isAuthenticated) { %>
<li class="main-header__item">
<a class="<%= path === '/orders' ? 'active' : '' %>" href="/orders"
>Orders</a
>
</li>
<li class="main-header__item">
<a
class="<%= path === '/admin/add-product' ? 'active' : '' %>"
href="/admin/add-product"
>Add Product
</a>
</li>
<li class="main-header__item">
<a
class="<%= path === '/admin/products' ? 'active' : '' %>"
href="/admin/products"
>Admin Products
</a>
</li>
<% } %>
</ul>
<ul class="main-header__item-list">
<% if (!isAuthenticated) { %>
<li class="main-header__item">
<a class="<%= path === '/login' ? 'active' : '' %>" href="/login"
>Login</a
>
</li>
<% } else { %>
<li class="main-header__item">
<form action="/logout" method="post">
<button type="submit">Logout</button>
</form>
</li>
<% } %>
</ul>
</nav>
</header>
<nav class="mobile-nav">
<ul class="mobile-nav__item-list">
<li class="mobile-nav__item">
<a class="<%= path === '/' ? 'active' : '' %>" href="/">Shop</a>
</li>
<li class="mobile-nav__item">
<a class="<%= path === '/products' ? 'active' : '' %>" href="/products"
>Products</a
>
</li>
<li class="mobile-nav__item">
<a class="<%= path === '/cart' ? 'active' : '' %>" href="/cart">Cart</a>
</li>
<li class="mobile-nav__item">
<a class="<%= path === '/orders' ? 'active' : '' %>" href="/orders"
>Orders</a
>
</li>
<li class="mobile-nav__item">
<a
class="<%= path === '/admin/add-product' ? 'active' : '' %>"
href="/admin/add-product"
>Add Product
</a>
</li>
<li class="mobile-nav__item">
<a
class="<%= path === '/admin/products' ? 'active' : '' %>"
href="/admin/products"
>Admin Products
</a>
</li>
</ul>
</nav>
IMPORTANT! Remember: The order matters! I got stuck for a little bit at the very beginning in that I couldn't get my "index.js" page to show because of the code I've got referenced below. Keep that in mind going forward!
1) app.js (back to top...)
app.js:
const path = require("path");
const express = require("express");
const bodyParser = require("body-parser");
const errorController = require("./controllers/error");
const app = express();
app.set("view engine", "ejs");
app.set("views", "views");
const startRoutes = require("./routes/start");
app.use(bodyParser.urlencoded());
app.use(express.static(path.join(__dirname, "public")));
app.use(startRoutes); // this code is correct and all of the corresponding files are bulletproof. But I originally had this line in AFTER the "app.use(errorController.get404" line and, as a result, everything was routed to the error page.
app.use(errorController.get404);
app.listen(3001);
const path = require("path");
const express = require("express");
const rootDir = require("../utility/path");
const startController = require("../controllers/start");
const authController = require("../controllers/auth");
const router = express.Router();
router.get("/", startController.getIndex);
router.get("/login", authController.getLogin);
module.exports = router;
<%-include('includes/header.ejs') %>
</head>
<body>
<%-include('includes/top.ejs') %>
<%-include('includes/navigation.ejs') %>
<main>
Welcome to the "Landing Pages Admin Suite!"
<br><br>
To start, go ahead and login below by entering your email and your password!
<br><br>
<div style="margin:auto; width:300px; border:1px solid #ccc; border-radius:10pt; box-shadow:5px 5px 3px #ccc; padding:10px;">
<form class="login-form" action="/login" method="POST">
<table style="margin:auto;">
<tr>
<td>email: </td>
<td>
<div class="form-control">
<input type="email" name="email" id="email">
</div>
</td>
</tr>
<tr>
<td>password: </td>
<td>
<div class="form-control">
<input type="password" name="password"id="password">
</div>
</td>
</tr>
<tr>
<td style="text-align:center; padding-top:10px;" colspan="2"><button class="btn" type="submit">Login</button></td>
</tr>
</table>
</form>
</div>
</main>
<%-include('includes/footer.ejs') %>
const session = require("express-session");
--
app.use(
session({
❶ secret: "my secret",
resave: false,
saveUninitialized: false,
❷ store: store
})
);
1
2
const store = new MongoDBStore({
uri: MONGODB_URI,
collection: "sessions"
});
---
app.use(
session({
secret: "my secret",
resave: false,
saveUninitialized: false,
store: store
})
);
---
app.use((req, res, next) => {
❶ if (!req.session.user) {
return next();
}
User.findById(req.session.user._id)
.then(user => {
req.user = user;
next();
})
.catch(err => console.log(err));
});
1
const bcrypt = require("bcryptjs");
exports.getLogin = (req, res, next) => {
res.render("login", {
pageTitle: "Login",
path: "/login"
});
};
exports.postLogin = (req, res, next) => {
const email = req.body.email;
const password = req.body.password;
User.findOne({ email: email })
.then(user => {
if (!user) {
req.flash("error", "Invalid email or password.");
return res.redirect("/login");
}
bcrypt
.compare(password, user.password)
.then(doMatch => {
if (doMatch) {
req.session.isLoggedIn = true;
req.session.user = user;
return req.session.save(err => {
console.log(err);
res.redirect("/");
});
}
res.redirect("/login");
})
.catch(err => {
console.log(err);
res.redirect("/login");
});
})
.catch(err => console.log(err));
};
<%- include('../includes/head.ejs') %>
<link rel="stylesheet" href="/css/forms.css">
<link rel="stylesheet" href="/css/auth.css">
</head>
<body>
<%- include('../includes/navigation.ejs') %>
<main>
<form class="login-form" action="/signup" method="POST">
<div class="form-control">
<label for="email">E-Mail</label>
<input type="email" name="email" id="email">
</div>
<div class="form-control">
<label for="password">Password</label>
<input type="password" name="password" id="password">
</div>
<div class="form-control">
<label for="confirmPassword">Confirm Password</label>
<input type="password" name="confirmPassword" id="confirmPassword">
</div>
<button class="btn" type="submit">Signup</button>
</form>
</main>
<%- include('../includes/end.ejs') %>
❶ exports.postSignup = (req, res, next) => {
const email = req.body.email;
const password = req.body.password;
const confirmPassword = req.body.confirmPassword;
User.findOne({ email: email })
.then(userDoc => {
if (userDoc) {
return res.redirect("/signup");
}
const user = new User({
email: email,
password: password,
cart: { items: [] }
});
return user.save();
console.log("user saved");
})
.then(result => {
res.redirect("/login");
})
.catch(err => {
console.log(err);
});
};
1
brucegust@BRUCEGUST59AC MINGW64 /c/wamp/www/adm/node/express_tutorial
$ npm install --save bcryptjs
Once that's in place, here's how your "auth.js" Controller is going to look:
❶ const bcrypt = require("bcryptjs");
...
exports.postSignup = (req, res, next) => {
const email = req.body.email;
const password = req.body.password;
const confirmPassword = req.body.confirmPassword;
User.findOne({ email: email })
.then(userDoc => {
if (userDoc) {
return res.redirect("/signup");
}
❷ return bcrypt
.hash(password, 12)
❸ .then(hashedPassword => {
const user = new User({
email: email,
password: hashedPassword,
cart: { items: [] }
});
return user.save();
})
.then(result => {
res.redirect("/login");
});
})
.catch(err => {
console.log(err);
});
};
1
2
3
exports.postLogin = (req, res, next) => {
const email = req.body.email;
const password = req.body.password;
User.findOne({ email: email })
.then(user => {
if (!user) {
return res.redirect("/login");
}
bcrypt
.compare(password, user.password)
.then(doMatch => {
if (doMatch) {
req.session.isLoggedIn = true;
req.session.user = user;
❶ return req.session.save(err => {
console.log(err);
res.redirect("/");
});
}
res.redirect("/login");
})
.catch(err => {
console.log(err);
res.redirect("/login");
});
})
.catch(err => console.log(err));
};
2
exports.getAddProduct = (req, res, next) => {
if (!req.session.isLoggedIn) {
return res.redirect("/login");
}
res.render("admin/edit-product", {
pageTitle: "Add Product",
path: "/admin/add-product",
editing: false,
isAuthenticated: req.session.isLoggedIn
});
};
admin.js route...
const path = require("path");
const express = require("express");
const adminController = require("../controllers/admin");
const isAuth = require("../middleware/is-auth");
const router = express.Router();
// /admin/add-product => GET
router.get("/add-product", isAuth, adminController.getAddProduct);
// /admin/products => GET
router.get("/products", isAuth, adminController.getProducts);
// /admin/add-product => POST
router.post("/add-product", isAuth, adminController.postAddProduct);
router.get("/edit-product/:productId", isAuth, adminController.getEditProduct);
router.post("/edit-product", isAuth, adminController.postEditProduct);
router.post("/delete-product", isAuth, adminController.postDeleteProduct);
module.exports = router;
brucegust@BRUCEGUST59AC MINGW64 /c/wamp/www/adm/node/express_tutorial
$ npm install --save csurf
Once that's in place, you'll need to import that package using your "app.js" file. Also, you're going to incorporate something called "locals." This gives you the ability to declare your "authenticated" and your "token" variables on a global scale.
const csrf = require("csurf");
...
const csrfProtection = csrf();
...
app.use(csrfProtection);
...
app.use((req, res, next) => {
res.locals.isAuthenticated = req.session.isLoggedIn;
res.locals.csrfToken = req.csrfToken();
next();
});
brucegust@BRUCEGUST59AC MINGW64 /c/wamp/www/adm/node/express_tutorial
$ npm install --save connect-flash
With that installed, we now import it into our "app.js" file by first storing it in a constant:
const flash = require("connect-flash");
...and then registering it AFTER the session has been defined:
app.use(
session({
secret: "my secret",
resave: false,
saveUninitialized: false,
store: store
})
);// after session...
app.use(csrfProtection);
app.use(flash());
2) Add it to postLogin on "auth.js" Controller (back to top...)
Once that's in place, we're now looking at the "auth.js" Controller:
exports.postLogin = (req, res, next) => {
const email = req.body.email;
const password = req.body.password;
User.findOne({ email: email })
.then(user => {
if (!user) {
req.flash("error", "Invalid email or password.");
return res.redirect("/login");
}
bcrypt
.compare(password, user.password)
.then(doMatch => {
if (doMatch) {
req.session.isLoggedIn = true;
req.session.user = user;
return req.session.save(err => {
console.log(err);
res.redirect("/");
});
}
res.redirect("/login");
})
.catch(err => {
console.log(err);
res.redirect("/login");
});
})
.catch(err => console.log(err));
};
<%- include('../includes/head.ejs') %>
<link rel="stylesheet" href="/css/auth.css">
</head>
<body>
<%- include('../includes/navigation.ejs') %>
<main>
<% if(errorMessage) { %>
<div class="user-message user-message---error"><%= errorMessage %></div>
<% } %>
<br>
<form action='/login' method="Post">
<table style="width:300px; margin:auto; border:1px solid #ccc; border-radius:10pt; padding:10px; box-shadow:5px 5px 3px #ccc;">
<tr>
<td><span style="font-size:11pt;">Email</span></td>
<td><div class="form-control"></div><input type="email" name="email" id="email"></div></td>
</tr>
<tr>
<td><span style="font-size:11pt;">Password</span></td>
<td><div class="form-control"></div><input type="password" name="password" id="password"></div></td>
</tr>
<tr>
<td colspan="2" style="text-align:center;">
<input type="hidden" name="_csrf" value="<%= csrfToken %>" />
<button class="btn" type="submit">Login</button>
</td>
</tr>
</table>
</form>
</main>
<%- include('../includes/end.ejs') %>
brucegust@BRUCEGUST59AC MINGW64 /c/wamp/www/adm/node/express_tutorial
$ npm install --save nodemailer nodemailer-sendgrid-transport
B) auth.js (back to top...)
Here's the code:
const bcrypt = require("bcryptjs");
❶ const nodemailer = require("nodemailer");
❷ const sendgridTransport = require("nodemailer-sendgrid-transport");
const User = require("../models/user");
❸ const transporter = nodemailer.createTransport(
sendgridTransport({
auth: {
api_key:
"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"
}
})
);
...
exports.postSignup = (req, res, next) => {
const email = req.body.email;
const password = req.body.password;
const confirmPassword = req.body.confirmPassword;
User.findOne({ email: email })
.then(userDoc => {
if (userDoc) {
req.flash("error", "email already exists...!");
return res.redirect("/signup");
}
return bcrypt
.hash(password, 12)
.then(hashedPassword => {
const user = new User({
email: email,
password: hashedPassword,
cart: { items: [] }
});
return user.save();
})
.then(result => {
console.log(email);
❹ res.redirect("/login");
❺ return transporter.sendMail({
to: email,
from: "bruce@muscularchristianityonline.com",
subject: "Thanks for logging in!",
html: "
You successfully signed up!
" }); }) .catch(err => { console.log(err); }); }) .catch(err => { console.log(err); }); };1
2
3
4
5
4
5
<%- include('../includes/head.ejs') %>
<link rel="stylesheet" href="/css/auth.css">
</head>
<body>
<%- include('../includes/navigation.ejs') %>
<main>
<% if(errorMessage) { %>
<div class="user-message user-message---error"><%= errorMessage %></div>
<% } %>
<br>
❶ <form action='/reset' method="Post">
<table style="width:300px; margin:auto; border:1px solid #ccc; border-radius:10pt; padding:10px; box-shadow:5px 5px 3px #ccc;">
<tr>
<td><span style="font-size:11pt;">Email</span></td>
<td><div class="form-control"><input type="email" name="email" id="email"></div></td>
</tr>
<tr>
<td colspan="2" style="text-align:center;"><br>
<input type="hidden" name="_csrf" value="<%= csrfToken %>" />
<button class="btn" type="submit">Reset Password</button>
</td>
</tr>
</table>
</form>
</main>
<%- include('../includes/end.ejs') %>
1
exports.postReset = (req, res, next) => {
crypto.randomBytes(32, (err, buffer) => {
if (err) {
console.log(err);
return res.redirect("/reset");
}
❷ const token = buffer.toString("hex");
❸ User.findOne({ email: req.body.email })
.then(user => {
if (!user) {
req.flash("error", "Sorry! That email wasn't found.");
return res.redirect("/reset");
}
❹ user.resetToken = token;
user.resetTokenExpiration = Date.now() + 360000;
return user.save();
})
.then(result => {
res.redirect("/");
❺ transporter.sendMail({
to: req.body.email,
from: "bruce@muscularchristianityonline.com",
subject: "Password Reset!",
html: `
<p>You requested a password reset.</p>
<p>Click this <a href="localhost:3000/reset/${token}">link</a>>to set a new password.
`
});
})
.catch(err => {
console.log(err);
});
});
};

1
2
3
4
5
exports.getNewPassword = (req, res, next) => {
❶ const token = req.params.token;
User.findOne({ resetToken: token, resetTokenExpiration: { $gt: Date.now() } })
.then(user => {
let message = req.flash("error");
if (message.length > 0) {
message = message[0];
} else {
message = null;
}
console.log(user);
res.render("auth/new-password", {
path: "/new-password",
pageTitle: "New Password",
errorMessage: message,
❷ userId: user._id.toString(),
❸ passwordToken: token
});
})
.catch(err => {
console.log(err);
});
};
1
2
3
<%- include('../includes/head.ejs') %>
<link rel="stylesheet" href="/css/auth.css">
</head>
<body>
<%- include('../includes/navigation.ejs') %>
<main>
<% if(errorMessage) { %>
<div class="user-message user-message---error"><%= errorMessage %></div>
<% } %>
<br>
<form action='/new-password' method="Post">
<table style="width:300px; margin:auto; border:1px solid #ccc; border-radius:10pt; padding:10px; box-shadow:5px 5px 3px #ccc;">
<tr>
<td><span style="font-size:11pt;">Password</span></td>
<td><div class="form-control"><input type="password" name="password" id="password"></div></td>
</tr>
<tr>
<td colspan="2" style="text-align:center;"><br>
<input type="hidden" name="userId" value="<%= userId %>" />
<input type="hidden" name="passwordToken" value="<%= passwordToken %>">
<input type="hidden" name="_csrf" value="<%= csrfToken %>" />
<button class="btn" type="submit">Update Password</button>
</td>
</tr>
</table>
</form>
</main>
<%- include('../includes/end.ejs') %>
exports.postNewPassword = (req, res, next) => {
const newPassword = req.body.password;
const userId = req.body.userId;
const passwordToken = req.body.passwordToken;
❶ let resetUser;
User.findOne({
resetToken: passwordToken,
resetTokenExpiration: { $gt: Date.now() },
_id: userId
})
❷ .then(user => {
resetUser = user;
return bcrypt.hash(newPassword, 12);
})
❸ .then(hashedPassword => {
resetUser.password = hashedPassword;
resetUser.resetToken = undefined;
resetUser.resetTokenExpiration = undefined;
return resetUser.save();
})
.then(result => {
res.redirect("/login");
})
.catch(err => {
console.log(err);
});
};
1
2
3
postEditProduct.js (before)
- exports.postEditProduct = (req, res, next) => {
- const prodId = req.body.productId;
- const updatedTitle = req.body.title;
- const updatedPrice = req.body.price;
- const updatedImageUrl = req.body.imageUrl;
- const updatedDesc = req.body.description;
- Product.findById(prodId)
- .then(product => {
- if(product.userId !== req.user._id) {
- return res.redirect('/');
- }
- product.title = updatedTitle;
- product.price = updatedPrice;
- product.description = updatedDesc;
- product.imageUrl = updatedImageUrl;
- return product.save();
- })
- .then(result => {
- console.log("UPDATED PRODUCT!");
- res.redirect("/admin/products");
- })
- .catch(err => console.log(err));
- };
postEditProduct (after)
- exports.postEditProduct = (req, res, next) => {
- const prodId = req.body.productId;
- const updatedTitle = req.body.title;
- const updatedPrice = req.body.price;
- const updatedImageUrl = req.body.imageUrl;
- const updatedDesc = req.body.description;
- Product.findById(prodId)
- .then(product => {
- if (product.userId.toString() !== req.user._id.toString()) {
- return res.redirect('/');
- }
- product.title = updatedTitle;
- product.price = updatedPrice;
- product.description = updatedDesc;
- product.imageUrl = updatedImageUrl;
- return product.save()
- .then(result => {
- console.log("UPDATED PRODUCT!");
- res.redirect("/admin/products");
- })
- })
- .catch(err => console.log(err));
- };
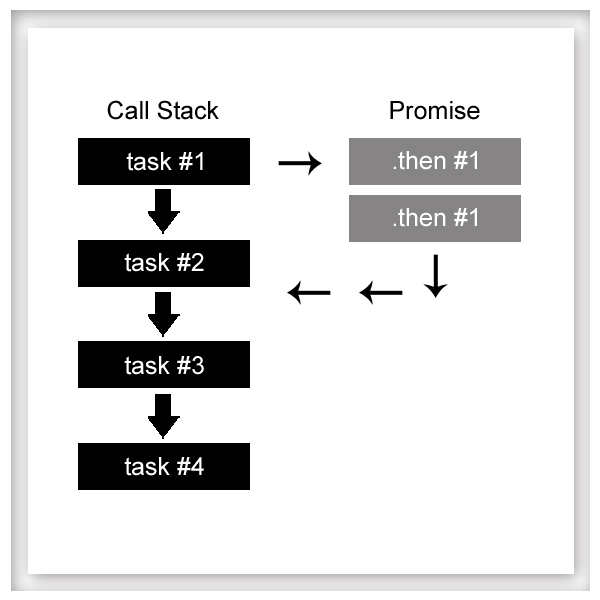
1
brucegust@BRUCEGUST59AC MINGW64 /c/wamp/www/adm/node/express_tutorial
$ npm install --save express-validator
1) auth.js Routes (back to top...)
This is the "basic" version where you're just going to get a system generated message. It's good though because it will alert the user of a bad email if they didn't use the "@" sign.
No, once you have installed the "express-validator" package, you're going to import it on your "auth.js" routes page.
const { check } = require("express-validator/check");
Notice how you're only importing a sub-package from the "express-validator" package. Here you're using a technique called "Destructuring" which is a shorthand way of storing variables from within an array.
After importing that package, you'll do this on your actual, "post signup" route.
router.post("/signup", check("email").isEmail(), authController.postSignup);
You're using the middleware represented by the "check" variable to see if what the user entered is a valid email address.
2) auth.js Controller (back to top...)
import the "validationResult" object that's available from the "express-validator/express" package
const { validationResult } = require("express-validator/check");
..and then for your actual "postSignup" method, you'll do this:
exports.postSignup = (req, res, next) => {
const email = req.body.email;
const password = req.body.password;
const confirmPassword = req.body.confirmPassword;
❶ const errors = validationResult(req);
❷ if (!errors.isEmpty()) {
console.log(errors.array());
return res.status(422).render("auth/signup", {
path: "/signup",
pageTitle: "Signup",
❸ errorMessage: errors.array()
});
}
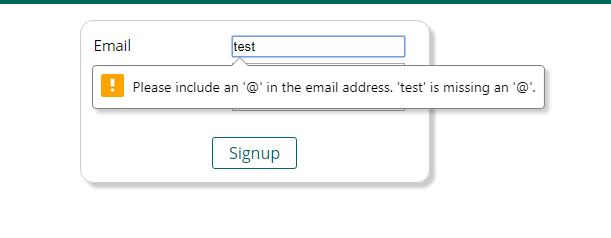
BTW: The above message is not a result of any of the validation middleware you have installed. Rather, it's Chrome's way of alerting the user that they've entered a bogus value and that comes from the fact that the input type was set to "email!"
1
2
3
[ { value: '',
msg: 'Invalid value',
param: 'email',
location: 'body' } ]
You can disable any kind of validation by adding "novalidation" to your form (<form action='/new-password' method="Post" novalidate>
You're getting in this array the value that was entered, the parameter (which matches the "name" of the field" and the location of the actual field itself. The thing we want to harness is the "msg."
Here's why:
If the user doesn't add ANY email address, they won't get a message that reminds them they need to add an "@" sign, instead they'll get the errors.array() which is currently assigned to the errorMessage variable.
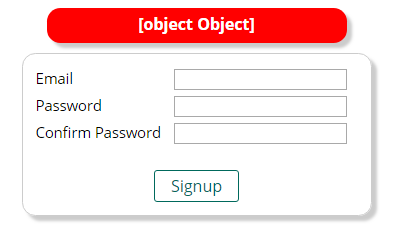
3
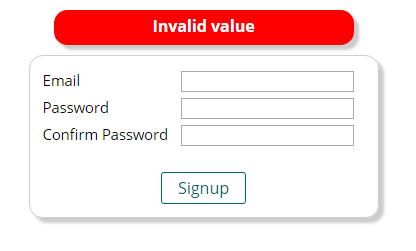
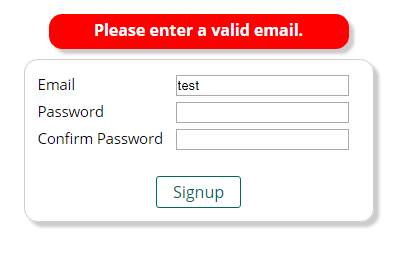
router.post(
"/signup",
check("email")
.isEmail()
.withMessage("Please enter a valid email.")
.custom((value, { req }) => {
if (value === "test@test.com") {
throw new Error("This email address is forbidden!");
}
return true;
}),
authController.postSignup
);
BTW: "express-validator" includes the "validator.js" library. You'll see "express-validator" described as something that "wraps" around "validator.js." It can be somewhat confusing in that there is a "wrap" function within JQuery. In this context, however, it's referring to the way in which "express-validator" is built on top of "validator.js."
D) More Validators (back to top...)
Here we're looking to see if the password is long enough and there aren't anything other than alphanumeric characters.
❶ const { check, body } = require("express-validator/check");
router.post(
"/signup",
[
check("email")
.isEmail()
.withMessage("Please enter a valid email.")
.custom((value, { req }) => {
if (value === "test@test.com") {
throw new Error("This email address is forbidden!");
}
return true;
}),
❷ body(
❸ "password",
❹ "Please enter a password that consists of at least 5 characters and contains only alphanumeric characters!"
)
❺ .isLength({ min: 5 })
❻ .isAlphanumeric()
],
authController.postSignup
);
1
2
3
4
5
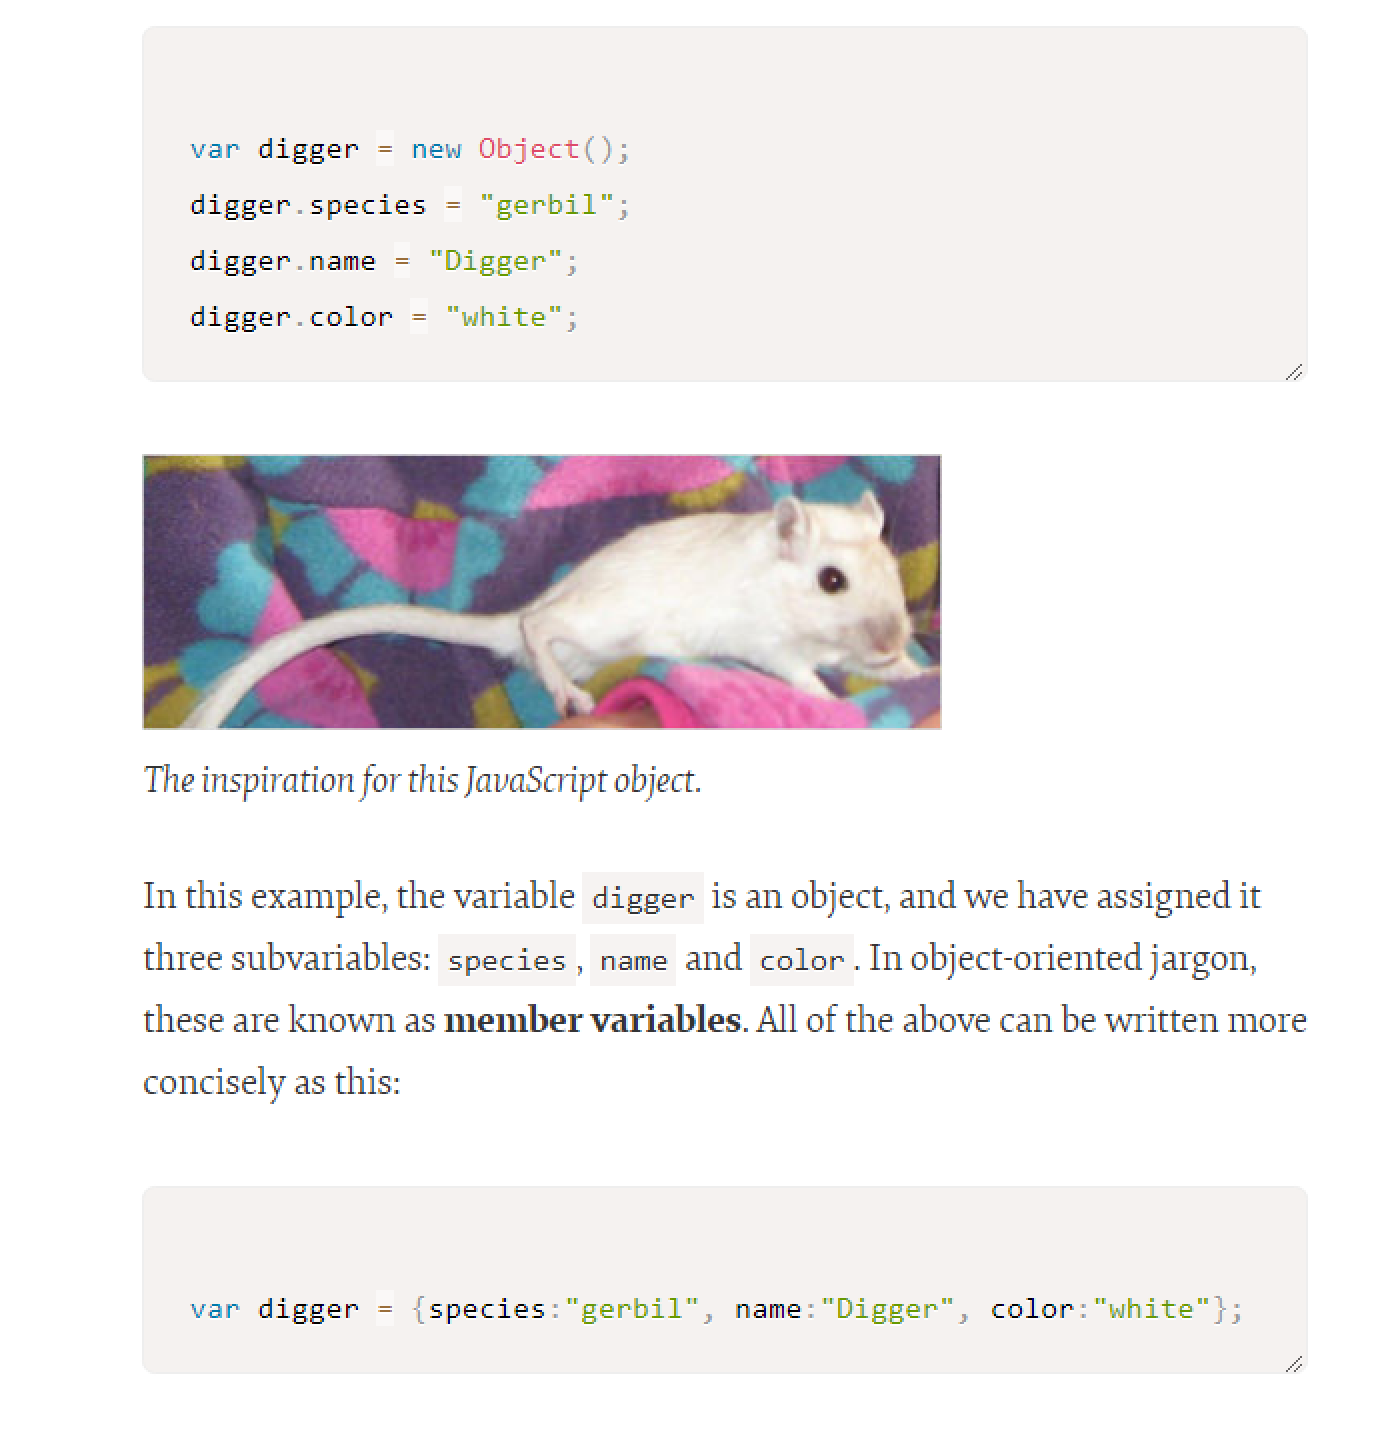
router.post(
"/signup",
[
check("email")
.isEmail()
.withMessage("Please enter a valid email.")
.custom((value, { req }) => {
if (value === "test@test.com") {
throw new Error("This email address is forbidden!");
}
return true;
}),
body(
"password",
"Please enter a password that consists of at least 5 characters and contains only alphanumeric characters!"
)
.isLength({ min: 5 })
.isAlphanumeric(),
body("confirmPassword").custom((value, { req }) => {
if (value !== req.body.password) {
throw new Error("Passwords have to match!");
}
return true;
})
],
authController.postSignup
);
router.post(
"/signup",
[
check("email")
.isEmail()
.withMessage("Please enter a valid email.")
.custom((value, { req }) => {
// if (value === "test@test.com") {
// throw new Error("This email address is forbidden!");
// }
// return true;
return User.findOne({ email: value }).then(userDoc => {
if (userDoc) {
return Promise.reject(
"Email already exists, please pick a different one."
);
}
});
}),
body(
"password",
"Please enter a password that consists of at least 5 characters and contains only alphanumeric characters!"
)
.isLength({ min: 5 })
.isAlphanumeric(),
body("confirmPassword").custom((value, { req }) => {
if (value !== req.body.password) {
throw new Error("Passwords have to match!");
}
return true;
})
],
authController.postSignup
);
auth.js Controller (before)
- exports.postSignup = (req, res, next) => {
- const email = req.body.email;
- const password = req.body.password;
- const errors = validationResult(req);
- if (!errors.isEmpty()) {
- console.log(errors.array());
- return res.status(422).render("auth/signup", {
- path: "/signup",
- pageTitle: "Signup",
- errorMessage: errors.array()[0].msg
- });
- }
- User.findOne({ email: email })
- .then(userDoc => {
- if (userDoc) {
- req.flash("error", "email already exists...!");
- return res.redirect("/signup");
- }
- return bcrypt
- .hash(password, 12)
- .then(hashedPassword => {
- const user = new User({
- email: email,
- password: hashedPassword,
- cart: { items: [] }
- });
- return user.save();
- })
- .then(result => {
- console.log(email);
- res.redirect("/login");
- return transporter.sendMail({
- to: email,
- from: "bruce@muscularchristianityonline.com",
- subject: "Thanks for logging in!",
- html: "<h1>You successfully signed up!</h1>"
- });
- })
- .catch(err => {
- console.log(err);
- });
- })
- .catch(err => {
- console.log(err);
- });
- };
auth.js Controller (after)
- exports.postSignup = (req, res, next) => {
- const email = req.body.email;
- const password = req.body.password;
- const errors = validationResult(req);
- if (!errors.isEmpty()) {
- console.log(errors.array());
- return res.status(422).render("auth/signup", {
- path: "/signup",
- pageTitle: "Signup",
- errorMessage: errors.array()[0].msg
- });
- }
- bcrypt
- .hash(password, 12)
- .then(hashedPassword => {
- const user = new User({
- email: email,
- password: hashedPassword,
- cart: { items: [] }
- });
- return user.save();
- })
- .then(result => {
- console.log(email);
- res.redirect("/login");
- return transporter.sendMail({
- to: email,
- from: "bruce@muscularchristianityonline.com",
- subject: "Thanks for logging in!",
- html: "<h1>You successfully signed up!</h1>"
- });
- })
- .catch(err => {
- console.log(err);
- });
- };
<tr>
<td><span style="font-size:11pt;">Email</span></td>
<td><input type="email" name="email" id="email" value="<%=oldInput.email %>"></td>
</tr>
<tr>
<td><span style="font-size:11pt;">Password</span></td>
<td><input type="password" name="password" id="password" value="<%=oldInput.password %>"></td>>
</tr>
<tr>
<td><span style="font-size:11pt;">Confirm Password</span></td>
<td><input type="password" name="confirmPassword" id="confirmPassword" value="<%=oldInput.confirmPassword %>"></td>
</tr>
<tr>
<td colspan="2" style="text-align:center;"><br>
<input type="hidden" name="_csrf" value="<%= csrfToken %>" />
<button class="btn" type="submit">Signup</button>
</td>
</tr>
exports.getSignup = (req, res, next) => {
let message = req.flash("error");
if (message.length > 0) {
message = message[0];
} else {
message = null;
}
res.render("auth/signup", {
path: "/signup",
pageTitle: "Signup",
errorMessage: message,
oldInput: {
email: "",
password: "",
confirmPassword: ""
}
});
};
exports.postSignup = (req, res, next) => {
const email = req.body.email;
const password = req.body.password;
const errors = validationResult(req);
if (!errors.isEmpty()) {
console.log(errors.array());
return res.status(422).render("auth/signup", {
path: "/signup",
pageTitle: "Signup",
errorMessage: errors.array()[0].msg,
oldInput: {
email: email,
password: password,
confirmPassword: req.body.confirmPassword
},
validationErrors: errors.array()
});
}
bcrypt
.hash(password, 12)
.then(hashedPassword => {
const user = new User({
email: email,
password: hashedPassword,
cart: { items: [] }
});
return user.save();
})
.then(result => {
console.log(email);
res.redirect("/login");
return transporter.sendMail({
to: email,
from: "bruce@muscularchristianityonline.com",
subject: "Thanks for logging in!",
html: "
You successfully signed up!
" }); }) .catch(err => { console.log(err); }); };<form action='/signup' method="Post">
<table style="width:350px; margin:auto; border:1px solid #ccc; border-radius:10pt; padding:10px; box-shadow:5px 5px 3px #ccc;">
<tr>
<td><span style="font-size:11pt;">Email</span></td>
<td>
<input
class="<%= validationErrors.find(e=> e.param === 'email') ? 'invalid' : '' %>"
type="email"
name="email"
id="email"
value="<%=oldInput.email %>"
>
</td>
</tr>
<tr>
<td><span style="font-size:11pt;">Password</span></td>
<td>
<input
class="<%= validationErrors.find(e=> e.param === 'password') ? 'invalid' : '' %>"
type="password"
name="password"
id="password"
value="<%=oldInput.password %>"
>
</td>
</tr>
<tr>
<td><span style="font-size:11pt;">Confirm Password</span></td>
<td>
<input
class="<%= validationErrors.find(e=> e.param === 'confirmPassword') ? 'invalid' : '' %>"
type="password"
name="confirmPassword"
id="confirmPassword" value="<%=oldInput.confirmPassword %>"
>
</td>
</tr>
<tr>
<td colspan="2" style="text-align:center;"><br>
<input type="hidden" name="_csrf" value="<%= csrfToken %>" />
<button class="btn" type="submit">Signup</button>
</td>
</tr>
</table>
</form>
FYI: I redid the form so it shows up as a table with a box-shadow etc. We're not doing the "form-control" dynamic, so that's why you're only using ".invalid" as opposed to "form-control input.invalid."
I) Sanitizing Data (back to top...)
By "sanitizing," we're referring to ensuring that the email address is valid, convert any uppercase letters to lowercase (normalizeEmail), eliminate any superflous spaces etc. You're going to do that on your router page. In this case, it will be "auth.js" and the code looks like this:
router.post(
"/login",
[
body("email")
.isEmail()
.withMessage("Please enter a valid email.")
.normalizeEmail(),
body("password", "Password has to be valid.")
.isLength({ min: 5 })
.isAlphanumeric()
.trim()
],
authController.postLogin
);
router.post(
"/edit-product",
[
body("title")
.isAlphanumeric()
.isLength({ min: 3 })
.trim(),
body("imageURL").isURL(),
body("price").isFloat(),
body("description")
.isLength({ min: 5, max: 400 })
.trim()
],
isAuth,
adminController.postEditProduct
);
if (!errors.isEmpty()) {
console.log(errors);
return res.status(422).render("admin/edit-product", {
pageTitle: "Edit Product",
path: "/admin/edit-product",
editing: true,
hasError: true,
product: {
title: updatedTitle,
price: updatedPrice,
imageUrl: updatedImageUrl,
description: updatedDesc,
_id: prodId // be sure to include this in the information you're reproducing if you publish an error
},
errorMessage: errors.array()[0].msg, // grab some of the array functionality that's coming from your validator package and store it in the "errorMessage" variable that your .ejs file will be looking for
validationErrors: errors.array()
});
}
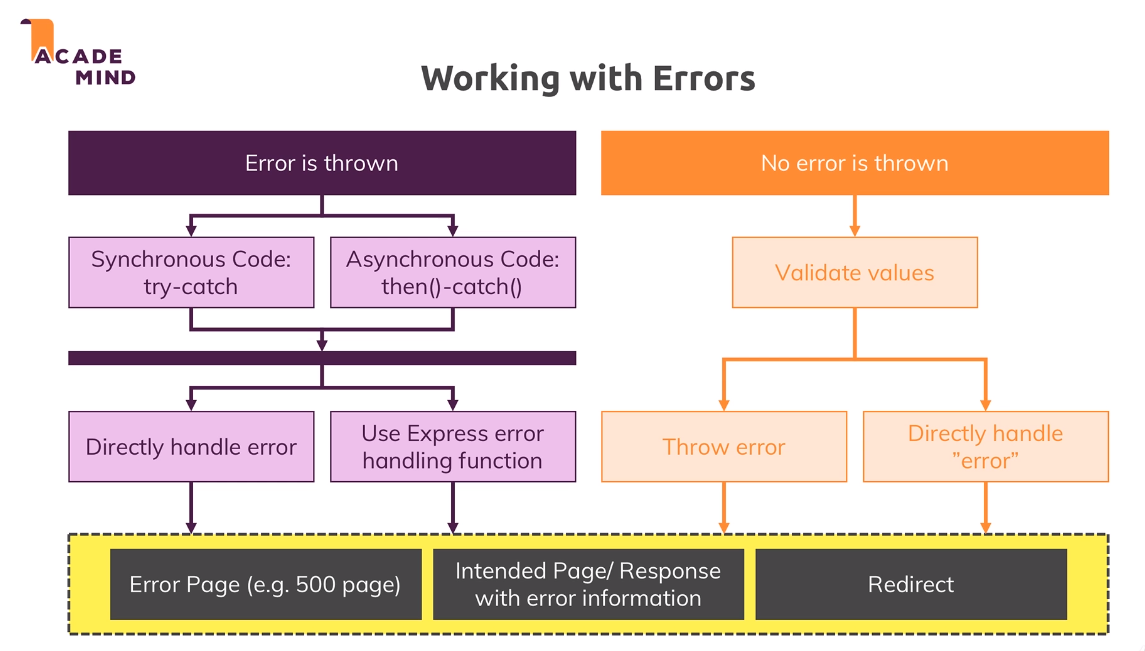
const sum = (a, b) => {
if (a && b) {
return a + b;
}
throw new Error("Invalid arguments");
};
console.log(sum(1));
brucegust@BRUCEGUST59AC MINGW64 /c/wamp/www/adm/node/express_tutorial
$ node errors-playground.js
C:\wamp\www\adm\node\express_tutorial\errors-playground.js:5
throw new Error("Invalid arguments"); // this is the actual location of the error when it was "thrown"
^
Error: Invalid arguments // here's your Call Stack and a summary of everything that happened right up to the point of the error being thrown
at sum (C:\wamp\www\adm\node\express_tutorial\errors-playground.js:5:9)
at Object.<anonymous> (C:\wamp\www\adm\node\express_tutorial\errors-playgrou
nd.js:8:13)
at Module._compile (internal/modules/cjs/loader.js:688:30)
at Object.Module._extensions..js (internal/modules/cjs/loader.js:699:10)
at Module.load (internal/modules/cjs/loader.js:598:32)
at tryModuleLoad (internal/modules/cjs/loader.js:537:12)
at Function.Module._load (internal/modules/cjs/loader.js:529:3)
at Function.Module.runMain (internal/modules/cjs/loader.js:741:12)
at startup (internal/bootstrap/node.js:285:19)
at bootstrapNodeJSCore (internal/bootstrap/node.js:739:3)
The thing you want to take note of is that when an error is "thrown," your app crashes and burns.
2) try /catch (syncronous)
If your code is being executed syncronously (meaning line by line - it's not waiting for anything like a file being uploaded or a row in a database being retrieved), you can use the "try / catch" approach.
Check it out! Here's your code:
const sum = (a, b) => {
if (a && b) {
return a + b;
}
throw new Error("Invalid arguments");
};
try {
console.log(sum(1));
} catch (error) {
console.log("Error occured!");
console.log(error);
}
brucegust@BRUCEGUST59AC MINGW64 /c/wamp/www/adm/node/express_tutorial
$ node errors-playground.js
Error occured!
Error: Invalid arguments
at sum (C:\wamp\www\adm\node\express_tutorial\errors-playground.js:5:9)
at Object. (C:\wamp\www\adm\node\express_tutorial\errors-playgrou
nd.js:9:15)
at Module._compile (internal/modules/cjs/loader.js:688:30)
at Object.Module._extensions..js (internal/modules/cjs/loader.js:699:10)
at Module.load (internal/modules/cjs/loader.js:598:32)
at tryModuleLoad (internal/modules/cjs/loader.js:537:12)
at Function.Module._load (internal/modules/cjs/loader.js:529:3)
at Function.Module.runMain (internal/modules/cjs/loader.js:741:12)
at startup (internal/bootstrap/node.js:285:19)
at bootstrapNodeJSCore (internal/bootstrap/node.js:739:3)
You get the error we put in place in the context of the "try / catch" dynamic and then the other stuff we saw earlier.
The thing to bear in mind is that we can proceed if we want to simply by removing the "thrown" error. If you get rid of the throw new Error("Invalid arguments");, the app would continue to run. That's something to keep in mind when you're wanting to maintain an elegant flow to your code even if something goes south.
For the asyncronous dynamic, you do what we've been doing throughout our app as far as the "then" block. Know that the "catch" portion of the "then" block is going to render all of the errors specified in your "then" clause.
B) Throwing Errors in Code (app.js) (back to top...)
Here's what we did to a portion of the app.js file. First here's the "before..."
app.use((req, res, next) => {
if (!req.session.user) {
return next();
}
User.findById(req.session.user._id)
.then(user => {
req.user = user;
next();
})
.catch(err => console.log(err));
});
app.use((req, res, next) => {
if (!req.session.user) {
❶ return next();
}
User.findById(req.session.user._id)
.then(user => {
if (!user) {
return next();
}
req.user = user;
❷ next();
})
.catch(err => {
throw new Error(err);
});
});
2
1
const mongoose = require("mongoose");
...
const product = new Product({
_id: new mongoose.Types.ObjectId("5d136c27d145ed475c184520"),
title: title,
price: price,
description: description,
imageUrl: imageUrl,
userId: req.user
});
at process._tickCallback (internal/process/next_tick.js:61:11)
driver: true,
name: 'MongoError',
index: 0,
code: 11000,
errmsg:
'E11000 duplicate key error collection: test.products index: _id_ dup key: { : ObjectId(\'5d136c27d145ed475c184520\') }',
[Symbol(mongoErrorContextSymbol)]: {} }
1) Regular Page (back to top...)
So, in this instance, a good way to handle this error is to use what we had going on with the "edit-product" dynamic and we're just going to copy and paste that code where we were normally just showing an error in the console.
Like this:
.catch(err => {
//console.log(err);
return res.status(500).render("admin/edit-product", {
pageTitle: "Add Product",
path: "/admin/add-product",
editing: false,
hasError: true,
product: {
title: title,
imageUrl: imageUrl,
price: price,
description: description
},
errorMessage: "Database operation failed, please try again.",
validationErrors: []
});
});
exports.get500 = (req, res, next) => {
res.status(500).render("500", {
pageTitle: "Whoops",
path: "/500",
isAuthenticated: req.session.isLoggedIn
});
};
app.get("/500", errorController.get500);
app.use(errorController.get404);
app.use((error, req, res, next) => {
res.redirect("/500");
});
(node:1320) UnhandledPromiseRejectionWarning: Error: Error: dummy
If you were to throw the error in more of an async fashion like this:
app.use((req, res, next) => {
throw new Error(err);
if (!req.session.user) {
return next();
}
User.findById(req.session.user._id)
.then(user => {
if (!user) {
return next();
}
req.user = user;
next();
})
.catch(err => {
throw new Error(err);
});
});
... you again encounter an infinite loop but not because your error is getting lost in the weeds. Instead, your code is being generated with each request. So when it goes to run the 500 page, it has to hit the initial "app.use" code which is asking for the 500 page and thus begins a circle that never concludes.
To get around that, you need to do three things:
First, render the 500 page right in your app;js code as opposed to redirecting it to a View...
app.use((error, req, res, next) => {
//res.redirect("/500");
res.status(500).render("500", {
pageTitle: "Whoops",
path: "/500",
isAuthenticated: req.session.isLoggedIn
});
});
app.use((req, res, next) => {
if (!req.session.user) {
return next();
}
User.findById(req.session.user._id)
.then(user => {
if (!user) {
return next();
}
req.user = user;
next();
})
.catch(err => {
//throw new Error(err);
next(new Error(err));
});
});
- 2XX -> Success
- 3XX -> Redirect
- 4XX-> Client Side Error
- 5XX-> Server Side Error
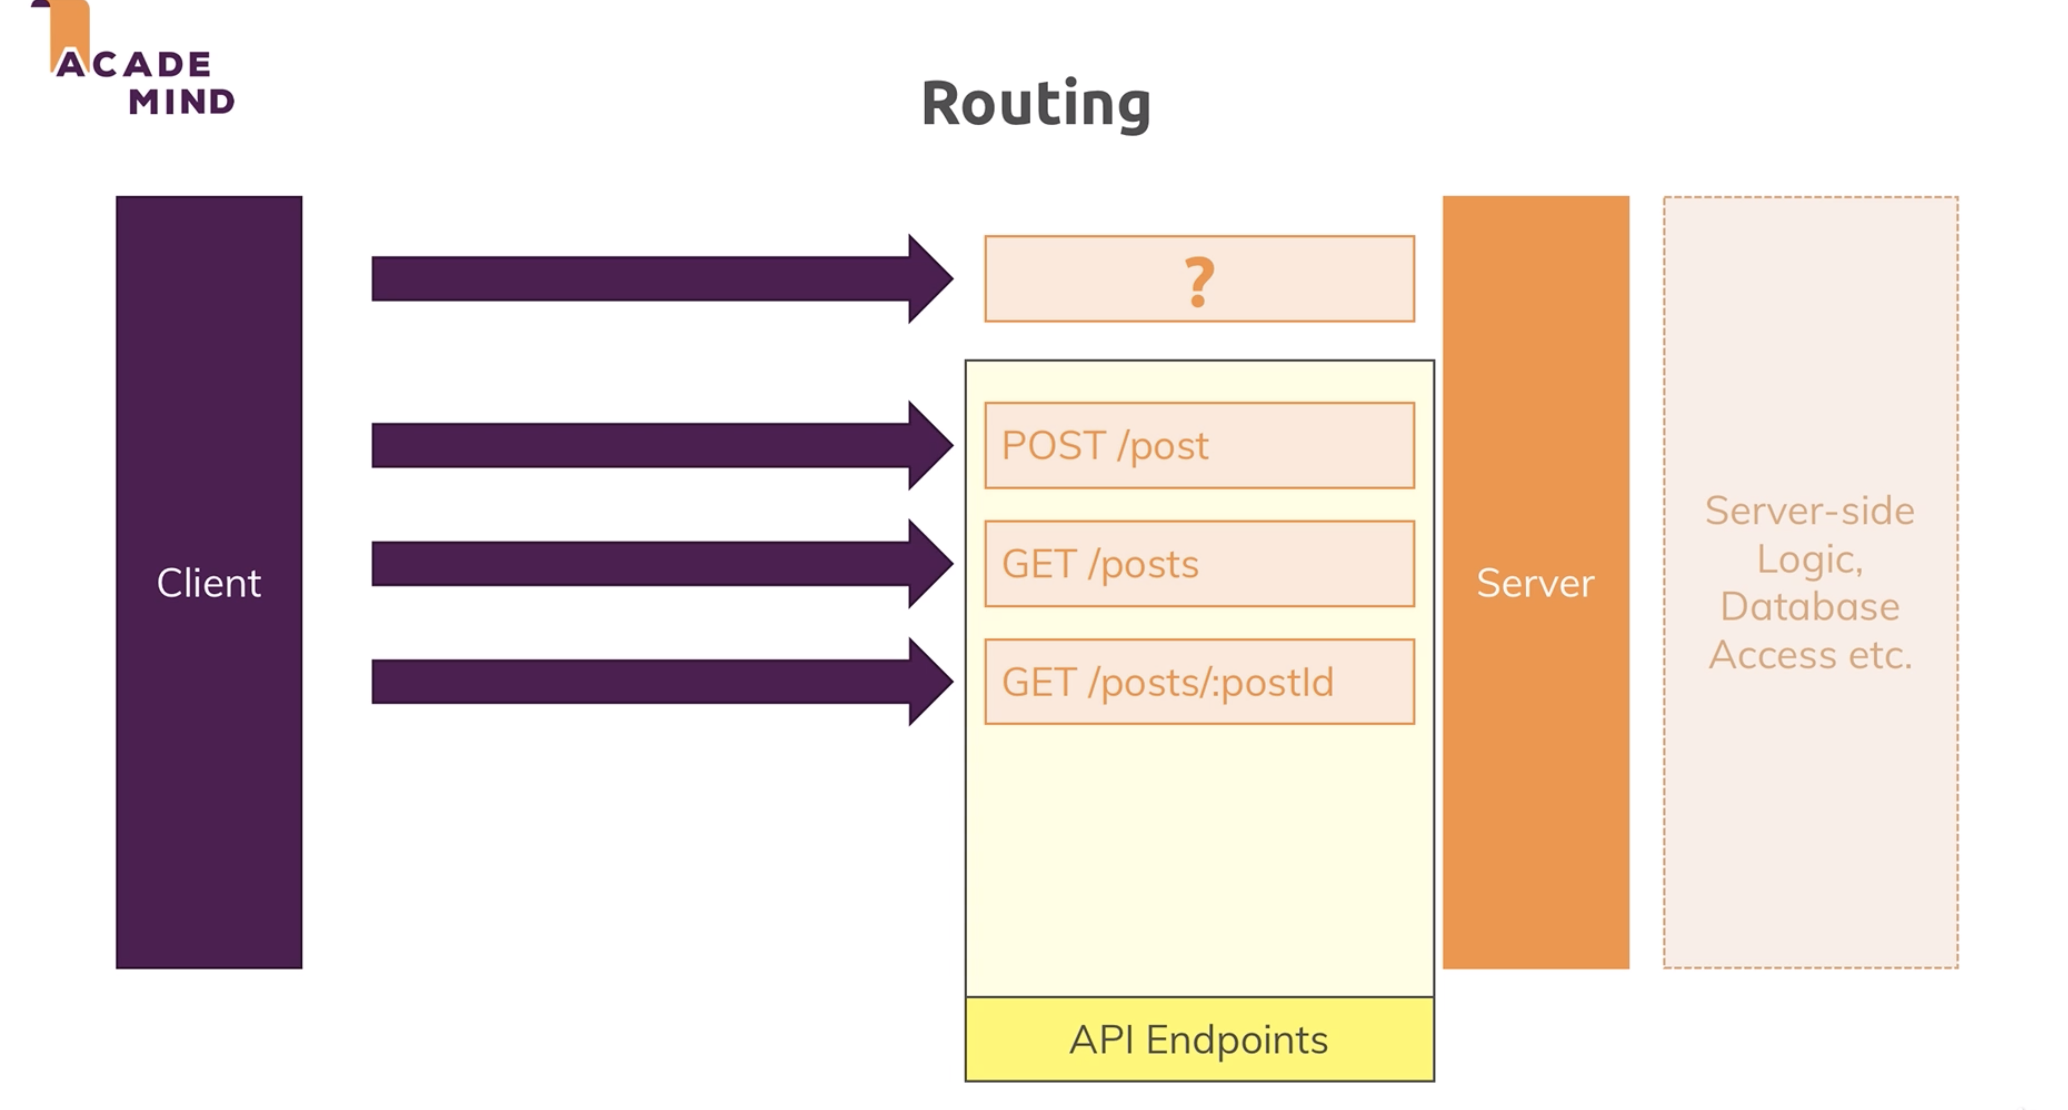
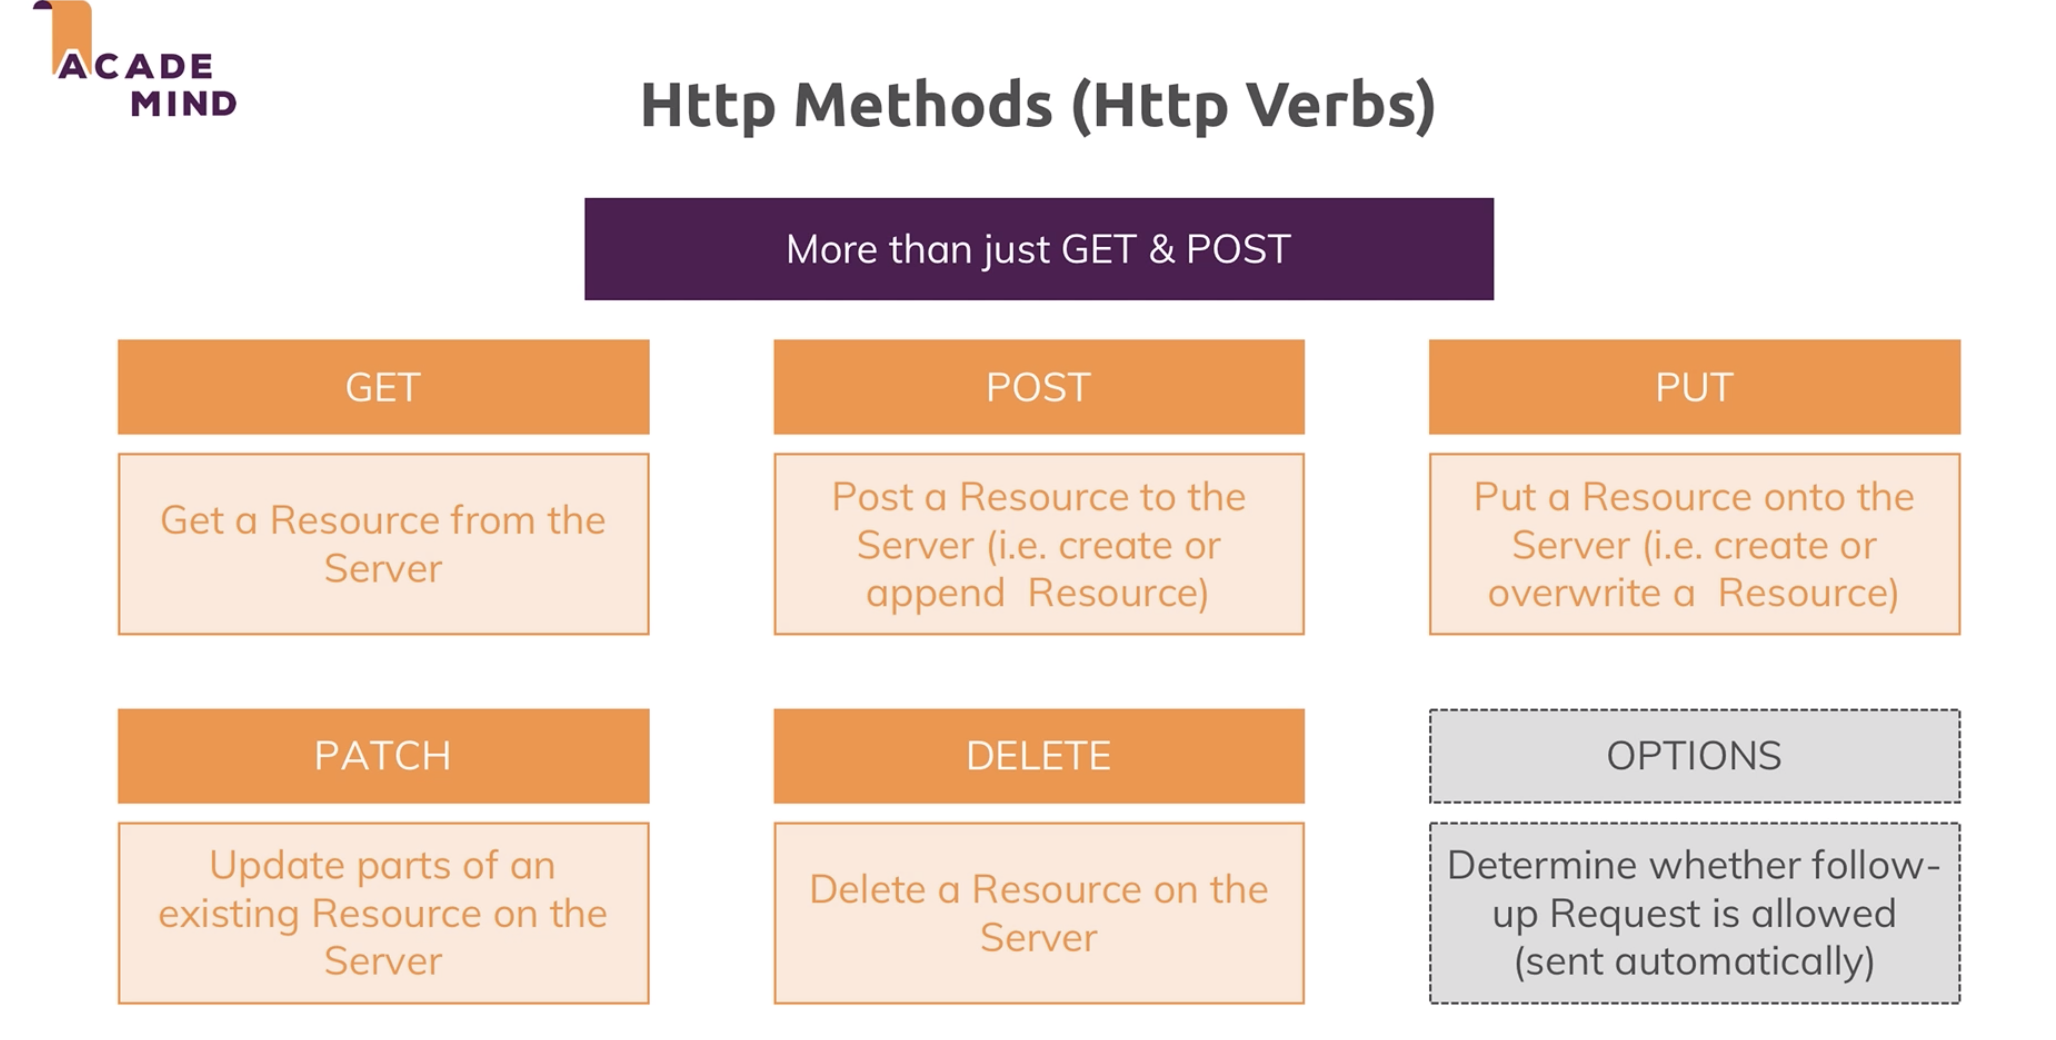
- UI -> we've already dealt with that somewhat in the context of OpenAPIs
- Stateless Interactions -> no session variables
- Cacheable -> some info can be stored in the apps head
- Client - Server -> persistent data / storage refers to data that is stored in the system after the user has powered down their app
- Layered System -> in the event you're dealing with an app that is utilizing multiple APIs<'li>
- Code on Demand -> very rare!
const express = require("express");
const bodyParser = require("body-parser");
const feedRoutes = require("./routes/feed");
const app = express();
app.use(bodyParser.json());
❶ app.use((req, res, next) => {
res.setHeader('Access-Control-Allow-Origin', '*');
res.setHeader('Access-Control-Allow-Methods', 'GET, POST, PUT, PATCH, DELETE');
res.setHeader('Access-Control-Allow-Headers', 'Content-Type, Authorization');
next();
});
app.use("/feed", feedRoutes);
app.listen(8080);
1
const express = require("express");
const feedController = require("../controllers/feed");
const router = express.Router();
//GET /feed/posts
router.get("/posts", feedController.getPosts);
router.post("/post", feedController.createPost);
module.exports = router;
exports.getPosts = (req, res, next) => {
res.status(200).json({
posts: [{ title: "First", content: "This is the first post!" }]
});
};
exports.createPost = (req, res, next) => {
const title = req.body.title;
const content = req.body.content;
res.status(201).json({
message: "Post created successfully",
post: { id: new Date().toISOString(), title: title, content: content }
});
};
{
"title": "My first post",
"content": "This is the content of my post"
}
GET REQUEST
HTML:
<button id="get">Get</button>
<button id="post">Post</button>
const getButton = document.getElementById('get');
const postButton = document.getElementById('post');
getButton.addEventListener('click', () => {
fetch('http://localhost:8080/feed/posts')
.then(res=>res.json())
.then(resData => console.log(resData))
.catch(err => console.log(err));
});
POST REQUEST
Same kind of thing with a POST request with a couple of differences in the way you structure the HTML:
postButton.addEventListener('click', () => {
fetch('http://localhost:8080/feed/post', {
method: 'POST',
❶ body: JSON.stringify({
title: "A codepen post",
content: "Boyhowdy"
}),
❷ headers: {
'Content-Type': 'application/json'
}
})
.then(res=>res.json())
.then(resData => console.log(resData))
.catch(err => console.log(err));
});
1
2
fetch(url, {
method: method,
headers: {
'Content-Type': 'application/json'
},
body: JSON.stringify({
title: postData.title,
content: postData.content
})
})
.then(res => {
if (res.status !== 200 && res.status !== 201) {
throw new Error('Creating or editing a post failed!');
}
return res.json();
})
.then(resData => {
console.log(resData);
const post = {
_id: resData.post._id,
title: resData.post.title,
content: resData.post.content,
creator: resData.post.creator,
createdAt: resData.post.createdAt
};
exports.createPost = (req, res, next) => {
const title = req.body.title;
const content = req.body.content;
res.status(201).json({
message: "Post created successfully",
post: {
_id: new Date().toISOString(),
title: title,
content: content,
creator: { name: "Bruce" },
createdAt: new Date()
}
});
};
const POST_FORM = {
title: {
value: '',
valid: false,
touched: false,
validators: [required, length({ min: 5 })]
},
image: {
value: '',
valid: false,
touched: false,
validators: [required]
},
content: {
value: '',
valid: false,
touched: false,
validators: [required, length({ min: 5 })]
}
};
const express = require("express");
❶ const { body } = require("express-validator/check");
const feedController = require("../controllers/feed");
const router = express.Router();
//GET /feed/posts
router.get("/posts", feedController.getPosts);
//POST /feed/post
router.post(
"/post",
❷ [
body("title")
.trim()
.isLength({ min: 5 }),
body("content")
.trim()
.isLength({ min: 5 })
],
feedController.createPost
);
module.exports = router;
1
2
const { validationResult } = require('express-validator/check');
...
exports.createPost = (req, res, next) => {
const errors = validationResult(req);
❶ if((!errors.isEmpty()) {
return res
.status(422)
.json({
message: "Validation failed, entered data is incorrect",
errors: errors.array()
});
}
const title = req.body.title;
const content = req.body.content;
res.status(201).json({
message: "Post created successfully",
post: {
_id: new Date().toISOString(),
title: title,
content: content,
content: content,
creator: { name: "Bruce" },
createdAt: new Date()
}
});
};
1
Be certain that your validation criteria is the same between your React and your API! Otherwise your user may not get an error that they can see on their screen, yet the code will still fail because of validation criteria that differs on the server side!
D) Adding a Database (back to top...)
post.js (model)
const mongoose = require("mongoose");
const Schema = mongoose.Schema;
const postSchema = new Schema(
{
title: {
type: String,
required: true
},
imageUrl: {
type: String,
required: true
},
content: {
type: String,
required: true
},
creator: {
type: Object,
required: String
}
},
{ timestamps: true }
);
module.exports = mongoose.model("Post", postSchema);
const { validationResult } = require("express-validator/check");
❶ const Post = require("../models/post");
exports.getPosts = (req, res, next) => {
res.status(200).json({
posts: [
{
_id: "1",
title: "First",
content: "This is the first post!",
imageUrl: "images/conjuction_junction.jpg",
creator: {
name: "Bruce"
},
createdAt: new Date()
}
]
});
};
exports.createPost = (req, res, next) => {
const errors = validationResult(req);
if (!errors.isEmpty()) {
return res.status(422).json({
message: "Validation failed, entered data is incorrect",
errors: errors.array()
});
}
const title = req.body.title;
const content = req.body.content;
❷ const post = new Post({
title: title,
content: content,
imageUrl: "images/conjuction_junction.jpg",
creator: { name: "Bruce" }
});
❸ post
.save()
.then(result => {
console.log(result);
res.status(201).json({
message: "Post created successfully",
post: result
});
})
.catch(err => {
console.log(err);
});
};
1
2
3
app.use((error, req, res, next) => {
console.log(error);
const status = error.statusCode;
const message = error.message;
res.status(status).json({ message: message });
});
const { validationResult } = require("express-validator/check");
const Post = require("../models/post");
exports.getPosts = (req, res, next) => {
res.status(200).json({
posts: [
{
_id: "1",
title: "First",
content: "This is the first post!",
imageUrl: "images/conjuction_junction.jpg",
creator: {
name: "Bruce"
},
createdAt: new Date()
}
]
});
};
exports.createPost = (req, res, next) => {
❶ const errors = validationResult(req);
if (!errors.isEmpty()) {
const error = new Error("Validation failed, entered data is incorrect.");
error.statusCode = 422;
throw error;
}
const title = req.body.title;
const content = req.body.content;
const post = new Post({
title: title,
content: content,
imageUrl: "images/conjuction_junction.jpg",
creator: { name: "Bruce" }
});
post
.save()
.then(result => {
console.log(result);
res.status(201).json({
message: "Post created successfully",
post: result
});
})
❷ .catch(err => {
if (!err.statusCode) {
err.statusCode = 500;
}
next(err);
});
};
1
2
One little but crucial thing: On your route, be sure to include the "/" character after "post" and before the ":" Otherwise, it won't work.
...and then for your Controller you'll do this:
exports.getPost = (req, res, next) => {
const postId = req.params.postId;
Post.findById(postId)
.then(post => {
if (!post) {
const error = new Error("Could not find post.");
error.statusCode = 404;
throw error;
}
console.log("good");
res.status(200).json({ message: "Post fetched.", post: post });
})
.catch(err => {
if (!err.statusCode) {
err.statusCode = 500;
}
next(err);
});
};
componentDidMount() {
const postId = this.props.match.params.postId;
fetch('http://localhost:8080/feed/post/' + postId)
.then(res => {
console.log("here");
if (res.status !== 200) {
throw new Error('Failed to fetch status');
}
return res.json();
})
.then(resData => {
this.setState({
title: resData.post.title,
author: resData.post.creator.name,
date: new Date(resData.post.createdAt).toLocaleDateString('en-US'),
content: resData.post.content
});
})
.catch(err => {
console.log(err);
});
}
const path = require("path");
const express = require("express");
const bodyParser = require("body-parser");
const mongoose = require("mongoose");
const multer = require("multer");
//const uuidv4 = require("uuid/v4");
const fileStorage = multer.diskStorage({
destination: (req, file, cb) => {
cb(null, "images");
},
filename: (req, file, cb) => {
//cb(null, uuidv4());
cb(null, file.originalname);
}
});
const fileFilter = (req, file, cb) => {
if (
file.mimetype === "image/png" ||
file.mimetype === "image/jpg" ||
file.mimetype === "image/jpeg"
) {
cb(null, true);
} else {
cb(null, false);
}
};
app.use(bodyParser.json());
app.use(
multer({
storage: fileStorage,
fileFilter: fileFilter
}).single("image")
);
.catch(err => console.log(err));
exports.createPost = (req, res, next) => {
const errors = validationResult(req);
if (!errors.isEmpty()) {
const error = new Error("Validation failed, entered data is incorrect.");
error.statusCode = 422;
throw error;
}
if (!req.file) {
const error = new Error("No image provided");
errorStatusCode = 422;
throw error;
}
const imageUrl = req.file.path.replace("\\", "/");
const title = req.body.title;
const content = req.body.content;
const post = new Post({
title: title,
content: content,
imageUrl: imageUrl,
creator: { name: "Bruce" }
});
post
.save()
.then(result => {
console.log(result);
res.status(201).json({
message: "Post created successfully",
post: result
});
})
.catch(err => {
if (!err.statusCode) {
err.statusCode = 500;
}
next(err);
});
};
const express = require("express");
const { body } = require("express-validator/check");
const feedController = require("../controllers/feed");
const router = express.Router();
//GET /feed/posts
router.get("/posts", feedController.getPosts);
//POST /feed/post
router.post(
"/post",
[
body("title")
.trim()
.isLength({ min: 5 }),
body("content")
.trim()
.isLength({ min: 5 })
],
feedController.createPost
);
router.get("/post/:postId", feedController.getPost);
router.put(
"/post/:postId",
[
body("title")
.trim()
.isLength({ min: 5 }),
body("content")
.trim()
.isLength({ min: 5 })
],
feedController.updatePost
);
module.exports = router;
const fs = require("fs");
const path = require("path");
const { validationResult } = require("express-validator/check");
const Post = require("../models/post");
exports.getPosts = (req, res, next) => {
Post.find()
.then(posts => {
res
.status(200)
.json({ message: "Fetched posts successfully.", posts: posts });
})
.catch(err => {
if (!err.statusCode) {
err.statusCode = 500;
}
next(err);
});
};
exports.createPost = (req, res, next) => {
const errors = validationResult(req);
if (!errors.isEmpty()) {
const error = new Error("Validation failed, entered data is incorrect.");
error.statusCode = 422;
throw error;
}
if (!req.file) {
const error = new Error("No image provided");
errorStatusCode = 422;
throw error;
}
const imageUrl = req.file.path.replace("\\", "/");
const title = req.body.title;
const content = req.body.content;
const post = new Post({
title: title,
content: content,
imageUrl: imageUrl,
creator: { name: "Bruce" }
});
post
.save()
.then(result => {
console.log(result);
res.status(201).json({
message: "Post created successfully",
post: result
});
})
.catch(err => {
if (!err.statusCode) {
err.statusCode = 500;
}
next(err);
});
};
exports.getPost = (req, res, next) => {
const postId = req.params.postId;
Post.findById(postId)
.then(post => {
if (!post) {
const error = new Error("Could not find post.");
error.statusCode = 404;
throw error;
}
console.log("good");
res.status(200).json({ message: "Post fetched.", post: post });
})
.catch(err => {
if (!err.statusCode) {
err.statusCode = 500;
}
next(err);
});
};
exports.updatePost = (req, res, next) => {
const postId = req.params.postId;
console.log("hello" + postId);
const errors = validationResult(req);
if (!errors.isEmpty()) {
const error = new Error("Validation failed, entered data is incorrect.");
error.statusCode = 422;
throw error;
}
const title = req.body.title;
const content = req.body.content;
let imageUrl = req.body.image;
if (req.file) {
imageUrl = req.file.path;
}
if (!imageUrl) {
const error = new Error("No file picked.");
error.statusCode = 422;
throw error;
}
Post.findById(postId)
.then(post => {
if (!post) {
const error = new Error("No file picked.");
error.statusCode = 422;
throw error;
}
if (imageUrl !== post.imageUrl) {
clearImage(post.imageUrl);
}
post.title = title;
post.imageUrl = imageUrl;
post.content = content;
return post.save();
})
.then(result => {
res.status(200).json({ message: "Post created", post: result });
})
.catch(err => {
if (!err.statusCode) {
err.statusCode = 500;
}
next(err);
});
};
const clearImage = filePath => {
filePath = path.join(__dirname, "..", filePath);
fs.unlink(filePath, err => console.log(err));
};
const path = require("path");
const express = require("express");
const bodyParser = require("body-parser");
const mongoose = require("mongoose");
const multer = require("multer");
//const uuidv4 = require("uuid/v4");
const feedRoutes = require("./routes/feed");
const app = express();
const fileStorage = multer.diskStorage({
destination: (req, file, cb) => {
cb(null, "images");
},
filename: (req, file, cb) => {
//cb(null, uuidv4());
cb(null, file.originalname);
}
});
const fileFilter = (req, file, cb) => {
if (
file.mimetype === "image/png" ||
file.mimetype === "image/jpg" ||
file.mimetype === "image/jpeg"
) {
cb(null, true);
} else {
cb(null, false);
}
};
app.use(bodyParser.json());
app.use(
multer({
storage: fileStorage,
fileFilter: fileFilter
}).single("image")
);
app.use("/images", express.static(path.join(__dirname, "images")));
app.use((req, res, next) => {
res.setHeader("Access-Control-Allow-Origin", "*");
res.setHeader(
"Access-Control-Allow-Methods",
"GET, POST, PUT, PATCH, DELETE"
);
res.setHeader("Access-Control-Allow-Headers", "Content-Type, Authorization");
next();
});
app.use("/feed", feedRoutes);
app.use((error, req, res, next) => {
console.log(error);
const status = error.statusCode;
const message = error.message;
res.status(status).json({ message: message });
});
mongoose
.connect(
"mongodb+srv://brucegust:M1ch3ll3@brucegust-qhxnz.mongodb.net/messages"
)
.then(result => {
app.listen(8080);
})
.catch(err => console.log(err));
exports.deletePost = (req, res, next) => {
const postId = req.params.postId; // grab the product ID
Post.findById(postId)
.then(post => { // we used this code before to find out if we've got a product in the database
if (!post) {
const error = new Error("Could not find post.");
error.statusCode = 404;
throw error;
}
clearImage(post.imageUrl); // kill the image
❶ return Post.findByIdAndRemove(postId); // this is your delete code
})
.then(result => {
console.log(result);
res.status(200).json({ message: "Deleted post!" });
})
.catch(err => {
if (!err.statusCode) {
err.statusCode = 500;
}
next(err);
});
};
1
loadPosts = direction => {
if (direction) {
this.setState({ postsLoading: true, posts: [] });
}
let page = this.state.postPage;
if (direction === 'next') {
page++;
this.setState({ postPage: page });
}
if (direction === 'previous') {
page--;
this.setState({ postPage: page });
}
fetch('http://localhost:8080/feed/posts?page=' + page) here's the URL that you're getting your info from. Notice the "+ page" dynamic. This is different than what you had before. You'll be passing the page value back into your backend code.
.then(res => {
if (res.status !== 200) {
throw new Error('Failed to fetch posts');
}
return res.json();
})
.then(resData => {
this.setState({
posts: resData.posts.map(post => {
return {
...post,
imagePath: post.imageUrl
};
}),
totalPosts: resData.totalItems,
postsLoading: false
});
})
.catch(this.catchError);
};
exports.getPosts = (req, res, next) => {
❶ const currentPage = req.query.page || 1;
❷ const perPage = 2;
❸ let totalItems;
Post.find() // "post" refers to your model which is your "post" table
❹ .countDocuments()
.then(count => {
❺ totalItems = count;
❻ return Post.find() // be sure to refer to the supplementary info about how"
return works in this context
❼ .skip((currentPage - 1) * perPage)
❽ .limit(perPage);
})
.then(posts => {
res.status(200).json({
message: "Fetched posts successfully",
posts: posts,
❾ totalItems: totalItems
});
})
.catch(err => {
if (!err.statusCode) {
err.statusCode = 500;
}
next(err);
});
};
1
2
3
4
5
6
You still looking at it in the correct context, but the bit I think you're missing is that you're actually chaining anonymous functions together. Your return statement does exit the flow of the function it's contained in. Instead of using anonymous function, think of it more like this:
function DeletePost(post) {
if (!post) {
const error = new Error("Could not find post.");
error.statusCode = 404;
throw error;
}
//check login user
clearImage(post.imageUrl);
return Post.findByIdAndRemove(postId);
}
If you expand out your anonymous functions to full functions, it might be a little clearer:
Post.findById(postId)
.then(DeletePost)
.then(OutputTheResult)
.catch(ErrorHandler);
function DeletePost(post) {
// the findById returns a Post (by resolving a promise)
// that gets passed into this function which we can use in here
// and we can also return something from this function which will be passed into the next
if (!post) {
const error = new Error("Could not find post.");
error.statusCode = 404;
throw error;
}
//check login user
clearImage(post.imageUrl);
return Post.findByIdAndRemove(postId);
}
function OutputTheResult(result) {
// result is what gets returned from the previous function
console.log(result);
res.status(200).json({ message: "Deleted post!" });
}
function ErrorHandler(err) {
// Oops - Something went wrong!
}
Your return is still just returning a value from a function. It's just that when you chain your functions together like that, the value returned is just automatically passed as a parameter into the next function. Take a look a this:
var myResult = DoSomething();
var nextResult = AnotherFunction( myResult );
var lastResult = FinalFunction( nextResult );
console.log( lastResult );
All we're doing here is manually assigning the return value of a function to variable. We're then passing that variable into another function, and so on and so on :)
The reason we chain like this using promises is because when we call an Async function, we never know when that function will complete (it might take a millisecond / it might take 10 seconds), but it does promise to return at some point. With a promise, you then call the next function, passing in the result of previous call.
7
8
9
const mongoose = require('mongoos');
const Schema = mongoose.Schema;
const userSchema = new Schema({
email: {
type: String,
required: true
},
password: {
type: String,
required: true
},
name: {
type: String,
required: true
},
status {
type: String,
required: true
},
posts: [
{
type: Schema.types.ObjectId,
ref: 'Post'
}
]
});
module.exports = mongoose.model('User', userSchema);
const express = require("express");
❶ const { body } = require("express-validator/check");
const User = require("../models/user");
const authController = require("../controllers/auth");
const router = express.Router();
router.put(
"/signup",
[
body("email")
.isEmail()
.withMessage("Please enter a valid email.")
.custom((value, { req }) => {
return User.findOne({ email: value }).then(userDoc => {
if (userDoc) {
return Promise.reject("Email already exists!");
}
});
})
.normalizeEmail(),
body("password")
.trim()
.isLength({ min: 5 }),
body("name")
.trim()
.not()
.isEmpty()
],
authController.signup
);
module.exports = router;
1
const User = require("..model/user");
const { validationResult } = require("express-validator/check");
exports.signup = (req, res, next) => {
const errors = validationResult(req); // here's where you're grabbing the errors
if (!errors.isEmpty()) {
const error = new Error("Validation failed!");
error.statusCode = 422;
error.data = errors.array(); // here's what you'll be passing to your app.js file
throw error;
}
const email = req.body.email;
const name = req.body.name;
const password = req.body.password;
};
const { validationResult } = require("express-validator/check");
const bcrypt = require('bcryptjs');
const User = require("../models/user");
exports.signup = (req, res, next) => {
const errors = validationResult(req);
if (!errors.isEmpty()) {
const error = new Error("Validation failed!");
error.statusCode = 422;
error.data = errors.array();
throw error;
}
const email = req.body.email;
const name = req.body.name;
const password = req.body.password;
bcrypt
.hash(password, 12)
.then(hashedPw => {
const user = new User({
email: email,
password: hashedPw,
name: name
});
return user.save();
})
.then(result => {
res.status(201)
.json({message: 'User created!', userId: result._id });
})
.catch(err => {
if(!err.statusCode) {
err.StatusCode = 500;
}
next(err);
});
};
signupHandler = (event, authData) => {
event.preventDefault();
this.setState({ authLoading: true });
fetch("http://localhost:8080/auth/signup", {
method: "PUT",
headers: {
"Content-Type": "application/json"
},
body: JSON.stringify({
email: authData.signupForm.email.value,
password: authData.signupForm.password.value,
name: authData.signupForm.name.value
})
})
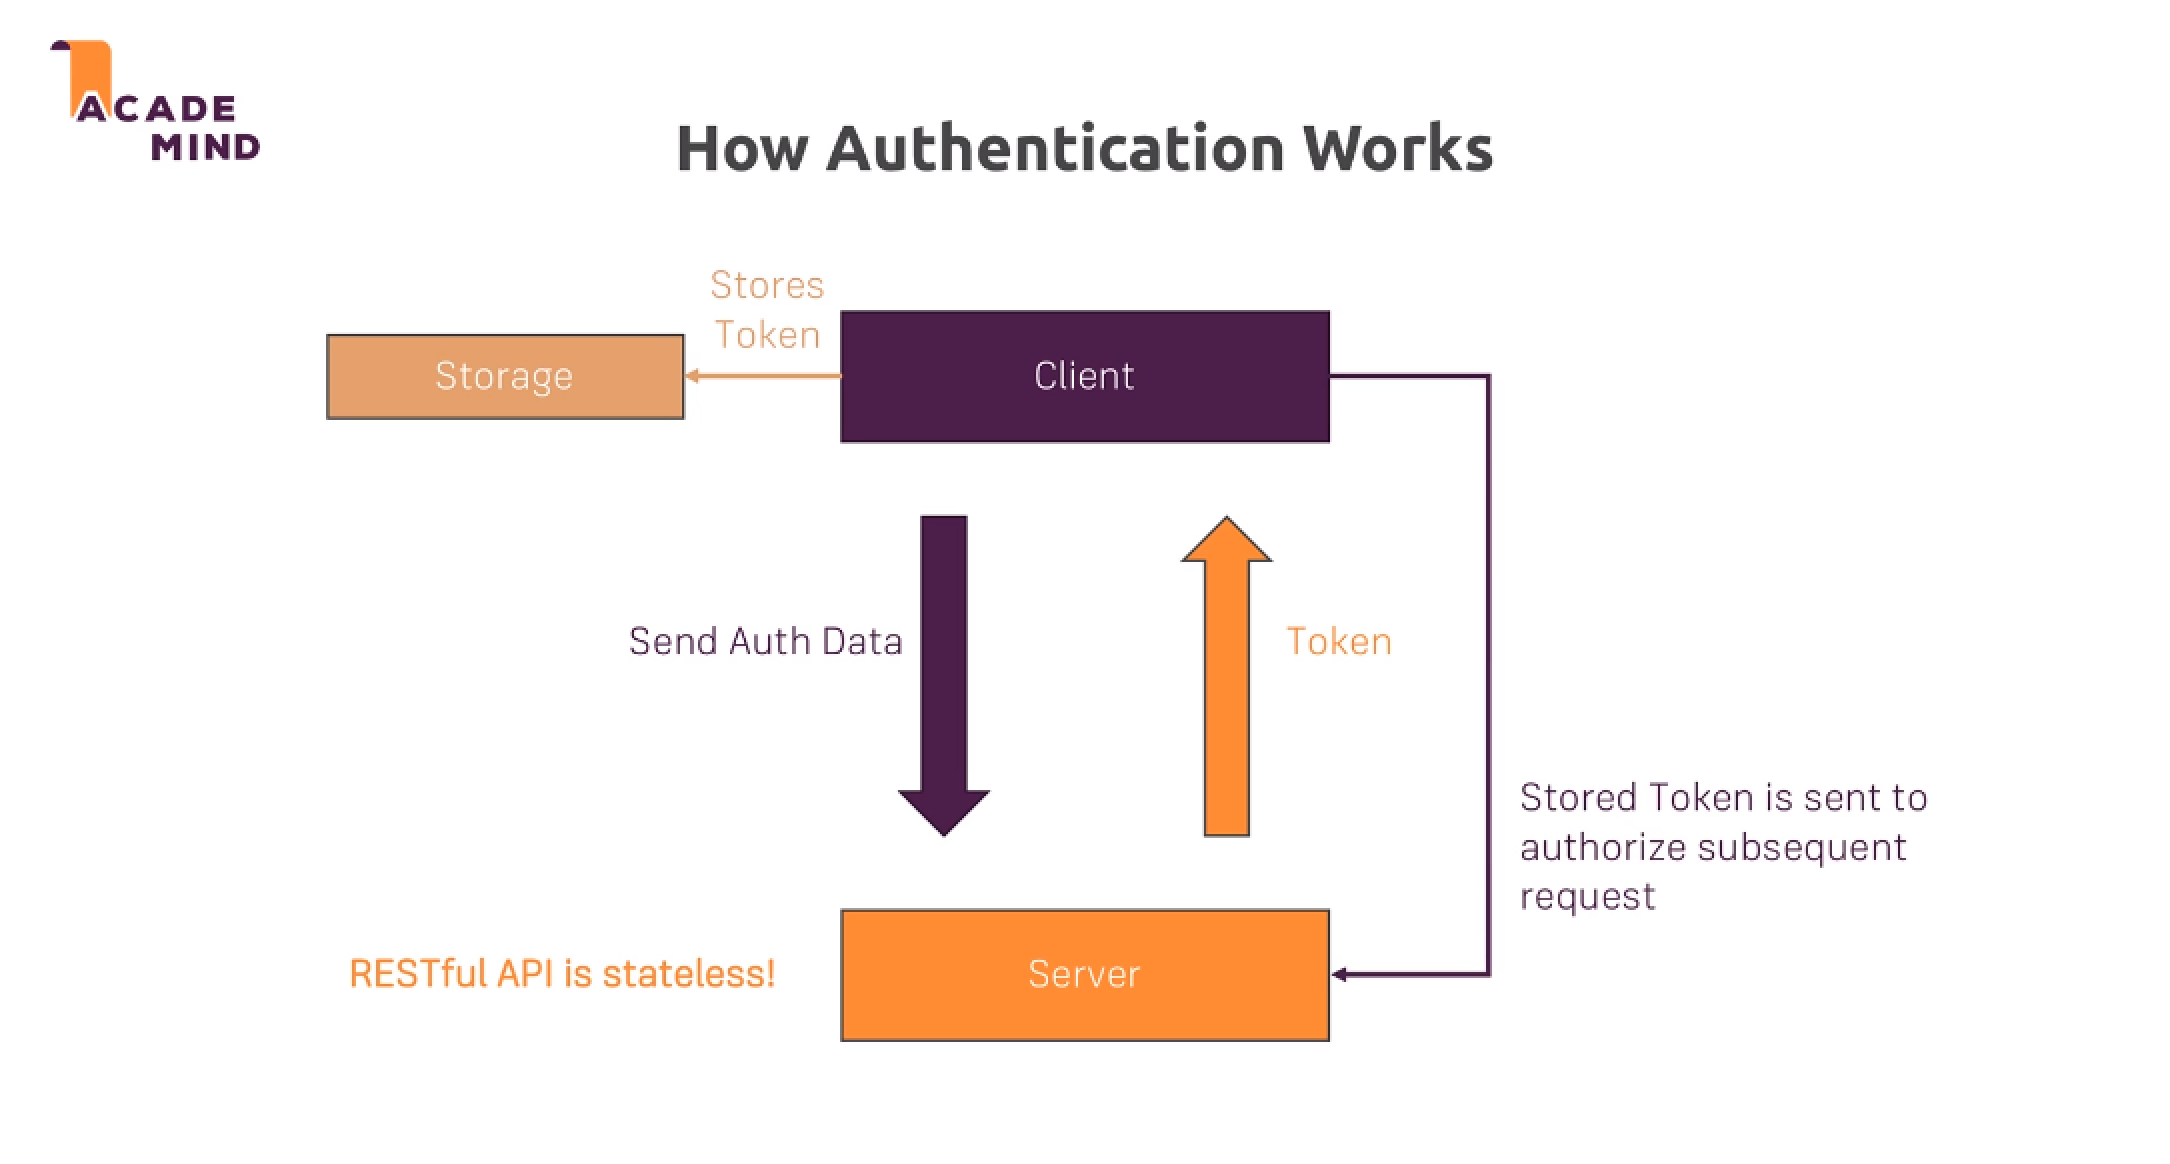
exports.login = (req, res, next) => {
const email = req.body.email;
const password = req.body.password;
❶ let loadedUser;
❷ User.findOne({ email: email })
.then(user => {
if(!user) = {
const error = new Error('A user with this email could not be found.');
error.statusCode = 401;
throw error;
}
❸ loadedUser = user;
❹ return bcrypt.compare(password, user.password);
})
❺ .then(isEqual => {
if(!isEqual) {
const error = new Error('Wrong password!');
error.statusCode = 401;
throw error;
}
//right here
})
.catch(err => {
if(!err.statusCode) {
err.StatusCode = 500;
}
next(err);
});
};
1
2
3
4
5
exports.login = (req, res, next) => {
const email = req.body.email;
const password = req.body.password;
let loadedUser;
User.findOne({ email: email })
.then(user => {
if(!user) {
const error = new Error('A user with this email could not be found.');
error.statusCode = 401;
throw error;
}
loadedUser = user;
return bcrypt.compare(password, user.password);
})
.then(isEqual => {
if(!isEqual) {
const error = new Error('Wrong password!');
error.statusCode = 401;
throw error;
}
const token = jwt.sign({
email: loadedUser.email,
userId: loadedUser._id.toString()
},
'secret',
{ expiresIn: '1h' }
);
res.status(200).json({ token: token, userId: loadedUser._id.toString() });
})
.catch(err => {
if(!err.statusCode) {
err.StatusCode = 500;
}
next(err);
});
};
loginHandler = (event, authData) => {
event.preventDefault();
this.setState({ authLoading: true });
fetch("http://localhost:8080/auth/login", {
method: "Post",
headers: {
"Content-Type": "application/json"
},
body: JSON.stringify({
email: authData.email,
password: authData.password
})
})
.then(res => {
if (res.status === 422) {
throw new Error("Validation failed.");
}
if (res.status !== 200 && res.status !== 201) {
console.log("Error!");
throw new Error("Could not authenticate you!");
}
return res.json();
})
.then(resData => {
console.log(resData);
this.setState({
isAuth: true,
token: resData.token,
authLoading: false,
userId: resData.userId
});
localStorage.setItem("token", resData.token);
localStorage.setItem("userId", resData.userId);
const remainingMilliseconds = 60 * 60 * 1000;
const expiryDate = new Date(
new Date().getTime() + remainingMilliseconds
);
localStorage.setItem("expiryDate", expiryDate.toISOString());
this.setAutoLogout(remainingMilliseconds);
})
.catch(err => {
console.log(err);
this.setState({
isAuth: false,
authLoading: false,
error: err
});
});
};
loadPosts = direction => {
if (direction) {
this.setState({ postsLoading: true, posts: [] });
}
let page = this.state.postPage;
if (direction === 'next') {
page++;
this.setState({ postPage: page });
}
if (direction === 'previous') {
page--;
this.setState({ postPage: page });
}
fetch('http://localhost:8080/feed/posts?page=' + page, {
headers: {
Authorization: 'Bearer ' + this.props.token
}
})
.then(res => {
if (res.status !== 200) {
throw new Error('Failed to fetch posts');
}
return res.json();
})
.then(resData => {
this.setState({
posts: resData.posts.map(post => {
return {
...post,
imagePath: post.imageUrl
};
}),
totalPosts: resData.totalItems,
postsLoading: false
});
})
.catch(this.catchError);
};
❶ const jwt = require('jsonwebtoken');
module.exports = (req, res, next) => {
❷ const authHeader = req.get('Authorization');
if(!authHeader) {
const error = new Error('Not Authenticated');
error.statusCode = 401;
throw error;
}
❸ const token = req.get('Authorization').split(' ')[1];
let decodedToken;
try {
❹ decodedToken = jwt.verify(token, 'secret');
❺ } catch (err) {
err.statusCode = 500;
throw err;
}
❻ if(!decodedToken) {
const error = new Error('Not Authenticated');
error.statuscode = 401;
throw error;
}
❼ req.userID = decodedToken.userId;
next();
};
1
2
3
4
exports.login = (req, res, next) => {
const email = req.body.email;
const password = req.body.password;
let loadedUser;
User.findOne({ email: email })
.then(user => {
if(!user) {
const error = new Error('A user with this email could not be found.');
error.statusCode = 401;
throw error;
}
loadedUser = user;
return bcrypt.compare(password, user.password);
})
.then(isEqual => {
if(!isEqual) {
const error = new Error('Wrong password!');
error.statusCode = 401;
throw error;
}
const token = jwt.sign({
email: loadedUser.email,
userId: loadedUser._id.toString()
},
'secret',
{ expiresIn: '1h' }
);
res.status(200).json({ token: token, userId: loadedUser._id.toString() });
})
.catch(err => {
if(!err.statusCode) {
err.StatusCode = 500;
}
next(err);
});
};
5
6
7
const express = require("express");
const { body } = require("express-validator/check");
const feedController = require("../controllers/feed");
const isAuth = require('../middleware/is-auth');
const router = express.Router();
//GET /feed/posts
router.get("/posts", isAuth, feedController.getPosts);
//POST /feed/post
router.post(
"/post",
[
body("title")
.trim()
.isLength({ min: 5 }),
body("content")
.trim()
.isLength({ min: 5 })
],
feedController.createPost
);
router.get("/post/:postId", feedController.getPost);
router.put(
"/post/:postId",
[
body("title")
.trim()
.isLength({ min: 5 }),
body("content")
.trim()
.isLength({ min: 5 })
],
feedController.updatePost
);
router.delete("/post/:postId", feedController.deletePost);
module.exports = router;
import React, { Component, Fragment } from 'react';
import Post from '../../components/Feed/Post/Post';
import Button from '../../components/Button/Button';
import FeedEdit from '../../components/Feed/FeedEdit/FeedEdit';
import Input from '../../components/Form/Input/Input';
import Paginator from '../../components/Paginator/Paginator';
import Loader from '../../components/Loader/Loader';
import ErrorHandler from '../../components/ErrorHandler/ErrorHandler';
import './Feed.css';
class Feed extends Component {
state = {
isEditing: false,
posts: [],
totalPosts: 0,
editPost: null,
status: '',
postPage: 1,
postsLoading: true,
editLoading: false
};
componentDidMount() {
fetch('URL')
.then(res => {
if (res.status !== 200) {
throw new Error('Failed to fetch user status.');
}
return res.json();
})
.then(resData => {
this.setState({ status: resData.status });
})
.catch(this.catchError);
this.loadPosts();
}
loadPosts = direction => {
if (direction) {
this.setState({ postsLoading: true, posts: [] });
}
let page = this.state.postPage;
if (direction === 'next') {
page++;
this.setState({ postPage: page });
}
if (direction === 'previous') {
page--;
this.setState({ postPage: page });
}
fetch('http://localhost:8080/feed/posts?page=' + page, {
headers: {
Authorization: 'Bearer ' + this.props.token
}
})
.then(res => {
if (res.status !== 200) {
throw new Error('Failed to fetch posts');
}
return res.json();
})
.then(resData => {
this.setState({
posts: resData.posts.map(post => {
return {
...post,
imagePath: post.imageUrl
};
}),
totalPosts: resData.totalItems,
postsLoading: false
});
})
.catch(this.catchError);
};
statusUpdateHandler = event => {
event.preventDefault();
fetch('URL')
.then(res => {
if (res.status !== 200 && res.status !== 201) {
throw new Error("Can't update status!");
}
return res.json();
})
.then(resData => {
console.log(resData);
})
.catch(this.catchError);
};
newPostHandler = () => {
this.setState({ isEditing: true });
};
startEditPostHandler = postId => {
this.setState(prevState => {
const loadedPost = { ...prevState.posts.find(p => p._id === postId) };
return {
isEditing: true,
editPost: loadedPost
};
});
};
cancelEditHandler = () => {
this.setState({ isEditing: false, editPost: null });
};
finishEditHandler = postData => {
this.setState({
editLoading: true
});
const formData = new FormData();
formData.append('title', postData.title);
formData.append('content', postData.content);
formData.append('image', postData.image);
let url = 'http://localhost:8080/feed/post';
let method = 'POST';
if (this.state.editPost) {
url = 'http://localhost:8080/feed/post/' + this.state.editPost._id;
method = 'PUT';
}
fetch(url, {
method: method,
body: formData,
headers: {
Authorization: 'Bearer ' + this.props.token
}
})
.then(res => {
if (res.status !== 200 && res.status !== 201) {
throw new Error('Creating or editing a post failed!');
}
return res.json();
})
.then(resData => {
console.log(resData);
const post = {
_id: resData.post._id,
title: resData.post.title,
content: resData.post.content,
creator: resData.post.creator,
createdAt: resData.post.createdAt
};
this.setState(prevState => {
let updatedPosts = [...prevState.posts];
if (prevState.editPost) {
const postIndex = prevState.posts.findIndex(
p => p._id === prevState.editPost._id
);
updatedPosts[postIndex] = post;
} else if (prevState.posts.length < 2) {
updatedPosts = prevState.posts.concat(post);
}
return {
posts: updatedPosts,
isEditing: false,
editPost: null,
editLoading: false
};
});
})
.catch(err => {
console.log(err);
this.setState({
isEditing: false,
editPost: null,
editLoading: false,
error: err
});
});
};
statusInputChangeHandler = (input, value) => {
this.setState({ status: value });
};
deletePostHandler = postId => {
this.setState({ postsLoading: true });
fetch('http://localhost:8080/feed/post/' + postId, {
method: 'DELETE',
headers: {
Authorization: 'Bearer ' + this.props.token
}
})
.then(res => {
if (res.status !== 200 && res.status !== 201) {
throw new Error('Deleting a post failed!');
}
return res.json();
})
.then(resData => {
console.log(resData);
this.setState(prevState => {
const updatedPosts = prevState.posts.filter(p => p._id !== postId);
return { posts: updatedPosts, postsLoading: false };
});
})
.catch(err => {
console.log(err);
this.setState({ postsLoading: false });
});
};
errorHandler = () => {
this.setState({ error: null });
};
catchError = error => {
this.setState({ error: error });
};
render() {
return (
<Fragment>
<ErrorHandler error={this.state.error} onHandle={this.errorHandler} />
<FeedEdit
editing={this.state.isEditing}
selectedPost={this.state.editPost}
loading={this.state.editLoading}
onCancelEdit={this.cancelEditHandler}
onFinishEdit={this.finishEditHandler}
/>
<section className="feed__status">
<form onSubmit={this.statusUpdateHandler}>
<Input
type="text"
placeholder="Your status"
control="input"
onChange={this.statusInputChangeHandler}
value={this.state.status}
/>
<Button mode="flat" type="submit">
Update
</Button>
</form>
</section>
<section className="feed__control">
<Button mode="raised" design="accent" onClick={this.newPostHandler}>
New Post
</Button>
</section>
<section className="feed">
{this.state.postsLoading && (
<div style={{ textAlign: 'center', marginTop: '2rem' }}>
<Loader />
</div>
)}
{this.state.posts.length <= 0 && !this.state.postsLoading ? (
<p style={{ textAlign: 'center' }}>No posts found.</p>
) : null}
{!this.state.postsLoading && (
<Paginator
onPrevious={this.loadPosts.bind(this, 'previous')}
onNext={this.loadPosts.bind(this, 'next')}
lastPage={Math.ceil(this.state.totalPosts / 2)}
currentPage={this.state.postPage}
>
{this.state.posts.map(post => (
<Post
key={post._id}
id={post._id}
author={post.creator.name}
date={new Date(post.createdAt).toLocaleDateString('en-US')}
title={post.title}
image={post.imageUrl}
content={post.content}
onStartEdit={this.startEditPostHandler.bind(this, post._id)}
onDelete={this.deletePostHandler.bind(this, post._id)}
/>
))}
</Paginator>
)}
</section>
</Fragment>
);
}
}
export default Feed;
import React, { Component } from 'react';
import Image from '../../../components/Image/Image';
import './SinglePost.css';
class SinglePost extends Component {
state = {
title: '',
author: '',
date: '',
image: '',
content: ''
};
componentDidMount() {
const postId = this.props.match.params.postId;
if(!postId) {
fetch('http://localhost:8080/feed/post/' + postId, {
headers: {
Authorization: 'Bearer ' + this.props.token
}
})
.then(res => {
if (res.status !== 200) {
throw new Error('Failed to fetch status');
}
return res.json();
})
.then(resData => {
this.setState({
title: resData.post.title,
author: resData.post.creator.name,
date: new Date(resData.post.createdAt).toLocaleDateString('en-US'),
content: resData.post.content
});
})
.catch(err => {
console.log(err);
});
}
}
render() {
return (
<section className="single-post">
<h1>{this.state.title}</h1>
<h2>
Created by {this.state.author} on {this.state.date}
</h2>
<div className="single-post__image">
<Image contain imageUrl={this.state.image} />
</div>
<p>{this.state.content}</p>
</section>
);
}
}
export default SinglePost;
const mongoose = require("mongoose");
const Schema = mongoose.Schema;
const postSchema = new Schema(
{
title: {
type: String,
required: true
},
imageUrl: {
type: String,
required: true
},
content: {
type: String,
required: true
},
creator: {
type: Schema.Types.ObjectId,
ref: 'User',
required: true
}
},
{ timestamps: true }
);
module.exports = mongoose.model("Post", postSchema);
exports.createPost = (req, res, next) => {
const errors = validationResult(req);
if (!errors.isEmpty()) {
const error = new Error("Validation failed, entered data is incorrect.");
error.statusCode = 422;
throw error;
}
if (!req.file) {
const error = new Error("No image provided");
errorStatusCode = 422;
throw error;
}
const imageUrl = req.file.path.replace("\\", "/");
const title = req.body.title;
const content = req.body.content;
❹ let creator;
const post = new Post({
title: title,
content: content,
imageUrl: imageUrl,
❶ //creator: { name: "Bruce" } //req.userId is available now through "is-auth.js"
creator: req.userId
});
post
.save()
❷ .then(result => {
return User.findById(req.userId);
})
.then(user=>{
❺ creator = user;
❸ user.posts.push(post); //this is going to work now because of the relationships we set up in the "posts" model
return user.save();
})
.then(result => {
res.status(201).json({
message: "Post created successfully",
post: result,
❻ creator: {_id: creator._id, name: creator.name}
});
})
.catch(err => {
if (!err.statusCode) {
err.statusCode = 500;
}
next(err);
});
};
1
2
3
4
5
6
BTW: Ran into an error when I first ran this code! It read: "Post validation failed: creator: Path `creator` is required." The problem was in your "createPost" method, you referred to your creator as req.UserId when you defined in your "is-auth.js" code as user.ID. That showed up in User.findById(req.userId) and creator: req.userId. Make a note...
T) Adding Authorization Checks (back to top...)
To ensure that only the user who created the resource in question is allowed to either update it or delete it, we add the code that you see highlighted below.
It's pretty straight forward. Basically, we're just throwing an error if the userID associated with the post doesn't match the Id of the user that's currently logged in.
exports.updatePost = (req, res, next) => {
const postId = req.params.postId;
const errors = validationResult(req);
if (!errors.isEmpty()) {
const error = new Error("Validation failed, entered data is incorrect.");
error.statusCode = 422;
throw error;
}
const title = req.body.title;
const content = req.body.content;
let imageUrl = req.body.image;
if (req.file) {
imageUrl = req.file.path;
}
if (!imageUrl) {
const error = new Error("No file picked.");
error.statusCode = 422;
throw error;
}
Post.findById(postId)
.then(post => {
if (!post) {
const error = new Error("No file picked.");
error.statusCode = 422;
throw error;
}
if(post.creator.toString() !== req.userID) {
const error = new Error('You are not authorized to fool with this post!');
error.statusCode = 403;
throw error;
}
if (imageUrl !== post.imageUrl) {
clearImage(post.imageUrl);
}
post.title = title;
post.imageUrl = imageUrl;
post.content = content;
return post.save();
})
.then(result => {
res.status(200).json({ message: "Post updated", post: result });
})
.catch(err => {
if (!err.statusCode) {
err.statusCode = 500;
}
next(err);
});
};
exports.deletePost = (req, res, next) => {
const postId = req.params.postId;
Post.findById(postId)
.then(post => {
if (!post) {
const error = new Error("Could not find post.");
error.statusCode = 404;
throw error;
}
if(post.creator.toString() !== req.userID) {
const error = new Error('You are not authorized to fool with this post!');
error.statusCode = 403;
throw error;
}
//check login user
clearImage(post.imageUrl);
return Post.findByIdAndRemove(postId);
})
.then(result => {
console.log(result);
res.status(200).json({ message: "Deleted post!" });
})
.catch(err => {
if (!err.statusCode) {
err.statusCode = 500;
}
next(err);
});
};
BTW: This little number: console.log(Authorization); wouldn't seem to be a dealbreaker, BUT, if you don't include the single quotes around console.log('Authorization'); you will get an error and things will crash.
This is not difficult. You simply include the highlighted code that you see below:
exports.deletePost = (req, res, next) => {
const postId = req.params.postId;
Post.findById(postId)
.then(post => {
if (!post) {
const error = new Error("Could not find post.");
error.statusCode = 404;
throw error;
}
if(post.creator.toString() !== req.userID) {
//const error = new Error('You are not authorized to fool with this post!');
const error = new Error(req.userID);
error.statusCode = 403;
throw error;
}
//check login user
clearImage(post.imageUrl);
return Post.findByIdAndRemove(postId);
})
.then(result => {
return User.findById(req.userID);
})
.then(user=> {
user.posts.pull(postId);
return user.save();
console.log(result);
res.status(200).json({ message: "Deleted post!" });
})
.catch(err => {
if (!err.statusCode) {
err.statusCode = 500;
}
next(err);
});
};
One thing to bear in mind is to ensure that your "isAuth" is in place within your route. I neglected to ensure this was in place initially and it caused an error on my "is-auth.js" page. It didn't make sense until I realized that my "delete" code was looking for the req.userID value that the "is-auth.js" code provides. Once I put router.delete("/post/:postId", isAuth, feedController.deletePost); in place, everything was gold!
V) Getting Rid of "Unexpected token < in JSON at position 0" (back to top...)
You're going to start by adding a new route just so you can see what's going on. "auth.js" is going to look like this:
const express = require("express");
const { body } = require("express-validator/check");
const User = require("../models/user");
const authController = require("../controllers/auth");
const isAuth = require('../middleware/is-auth');
const router = express.Router();
router.put(
"/signup",
[
body("email")
.isEmail()
.withMessage("Please enter a valid email.")
.custom((value, { req }) => {
return User.findOne({ email: value }).then(userDoc => {
if (userDoc) {
return Promise.reject("Email already exists!");
}
});
})
.normalizeEmail(),
body("password")
.trim()
.isLength({ min: 5 }),
body("name")
.trim()
.not()
.isEmpty()
],
authController.signup
);
router.get('/status', isAuth, authController.getUserStatus);
router.patch(
'/status',
isAuth,
[
body('status')
.trim()
.not()
.isEmpty()
],
authController.updateUserStatus
);
module.exports = router;
exports.getUserStatus = (req, res, next) => {
console.log(req.userID);
User.findById(req.userID)
.then(user => {
if(!user) {
const error = new Error('User not found');
error.statusCode = 404;
throw error;
}
res.status(200).json({status: user.status});
})
.catch(err=> {
if(!err.statusCode) {
err.StatusCode = 500;
}
next(err);
});
};
exports.updateUserStatus = (req, res, next) => {
const newStatus = req.body.status;
User.findById(req.userID)
.then(user => {
if(!user) {
const error = new Error('User not found');
error.statusCode = 404;
throw error;
}
user.status = newStatus;
return user.save();
})
.then(result => {
res.status(200).json({message: 'User updated.'});
})
.catch(err => {
if(!err.statusCode) {
err.StatusCode = 500;
}
next(err);
});
}
componentDidMount() {
fetch('http://localhost:8080/auth/status', { added localhost:8080..to replace URL
headers: {
Authorization: 'Bearer ' + this.props.token
}
})
.then(res => {
if (res.status !== 200) {
throw new Error('This is my problem now.');
}
return res.json();
})
.then(resData => {
this.setState({ status: resData.status }); //looking for some resData so, we'll add that to our auth.js controller
})
.catch(this.catchError);
this.loadPosts();
}
...and then this function...
loadPosts = direction => {
if (direction) {
this.setState({ postsLoading: true, posts: [] });
}
let page = this.state.postPage;
if (direction === 'next') {
page++;
this.setState({ postPage: page });
}
if (direction === 'previous') {
page--;
this.setState({ postPage: page });
}
fetch('http://localhost:8080/feed/posts?page=' + page, { //Authorization header here and line #131, 187
headers: {
Authorization: 'Bearer ' + this.props.token
}
})
.then(res => {
if (res.status !== 200) {
throw new Error('Failed to fetch posts');
}
return res.json();
})
.then(resData => {
this.setState({
posts: resData.posts.map(post => {
return {
...post,
imagePath: post.imageUrl
};
}),
totalPosts: resData.totalItems,
postsLoading: false
});
})
.catch(this.catchError);
};
feed.js Controller (before)
- exports.getPosts = (req, res, next) => {
- const currentPage = req.query.page || 1;
- const perPage = 2;
- let totalItems;
- Post.find()
- .countDocuments()
- .then(count => {
- totalItems = count;
- return Post.find()
- .skip((currentPage - 1) * perPage)
- .limit(perPage);
- })
- .then(posts => {
- res.status(200).json({
- message: "Fetched posts successfully",
- posts: posts,
- totalItems: totalItems
- });
- })
- .catch(err => {
- if (!err.statusCode) {
- err.statusCode = 500;
- }
- next(err);
- });
- };
feed.js Controller (after)
- exports.getPosts = async (req, res, next) => {
- const currentPage = req.query.page || 1;
- const perPage = 2;
- let totalItems;
- try {
- const totalItems = await Post.find().countDocuments();
- const posts = await Post.find()
- .skip((currentPage - 1) * perPage)
- .limit(perPage);
- res.status(200).json({
- message: "Fetched posts successfully",
- posts: posts,
- totalItems: totalItems
- });
- } catch (err) {
- if(!err.statusCode) {
- err.statusCode = 500;
- }
- next(err);
- }
- };
const fs = require("fs");
const path = require("path");
const { validationResult } = require("express-validator/check");
const Post = require("../models/post");
const User = require("../models/user");
exports.getPosts = async (req, res, next) => {
const currentPage = req.query.page || 1;
let totalItems;
try {
const totalItems = await Post.find().countDocuments();
const posts = await Post.find()
.skip((currentPage - 1) * perPage)
.limit(perPage);
res.status(200).json({
message: "Fetched posts successfully",
posts: posts,
totalItems: totalItems
});
} catch (err) {
if(!err.statusCode) {
err.statusCode = 500;
}
next(err);
}
};
exports.createPost = async (req, res, next) => {
const errors = validationResult(req);
if (!errors.isEmpty()) {
const error = new Error('Validation failed, entered data is incorrect.');
error.statusCode = 422;
throw error;
}
if (!req.file) {
const error = new Error('No image provided.');
error.statusCode = 422;
throw error;
}
const imageUrl = req.file.path;
const title = req.body.title;
const content = req.body.content;
const post = new Post({
title: title,
content: content,
imageUrl: imageUrl,
creator: req.userID
});
try {
await post.save();
const user = await User.findById(req.userID);
user.posts.push(post);
await user.save();
res.status(201).json({
message: 'Post created successfully!',
post: post,
creator: { _id: user._id, name: user.name }
});
};
//9:56
exports.getPost = (req, res, next) => {
const postId = req.params.postId;
Post.findById(postId)
.then(post => {
if (!post) {
const error = new Error("Could not find post.");
error.statusCode = 404;
throw error;
}
console.log("good");
res.status(200).json({ message: "Post fetched.", post: post });
})
.catch(err => {
if (!err.statusCode) {
err.statusCode = 500;
}
next(err);
});
};
exports.updatePost = (req, res, next) => {
const postId = req.params.postId;
const errors = validationResult(req);
if (!errors.isEmpty()) {
const error = new Error("Validation failed, entered data is incorrect.");
error.statusCode = 422;
throw error;
}
const title = req.body.title;
const content = req.body.content;
let imageUrl = req.body.image;
if (req.file) {
imageUrl = req.file.path;
}
if (!imageUrl) {
const error = new Error("No file picked.");
error.statusCode = 422;
throw error;
}
Post.findById(postId)
.then(post => {
if (!post) {
const error = new Error("No file picked.");
error.statusCode = 422;
throw error;
}
if(post.creator.toString() !== req.userID) {
const error = new Error('You are not authorized to fool with this post!');
error.statusCode = 403;
throw error;
}
if (imageUrl !== post.imageUrl) {
clearImage(post.imageUrl);
}
post.title = title;
post.imageUrl = imageUrl;
post.content = content;
return post.save();
})
.then(result => {
res.status(200).json({ message: "Post updated", post: result });
})
.catch(err => {
if (!err.statusCode) {
err.statusCode = 500;
}
next(err);
});
};
exports.deletePost = (req, res, next) => {
const postId = req.params.postId;
Post.findById(postId)
.then(post => {
if (!post) {
const error = new Error("Could not find post.");
error.statusCode = 404;
throw error;
}
if(post.creator.toString() !== req.userID) {
//const error = new Error('You are not authorized to fool with this post!');
const error = new Error(req.userID);
error.statusCode = 403;
throw error;
}
//check login user
clearImage(post.imageUrl);
return Post.findByIdAndRemove(postId);
})
.then(result => {
return User.findById(req.userID);
})
.then(user=> {
user.posts.pull(postId);
return user.save();
console.log(result);
res.status(200).json({ message: "Deleted post!" });
})
.catch(err => {
if (!err.statusCode) {
err.statusCode = 500;
}
next(err);
});
};
const clearImage = filePath => {
filePath = path.join(__dirname, "..", filePath);
fs.unlink(filePath, err => console.log(err));
};
const fs = require("fs");
const path = require("path");
const { validationResult } = require("express-validator/check");
const Post = require("../models/post");
const User = require("../models/user");
exports.getPosts = async (req, res, next) => {
const currentPage = req.query.page || 1;
const perPage = 2;
let totalItems;
try {
const totalItems = await Post.find().countDocuments();
const posts = await Post.find()
.skip((currentPage - 1) * perPage)
.limit(perPage);
res.status(200).json({
message: "Fetched posts successfully",
posts: posts,
totalItems: totalItems
});
} catch (err) {
if(!err.statusCode) {
err.statusCode = 500;
}
next(err);
}
};
exports.createPost = async (req, res, next) => {
const errors = validationResult(req);
if (!errors.isEmpty()) {
const error = new Error('Validation failed, entered data is incorrect.');
error.statusCode = 422;
throw error;
}
if (!req.file) {
const error = new Error('No image provided.');
error.statusCode = 422;
throw error;
}
const imageUrl = req.file.path;
const title = req.body.title;
const content = req.body.content;
const post = new Post({
title: title,
content: content,
imageUrl: imageUrl,
creator: req.userID
});
try {
await post.save();
const user = await User.findById(req.userID);
user.posts.push(post);
await user.save();
res.status(201).json({
message: 'Post created successfully!',
post: post,
creator: { _id: user._id, name: user.name }
});
}
catch (err) {
if(!err.statusCode) {
err.statusCode = 500;
}
next(err);
}
};
//9:56
exports.getPost = async (req, res, next) => {
console.log("hit it");
const postId = req.params.postId;
const post = await Post.findById(postId)
try {
if (!post) {
const error = new Error("Could not find post.");
error.statusCode = 404;
throw error;
}
res.status(200).json({ message: "Post fetched.", post: post });
} catch(err) {
if (!err.statusCode) {
err.statusCode = 500;
}
next(err);
}
};
exports.updatePost = async (req, res, next) => {
const postId = req.params.postId;
const errors = validationResult(req);
if (!errors.isEmpty()) {
const error = new Error("Validation failed, entered data is incorrect.");
error.statusCode = 422;
throw error;
}
const title = req.body.title;
const content = req.body.content;
let imageUrl = req.body.image;
if (req.file) {
imageUrl = req.file.path;
}
if (!imageUrl) {
const error = new Error("No file picked.");
error.statusCode = 422;
throw error;
}
try {
const post = await Post.findById(postId)
if (!post) {
const error = new Error("No file picked.");
error.statusCode = 422;
throw error;
}
if(post.creator.toString() !== req.userID) {
const error = new Error('You are not authorized to fool with this post!');
error.statusCode = 403;
throw error;
}
if (imageUrl !== post.imageUrl) {
clearImage(post.imageUrl);
}
post.title = title;
post.imageUrl = imageUrl;
post.content = content;
const result = await post.save();
res.status(200).json({ message: "Post updated", post: result });
} catch(err) {
if (!err.statusCode) {
err.statusCode = 500;
}
next(err);
}
};
exports.deletePost = async (req, res, next) => {
const postId = req.params.postId;
try {
const post = await Post.findById(postId)
if (!post) {
const error = new Error("Could not find post.");
error.statusCode = 404;
throw error;
}
if(post.creator.toString() !== req.userID) {
const error = new Error(req.userID);
error.statusCode = 403;
throw error;
}
clearImage(post.imageUrl);
await Post.findByIdAndRemove(postId);
const user = await User.findById(req.userID);
user.posts.pull(postId);
await user.save();
res.status(200).json({ message: "Deleted post!" });
} catch(err) {
if (!err.statusCode) {
err.statusCode = 500;
}
next(err);
}
};
const clearImage = filePath => {
filePath = path.join(__dirname, "..", filePath);
fs.unlink(filePath, err => console.log(err));
};

$ npm install --save socket.io
...and then you're going to incorporate it into your "app.js" code like this:
mongoose
.connect(
"mongodb+srv://brucegust:M1ch3ll3@brucegust-qhxnz.mongodb.net/messages"
)
.then(result => {
const server = app.listen(8080);
const io = require('socket.io')(server);
io.on('connection', socket => {
console.log('client connected');
});
})
.catch(err => console.log(err)
);
$ npm install save socket.io-client
You'll then put this near the top of your page...
import openSocket from 'socket.io-client';
...and then add this to the tail end of the "class Feed extends Component" code:
class Feed extends Component {
state = {
isEditing: false,
posts: [],
totalPosts: 0,
editPost: null,
status: '',
postPage: 1,
postsLoading: true,
editLoading: false
};
componentDidMount() {
fetch('http://localhost:8080/auth/status', {
headers: {
Authorization: 'Bearer ' + this.props.token
}
})
.then(res => {
if (res.status !== 200) {
throw new Error('This is my problem now.');
}
return res.json();
})
.then(resData => {
this.setState({ status: resData.status }); //looking for some resData so, we'll add that to our auth.js controller
})
.catch(this.catchError);
this.loadPosts();
openSocket('http://localhost:8080');
}
addPost = post => {
this.setState(prevState => {
const updatedPosts = [...prevState.posts];
if (prevState.postPage === 1) {
if (prevState.posts.length >= 2) {
updatedPosts.pop();
}
updatedPosts.unshift(post);
}
return {
posts: updatedPosts,
totalPosts: prevState.totalPosts + 1
};
});
};
let it;
module.exports = {
init: httpServer => {
io = require('socket.io')(server)(httpServer);
return io;
},
getIO: () => {
if(!io) {
throw new Error('Socket.io not initialized!');
}
return io;
}
}
exports.createPost = async (req, res, next) => {
const errors = validationResult(req);
if (!errors.isEmpty()) {
const error = new Error('Validation failed, entered data is incorrect.');
error.statusCode = 422;
throw error;
}
if (!req.file) {
const error = new Error('No image provided.');
error.statusCode = 422;
throw error;
}
const imageUrl = req.file.path;
const title = req.body.title;
const content = req.body.content;
const post = new Post({
title: title,
content: content,
imageUrl: imageUrl,
creator: req.userID
});
try {
await post.save();
const user = await User.findById(req.userID);
user.posts.push(post);
await user.save();
io.getIO().emit('posts', {action: 'create', post: post});
res.status(201).json({
message: 'Post created successfully!',
post: post,
creator: { _id: user._id, name: user.name }
});
}
catch (err) {
if(!err.statusCode) {
err.statusCode = 500;
}
next(err);
}
};
componentDidMount() {
fetch('http://localhost:8080/auth/status', {
headers: {
Authorization: 'Bearer ' + this.props.token
}
})
.then(res => {
if (res.status !== 200) {
throw new Error('This is my problem now.');
}
return res.json();
})
.then(resData => {
this.setState({ status: resData.status }); //looking for some resData so, we'll add that to our auth.js controller
})
.catch(this.catchError);
this.loadPosts();
const socket = openSocket('http://localhost:8080');
socket.on('posts', data => {
if(data.action === 'create') {
this.addPost(data.post);
}
});
}
exports.getPosts = async (req, res, next) => {
const currentPage = req.query.page || 1;
const perPage = 2;
let totalItems;
try {
const totalItems = await Post.find().countDocuments();
const posts = await Post.find()
❶ .populate('creator')
.skip((currentPage - 1) * perPage)
.limit(perPage);
res.status(200).json({
message: "Fetched posts successfully",
posts: posts,
totalItems: totalItems
});
} catch (err) {
if(!err.statusCode) {
err.statusCode = 500;
}
next(err);
}
};
exports.createPost = async (req, res, next) => {
const errors = validationResult(req);
if (!errors.isEmpty()) {
const error = new Error('Validation failed, entered data is incorrect.');
error.statusCode = 422;
throw error;
}
if (!req.file) {
const error = new Error('No image provided.');
error.statusCode = 422;
throw error;
}
const imageUrl = req.file.path;
const title = req.body.title;
const content = req.body.content;
const post = new Post({
title: title,
content: content,
imageUrl: imageUrl,
creator: req.userID
});
try {
await post.save();
const user = await User.findById(req.userID);
user.posts.push(post);
await user.save();
❷ io.getIO().emit('posts', {action: 'create', { ...post._doc, creator: {_id: req.userId, name: user.name} }});
res.status(201).json({
message: 'Post created successfully!',
post: post,
creator: { _id: user._id, name: user.name }
});
}
catch (err) {
if(!err.statusCode) {
err.statusCode = 500;
}
next(err);
}
};
1
2
exports.updatePost = async (req, res, next) => {
const postId = req.params.postId;
const errors = validationResult(req);
if (!errors.isEmpty()) {
const error = new Error("Validation failed, entered data is incorrect.");
error.statusCode = 422;
throw error;
}
const title = req.body.title;
const content = req.body.content;
let imageUrl = req.body.image;
if (req.file) {
imageUrl = req.file.path;
}
if (!imageUrl) {
const error = new Error("No file picked.");
error.statusCode = 422;
throw error;
}
try {
const post = await Post.findById(postId).❶ populate('creator');
if (!post) {
const error = new Error("No file picked.");
error.statusCode = 422;
throw error;
}
if(post.creator._id.toString() !== req.userID) {
const error = new Error('You are not authorized to fool with this post!');
error.statusCode = 403;
throw error;
}
if (imageUrl !== post.imageUrl) {
clearImage(post.imageUrl);
}
post.title = title;
post.imageUrl = imageUrl;
post.content = content;
const result = await post.save();
❷ io.getIO().emit('posts', { action: 'update', post: result });
res.status(200).json({ message: "Post updated", post: result });
} catch(err) {
if (!err.statusCode) {
err.statusCode = 500;
}
next(err);
}
};
1
2
updatePost = post => {
this.setState(prevState => {
const updatedPosts = [...prevState.posts];
const updatedPostIndex = updatedPosts.findIndex(p => p._id === post._id);
if (updatedPostIndex > -1) {
updatedPosts[updatedPostIndex] = post;
}
return {
posts: updatedPosts
};
});
};
componentDidMount() {
fetch('http://localhost:8080/auth/status', {
headers: {
Authorization: 'Bearer ' + this.props.token
}
})
.then(res => {
if (res.status !== 200) {
throw new Error('Failed to fetch user status.');
}
return res.json();
})
.then(resData => {
this.setState({ status: resData.status });
})
.catch(this.catchError);
this.loadPosts();
const socket = openSocket('http://localhost:8080');
socket.on('posts', data => {
if (data.action === 'create') {
this.addPost(data.post);
} else if (data.action === 'update') {
this.updatePost(data.post);
}
});
}
exports.getPosts = async (req, res, next) => {
const currentPage = req.query.page || 1;
const perPage = 2;
let totalItems;
try {
const totalItems = await Post.find().countDocuments();
const posts = await Post.find()
.populate('creator')
.sort({createdAt: -1})
.skip((currentPage - 1) * perPage)
.limit(perPage);
res.status(200).json({
message: "Fetched posts successfully",
posts: posts,
totalItems: totalItems
});
} catch (err) {
if(!err.statusCode) {
err.statusCode = 500;
}
next(err);
}
};
exports.deletePost = async (req, res, next) => {
const postId = req.params.postId;
try {
const post = await Post.findById(postId)
if (!post) {
const error = new Error("Could not find post.");
error.statusCode = 404;
throw error;
}
if(post.creator.toString() !== req.userID) {
const error = new Error(req.userID);
error.statusCode = 403;
throw error;
}
clearImage(post.imageUrl);
await Post.findByIdAndRemove(postId);
const user = await User.findById(req.userID);
user.posts.pull(postId);
await user.save();
io.getIO().emit('posts', {action: 'delete', post: postId});
res.status(200).json({ message: "Deleted post!" });
} catch(err) {
if (!err.statusCode) {
err.statusCode = 500;
}
next(err);
}
};


const path = require("path");
const express = require("express");
const bodyParser = require("body-parser");
const mongoose = require("mongoose");
const multer = require("multer");
const graphqlHttp = require('express-graphql');
const graphqlSchema = require('./graphql/schema');
const graphqlResolver = require('./graphql/resolvers');
const app = express();
const fileStorage = multer.diskStorage({
destination: (req, file, cb) => {
cb(null, "images");
},
filename: (req, file, cb) => {
//cb(null, uuidv4());
cb(null, file.originalname);
}
});
const fileFilter = (req, file, cb) => {
if (
file.mimetype === "image/png" ||
file.mimetype === "image/jpg" ||
file.mimetype === "image/jpeg"
) {
cb(null, true);
} else {
cb(null, false);
}
};
app.use(bodyParser.json());
app.use(
multer({
storage: fileStorage,
fileFilter: fileFilter
}).single("image")
);
app.use("/images", express.static(path.join(__dirname, "images")));
app.use((req, res, next) => {
res.setHeader("Access-Control-Allow-Origin", "*");
res.setHeader(
"Access-Control-Allow-Methods",
"GET, POST, PUT, PATCH, DELETE"
);
res.setHeader("Access-Control-Allow-Headers", "Content-Type, Authorization");
next();
});
app.use('/graphql',
graphqlHttp({
schema: graphqlSchema,
rootValue: graphqlResolver
})
);
app.use((error, req, res, next) => {
console.log(error);
const status = error.statusCode || 500;
const message = error.message;
const data = error.data;
res.status(status).json({ message: message, data: data });
});
mongoose
.connect(
"mongodb+srv://brucegust:M1ch3ll3@brucegust-qhxnz.mongodb.net/messages"
)
.then(result => {
const server = app.listen(8080);
})
.catch(err => console.log(err));
1
2
3
const { buildSchema } = require('graphql');
module.exports = buildSchema(`
type Post {
_id: ID!
title: String!
content: String!
imageUrl: String!
creator: User!
createdAt: String!
updatedAt: String!
}
type User {
_id: ID!
name: String!
email: String!
password: String
posts: [Post!]!
}
input UserData {
email: String!
name: String!
password: String!
}
type RootMutation {
createUser(userInput: UserInputData): User!
}
schema {
mutation: RootMutation
}
`);
const { buildSchema } = require('graphql');
module.exports = buildSchema(`
type Post {
_id: ID!
title: String!
content: String!
imageUrl: String!
creator: User!
createdAt: String!
updatedAt: String!
}
type User {
_id: ID!
name: String!
email: String!
password: String
posts: [Post!]!
}
input UserInputData {
email: String!
name: String!
password: String!
}
type RootQuery {
hello: String
}
type RootMutation {
createUser(userInput: UserInputData): User!
}
schema {
query: RootQuery
mutation: RootMutation
}
`);
const bcrypt = require('bcryptjs');
const User = require('../models/user');
module.exports = {
createUser: async function({ userInput }, req) {
//const email = args.userInput.email;
const existingUser = await User.findOne({email: userInput.email});
if(existingUser) {
const error = new Error('User exists already!');
throw error;
}
const hashedPw = await bcrypt.hash(userInput.password, 12);
const user = new User({
email: userInput.email,
name: userInput.name,
password: hashedPw
});
const createdUser = await user.save();
return { ...createdUser._doc, _id: createdUser._id.toString() };
}
};

const bcrypt = require('bcryptjs');
❶ const validator = require('validator');
const User = require('../models/user');
module.exports = {
createUser: async function({ userInput }, req) {
//const email = args.userInput.email;
❷ const errors = [];
❸ if(!validator.isEmail(userInput.email)) {
errors.push({ message: 'Email is invalid.' });
}
if(
validator.isEmpty(userInput.password) ||
!validator.isLength(userInput.password, { min: 5 })
) {
errors.push({ message: 'Password too short!' });
}
❹ if(errors.length>0)
{
const error = new Error('Invalid input.');
throw error;
}
const existingUser = await User.findOne({email: userInput.email});
if(existingUser) {
const error = new Error('User exists already!');
throw error;
}
const hashedPw = await bcrypt.hash(userInput.password, 12);
const user = new User({
email: userInput.email,
name: userInput.name,
password: hashedPw
});
const createdUser = await user.save();
return { ...createdUser._doc, _id: createdUser._id.toString() };
}
};
1
2
3
4
const bcrypt = require('bcryptjs');
const validator = require('validator');
const User = require('../models/user');
module.exports = {
createUser: async function({ userInput }, req) {
//const email = args.userInput.email;
const errors = [];
if(!validator.isEmail(userInput.email)) {
errors.push({ message: 'Email is invalid.' });
}
if(
validator.isEmpty(userInput.password) ||
!validator.isLength(userInput.password, { min: 5 })
) {
errors.push({ message: 'Password too short!' });
}
if(errors.length>0)
{
const error = new Error('Invalid input.');
❶ error.data = errors;
error.code = 422;
throw error;
}
const existingUser = await User.findOne({email: userInput.email});
if(existingUser) {
const error = new Error('User exists already!');
throw error;
}
const hashedPw = await bcrypt.hash(userInput.password, 12);
const user = new User({
email: userInput.email,
name: userInput.name,
password: hashedPw
});
const createdUser = await user.save();
return { ...createdUser._doc, _id: createdUser._id.toString() };
}
};
1
app.use(
'/graphql',
graphqlHttp({
schema: graphqlSchema,
rootValue: graphqlResolver,
graphiql:true,
❶ formatError(err) {
❷ if(!err.originalError) {
return err;
}
❸ const data = err.originalError.data;
❹ const message = err.message || 'An error occurred.';
❺ const code = err.originalError.code || 500;
❻ return { message: message, status: code, data: data };
}
})
);
1
2
3
4
5
6
Cross-Origin Resource Sharing (CORS) is a mechanism that uses additional HTTP headers to tell browsers to give a web application running at one origin, access to selected resources from a different origin. A web application executes a cross-origin HTTP request when it requests a resource that has a different origin (domain, protocol, or port) from its own.
An example of a cross-origin request: the front-end JavaScript code served from https://domain-a.com uses XMLHttpRequest to make a request for https://domain-b.com/data.json.
For security reasons, browsers restrict cross-origin HTTP requests initiated from scripts. For example, XMLHttpRequest and the Fetch API follow the same-origin policy. This means that a web application using those APIs can only request resources from the same origin the application was loaded from, unless the response from other origins includes the right CORS headers.
Here's a graphic to help visualize all this:

app.use((req, res, next) => {
res.setHeader("Access-Control-Allow-Origin", "*");
res.setHeader(
'Access-Control-Allow-Methods',
'GET, POST, PUT, PATCH, DELETE'
);
res.setHeader("Access-Control-Allow-Headers", "Content-Type, Authorization");
if(req.method==='OPTIONS') {
return res.sendStatus(200);
}
next();
});
import React, { Component, Fragment } from 'react';
import { Route, Switch, Redirect, withRouter } from 'react-router-dom';
import Layout from './components/Layout/Layout';
import Backdrop from './components/Backdrop/Backdrop';
import Toolbar from './components/Toolbar/Toolbar';
import MainNavigation from './components/Navigation/MainNavigation/MainNavigation';
import MobileNavigation from './components/Navigation/MobileNavigation/MobileNavigation';
import ErrorHandler from './components/ErrorHandler/ErrorHandler';
import FeedPage from './pages/Feed/Feed';
import SinglePostPage from './pages/Feed/SinglePost/SinglePost';
import LoginPage from './pages/Auth/Login';
import SignupPage from './pages/Auth/Signup';
import './App.css';
class App extends Component {
state = {
showBackdrop: false,
showMobileNav: false,
isAuth: false,
token: null,
userId: null,
authLoading: false,
error: null
};
componentDidMount() {
const token = localStorage.getItem('token');
const expiryDate = localStorage.getItem('expiryDate');
if (!token || !expiryDate) {
return;
}
if (new Date(expiryDate) <= new Date()) {
this.logoutHandler();
return;
}
const userId = localStorage.getItem('userId');
const remainingMilliseconds =
new Date(expiryDate).getTime() - new Date().getTime();
this.setState({ isAuth: true, token: token, userId: userId });
this.setAutoLogout(remainingMilliseconds);
}
mobileNavHandler = isOpen => {
this.setState({ showMobileNav: isOpen, showBackdrop: isOpen });
};
backdropClickHandler = () => {
this.setState({ showBackdrop: false, showMobileNav: false, error: null });
};
logoutHandler = () => {
this.setState({ isAuth: false, token: null });
localStorage.removeItem('token');
localStorage.removeItem('expiryDate');
localStorage.removeItem('userId');
};
loginHandler = (event, authData) => {
event.preventDefault();
this.setState({ authLoading: true });
fetch('http://localhost:8080/auth/login', {
method: 'POST',
headers: {
'Content-Type': 'application/json'
},
body: JSON.stringify({
email: authData.email,
password: authData.password
})
})
.then(res => {
if (res.status === 422) {
throw new Error('Validation failed.');
}
if (res.status !== 200 && res.status !== 201) {
console.log('Error!');
throw new Error('Could not authenticate you!');
}
return res.json();
})
.then(resData => {
console.log(resData);
this.setState({
isAuth: true,
token: resData.token,
authLoading: false,
userId: resData.userId
});
localStorage.setItem('token', resData.token);
localStorage.setItem('userId', resData.userId);
const remainingMilliseconds = 60 * 60 * 1000;
const expiryDate = new Date(
new Date().getTime() + remainingMilliseconds
);
localStorage.setItem('expiryDate', expiryDate.toISOString());
this.setAutoLogout(remainingMilliseconds);
})
.catch(err => {
console.log(err);
this.setState({
isAuth: false,
authLoading: false,
error: err
});
});
};
signupHandler = (event, authData) => {
event.preventDefault();
this.setState({ authLoading: true });
const graphqlQuery = {
query: `
mutation {
createUser(userInput: {email: "${
authData.signupForm.email.value
}", name:"${authData.signupForm.name.value}", password:"${
authData.signupForm.password.value
}"}) {
_id
email
}
}
`
};
fetch('http://localhost:8080/graphql', {
method: 'POST',
headers: {
'Content-Type': 'application/json'
},
body: JSON.stringify(graphqlQuery)
})
.then(res => {
return res.json();
})
.then(resData => {
if (resData.errors && resData.errors[0].status === 422) {
throw new Error(
"Validation failed. Make sure the email address isn't used yet!"
);
}
if (resData.errors) {
throw new Error('User creation didn\'t happen!');
}
console.log(resData);
this.setState({ isAuth: false, authLoading: false });
this.props.history.replace('/');
})
.catch(err => {
console.log(err);
this.setState({
isAuth: false,
authLoading: false,
error: err
});
});
};
setAutoLogout = milliseconds => {
setTimeout(() => {
this.logoutHandler();
}, milliseconds);
};
errorHandler = () => {
this.setState({ error: null });
};
render() {
let routes = (
(
(
);
if (this.state.isAuth) {
routes = (
(
(
);
}
return (
{this.state.showBackdrop && (
);
}
}
export default withRouter(App);
const path = require("path");
const express = require("express");
const bodyParser = require("body-parser");
const mongoose = require("mongoose");
const multer = require("multer");
const graphqlHttp = require('express-graphql');
const graphqlSchema = require('./graphql/schema');
const graphqlResolver = require('./graphql/resolvers');
const app = express();
const fileStorage = multer.diskStorage({
destination: (req, file, cb) => {
cb(null, "images");
},
filename: (req, file, cb) => {
//cb(null, uuidv4());
cb(null, file.originalname);
}
});
const fileFilter = (req, file, cb) => {
if (
file.mimetype === "image/png" ||
file.mimetype === "image/jpg" ||
file.mimetype === "image/jpeg"
) {
cb(null, true);
} else {
cb(null, false);
}
};
app.use(bodyParser.json());
app.use(
multer({
storage: fileStorage,
fileFilter: fileFilter
}).single("image")
);
app.use("/images", express.static(path.join(__dirname, "images")));
app.use((req, res, next) => {
res.setHeader("Access-Control-Allow-Origin", "*");
res.setHeader(
'Access-Control-Allow-Methods',
'GET, POST, PUT, PATCH, DELETE'
);
res.setHeader("Access-Control-Allow-Headers", "Content-Type, Authorization");
if(req.method==='OPTIONS') {
return res.sendStatus(200);
}
next();
});
app.use(
'/graphql',
graphqlHttp({
schema: graphqlSchema,
rootValue: graphqlResolver,
graphiql:true,
formatError(err) {
if(!err.originalError) {
return err;
}
const data = err.originalError.data;
const message = err.message || 'An error occurred.';
const code = err.originalError.code || 500;
return { message: message, status: code, data: data };
}
})
);
app.use((error, req, res, next) => {
console.log(error);
const status = error.statusCode || 500;
const message = error.message;
const data = error.data;
res.status(status).json({ message: message, data: data });
});
mongoose
.connect(
"mongodb+srv://brucegust:M1ch3ll3@brucegust-qhxnz.mongodb.net/messages"
)
.then(result => {
const server = app.listen(8080);
})
.catch(err => console.log(err));
Error: listen EADDRinuse; address already in us :::8000
While a search on Google was quick to produce a "killall" command, that didn't do the trick. Instead I had to use Command Prompt and it went like this:
First, find all of the ports and see who's doing what:
C:Users/b.gust>netstat -aon
TCP 0.0.0.0:80 0.0.0.0:0 LISTENING 4
TCP 0.0.0.0:135 0.0.0.0:0 LISTENING 376
TCP 0.0.0.0:445 0.0.0.0:0 LISTENING 4
TCP 0.0.0.0:623 0.0.0.0:0 LISTENING 8572
TCP 0.0.0.0:1801 0.0.0.0:0 LISTENING 4324
TCP 0.0.0.0:2103 0.0.0.0:0 LISTENING 4324
TCP 0.0.0.0:2105 0.0.0.0:0 LISTENING 4324
TCP 0.0.0.0:2107 0.0.0.0:0 LISTENING 4324
TCP 0.0.0.0:2179 0.0.0.0:0 LISTENING 4752
TCP 0.0.0.0:3306 0.0.0.0:0 LISTENING 14260
TCP 0.0.0.0:3307 0.0.0.0:0 LISTENING 16848
TCP 0.0.0.0:5357 0.0.0.0:0 LISTENING 4
TCP 0.0.0.0:5985 0.0.0.0:0 LISTENING 4
TCP 0.0.0.0:8000 0.0.0.0:0 LISTENING 11360
TCP 0.0.0.0:8080 0.0.0.0:0 LISTENING 7576
TCP 0.0.0.0:16992 0.0.0.0:0 LISTENING 8572
TCP 0.0.0.0:27019 0.0.0.0:0 LISTENING 1808
TCP 0.0.0.0:47001 0.0.0.0:0 LISTENING 4
TCP 0.0.0.0:49664 0.0.0.0:0 LISTENING 792
TCP 0.0.0.0:49665 0.0.0.0:0 LISTENING 1620
TCP 0.0.0.0:49666 0.0.0.0:0 LISTENING 2636
TCP 0.0.0.0:49667 0.0.0.0:0 LISTENING 3884
TCP 0.0.0.0:49668 0.0.0.0:0 LISTENING 884
TCP 0.0.0.0:49669 0.0.0.0:0 LISTENING 4324
TCP 0.0.0.0:49670 0.0.0.0:0 LISTENING 864
TCP 0.0.0.0:49711 0.0.0.0:0 LISTENING 884
TCP 0.0.0.0:49767 0.0.0.0:0 LISTENING 2280
TCP 10.0.75.1:445 10.0.75.2:37476 ESTABLISHED 4
TCP 10.0.75.1:5040 0.0.0.0:0 LISTENING 9320
TCP 127.0.0.1:515 0.0.0.0:0 LISTENING 6592
TCP 127.0.0.1:49781 127.0.0.1:49782 ESTABLISHED 7356
TCP 127.0.0.1:49782 127.0.0.1:49781 ESTABLISHED 7356
TCP 127.0.0.1:49800 127.0.0.1:49801 ESTABLISHED 4192
TCP 127.0.0.1:49801 127.0.0.1:49800 ESTABLISHED 4192
TCP 127.0.0.1:49820 0.0.0.0:0 LISTENING 8572
TCP 127.0.0.1:49950 0.0.0.0:0 LISTENING 15676
TCP 127.0.0.1:49993 0.0.0.0:0 LISTENING 12012
TCP 127.0.0.1:49993 127.0.0.1:49995 ESTABLISHED 12012
TCP 127.0.0.1:49995 127.0.0.1:49993 ESTABLISHED 12320
TCP 127.0.0.1:49996 0.0.0.0:0 LISTENING 12012
TCP 127.0.0.1:49996 127.0.0.1:49999 ESTABLISHED 12012
TCP 127.0.0.1:49999 127.0.0.1:49996 ESTABLISHED 3044
TCP 127.0.0.1:59382 127.0.0.1:59383 ESTABLISHED 8572
TCP 127.0.0.1:59383 127.0.0.1:59382 ESTABLISHED 8572
TCP 172.28.190.97:5040 0.0.0.0:0 LISTENING 9320
TCP 192.168.13.62:139 0.0.0.0:0 LISTENING 4
TCP 192.168.13.62:60418 3.215.109.207:27017 ESTABLISHED 11360
TCP 192.168.13.62:60419 107.23.169.230:27017 ESTABLISHED 11360
TCP 192.168.13.62:60420 3.215.202.137:27017 ESTABLISHED 11360
TCP 192.168.13.62:60486 52.242.211.89:443 ESTABLISHED 4708
TCP 192.168.13.62:60491 52.144.52.89:5721 ESTABLISHED 4184
TCP 192.168.13.62:60495 52.144.52.89:5721 ESTABLISHED 4192
TCP 192.168.13.62:60786 107.21.160.158:443 ESTABLISHED 13704
TCP 192.168.13.62:60798 35.174.127.31:443 ESTABLISHED 13704
TCP 192.168.13.62:61100 35.170.0.145:443 ESTABLISHED 2684
TCP 192.168.13.62:61139 52.144.52.89:5721 ESTABLISHED 7356
TCP 192.168.13.62:61609 192.168.1.12:445 ESTABLISHED 4
TCP 192.168.13.62:61736 69.147.64.33:443 ESTABLISHED 13704
TCP 192.168.13.62:61790 72.21.91.29:80 CLOSE_WAIT 8632
TCP 192.168.13.62:61887 23.15.135.9:443 ESTABLISHED 13704
TCP 192.168.13.62:61894 172.224.187.18:443 ESTABLISHED 13704
TCP 192.168.13.62:61900 23.79.193.133:443 ESTABLISHED 13704
TCP 192.168.13.62:61921 151.101.2.49:443 ESTABLISHED 13704
TCP 192.168.13.62:61925 151.101.184.134:443 ESTABLISHED 13704
TCP 192.168.13.62:61926 192.132.33.46:443 ESTABLISHED 13704
TCP 192.168.13.62:61931 23.79.203.102:443 ESTABLISHED 13704
TCP 192.168.13.62:61932 104.121.94.99:443 ESTABLISHED 13704
TCP 192.168.13.62:61933 23.79.203.102:443 ESTABLISHED 13704
TCP 192.168.13.62:61938 151.101.0.166:443 ESTABLISHED 13704
TCP 192.168.13.62:61942 67.202.110.13:443 ESTABLISHED 13704
TCP 192.168.13.62:61943 104.106.27.115:443 ESTABLISHED 13704
TCP 192.168.13.62:61945 23.79.194.49:443 ESTABLISHED 13704
TCP 192.168.13.62:61956 208.100.17.190:443 ESTABLISHED 13704
TCP 192.168.13.62:61958 151.101.2.2:443 ESTABLISHED 13704
TCP 192.168.13.62:61963 104.24.16.91:443 ESTABLISHED 13704
TCP 192.168.13.62:61977 50.57.31.206:443 ESTABLISHED 13704
TCP 192.168.13.62:61978 151.101.2.49:443 ESTABLISHED 13704
TCP 192.168.13.62:61985 172.224.201.229:443 ESTABLISHED 13704
TCP 192.168.13.62:61995 172.226.186.40:443 ESTABLISHED 13704
TCP 192.168.13.62:62000 172.224.201.229:443 ESTABLISHED 13704
TCP 192.168.13.62:62010 151.101.186.114:443 ESTABLISHED 13704
TCP 192.168.13.62:62014 13.249.122.78:443 ESTABLISHED 13704
TCP 192.168.13.62:62021 23.79.194.49:443 ESTABLISHED 13704
TCP 192.168.13.62:62029 23.79.194.49:443 ESTABLISHED 13704
TCP 192.168.13.62:62032 172.226.179.36:443 ESTABLISHED 13704
TCP 192.168.13.62:62033 23.79.194.49:443 ESTABLISHED 13704
TCP 192.168.13.62:62038 23.79.194.49:443 ESTABLISHED 13704
TCP 192.168.13.62:62040 104.36.113.23:443 ESTABLISHED 13704
TCP 192.168.13.62:62041 172.224.182.34:443 ESTABLISHED 13704
TCP 192.168.13.62:62044 13.249.122.78:443 ESTABLISHED 13704
TCP 192.168.13.62:62046 151.101.186.114:443 ESTABLISHED 13704
TCP 192.168.13.62:62048 104.36.113.34:443 ESTABLISHED 13704
TCP 192.168.13.62:62049 104.36.113.34:443 ESTABLISHED 13704
TCP 192.168.13.62:62055 23.72.233.140:443 ESTABLISHED 13704
TCP 192.168.13.62:62064 23.72.233.140:443 ESTABLISHED 13704
TCP 192.168.13.62:62065 104.36.115.114:443 ESTABLISHED 13704
TCP 192.168.13.62:62066 104.36.115.114:443 ESTABLISHED 13704
TCP 192.168.13.62:62071 162.248.19.147:443 ESTABLISHED 13704
TCP 192.168.13.62:62093 104.84.235.66:443 ESTABLISHED 13704
TCP 192.168.13.62:62096 104.114.162.10:443 ESTABLISHED 13704
TCP 192.168.13.62:62097 104.114.162.10:443 ESTABLISHED 13704
TCP 192.168.13.62:62098 104.114.162.10:443 ESTABLISHED 13704
TCP 192.168.13.62:62100 104.114.162.10:443 ESTABLISHED 13704
TCP 192.168.13.62:62102 104.20.119.107:443 ESTABLISHED 13704
TCP 192.168.13.62:62105 23.73.150.77:443 ESTABLISHED 13704
TCP 192.168.13.62:62106 104.19.198.151:443 ESTABLISHED 13704
TCP 192.168.13.62:62109 23.73.150.77:443 ESTABLISHED 13704
TCP 192.168.13.62:62110 23.73.150.77:443 ESTABLISHED 13704
TCP 192.168.13.62:62111 23.73.150.77:443 ESTABLISHED 13704
TCP 192.168.13.62:62112 23.73.150.77:443 ESTABLISHED 13704
TCP 192.168.13.62:62114 23.73.150.77:443 ESTABLISHED 13704
TCP 192.168.13.62:62115 23.73.150.77:443 ESTABLISHED 13704
TCP 192.168.13.62:62116 23.73.150.77:443 ESTABLISHED 13704
TCP 192.168.13.62:62117 23.73.150.77:443 ESTABLISHED 13704
TCP 192.168.13.62:62118 162.248.19.152:443 ESTABLISHED 13704
TCP 192.168.13.62:62125 104.112.206.159:443 ESTABLISHED 13704
TCP 192.168.13.62:62126 23.79.217.70:443 ESTABLISHED 13704
TCP 192.168.13.62:62141 104.114.162.10:443 ESTABLISHED 13704
TCP 192.168.13.62:62142 104.114.162.10:443 ESTABLISHED 13704
TCP 192.168.13.62:62143 104.114.162.10:443 ESTABLISHED 13704
TCP 192.168.13.62:62144 104.114.162.10:443 ESTABLISHED 13704
TCP 192.168.13.62:62225 151.101.185.108:443 ESTABLISHED 13704
TCP 192.168.13.62:62233 104.122.43.43:443 ESTABLISHED 13704
TCP 192.168.13.62:62242 23.79.210.204:443 ESTABLISHED 13704
TCP 192.168.13.62:62243 23.79.207.44:443 ESTABLISHED 13704
TCP 192.168.13.62:62246 23.79.207.44:443 ESTABLISHED 13704
TCP 192.168.13.62:62259 10.101.1.12:1563 TIME_WAIT 0
TCP 192.168.13.62:62260 13.107.13.88:443 ESTABLISHED 12012
TCP 192.168.13.62:62261 72.21.81.200:443 ESTABLISHED 12012
TCP 192.168.13.62:62262 72.21.81.200:443 ESTABLISHED 12012
TCP 192.168.13.62:62268 72.21.81.200:443 ESTABLISHED 1712
TCP 192.168.13.62:62269 104.20.50.118:443 ESTABLISHED 13704
TCP 192.168.13.62:62270 104.20.50.118:443 TIME_WAIT 0
TCP 192.168.13.62:62271 23.73.177.22:443 ESTABLISHED 13704
TCP 192.168.13.62:62272 192.184.69.178:443 ESTABLISHED 13704
TCP 192.168.13.62:62273 192.184.69.178:443 ESTABLISHED 13704
TCP 192.168.13.62:62274 172.217.0.14:443 ESTABLISHED 13704
TCP 192.168.13.62:62277 31.13.65.1:443 ESTABLISHED 13704
TCP 192.168.13.62:62278 34.208.139.105:443 ESTABLISHED 13704
TCP 192.168.13.62:62279 10.101.1.12:1563 TIME_WAIT 0
TCP 192.168.13.62:62280 205.185.216.10:443 ESTABLISHED 13704
TCP 192.168.13.62:62281 54.175.52.116:443 ESTABLISHED 13704
TCP 192.168.13.62:62282 198.54.12.145:443 ESTABLISHED 13704
TCP 192.168.13.62:62284 198.54.12.97:443 ESTABLISHED 13704
TCP 192.168.13.62:62285 52.73.145.140:443 ESTABLISHED 13704
TCP 192.168.13.62:62287 104.84.238.39:443 ESTABLISHED 13704
TCP 192.168.13.62:62288 199.166.0.26:443 CLOSE_WAIT 13704
TCP 192.168.13.62:62290 52.0.189.80:443 ESTABLISHED 13704
TCP 192.168.13.62:62292 23.111.8.18:443 ESTABLISHED 13704
TCP 192.168.13.62:62293 104.84.238.39:443 ESTABLISHED 13704
TCP 192.168.13.62:62296 173.194.55.92:443 TIME_WAIT 0
TCP 192.168.13.62:62298 13.249.87.117:443 ESTABLISHED 13704
TCP 192.168.13.62:62299 31.13.65.36:443 ESTABLISHED 13704
TCP 192.168.13.62:62300 157.240.18.5:443 ESTABLISHED 13704
TCP 192.168.13.62:62301 35.163.105.237:443 ESTABLISHED 13704
TCP 192.168.13.62:62302 52.21.237.164:443 ESTABLISHED 13704
TCP 192.168.13.62:62303 104.244.36.20:443 ESTABLISHED 13704
TCP 192.168.13.62:62304 204.154.111.128:443 ESTABLISHED 13704
TCP 192.168.13.62:62305 104.244.36.20:443 ESTABLISHED 13704
TCP 192.168.13.62:62306 104.244.36.20:443 ESTABLISHED 13704
TCP 192.168.13.62:62307 72.21.81.200:443 ESTABLISHED 15980
TCP [::]:80 [::]:0 LISTENING 4
TCP [::]:135 [::]:0 LISTENING 376
TCP [::]:445 [::]:0 LISTENING 4
TCP [::]:623 [::]:0 LISTENING 8572
TCP [::]:1801 [::]:0 LISTENING 4324
TCP [::]:2103 [::]:0 LISTENING 4324
TCP [::]:2105 [::]:0 LISTENING 4324
TCP [::]:2107 [::]:0 LISTENING 4324
TCP [::]:2179 [::]:0 LISTENING 4752
TCP [::]:3306 [::]:0 LISTENING 14260
TCP [::]:3307 [::]:0 LISTENING 16848
TCP [::]:5357 [::]:0 LISTENING 4
TCP [::]:5985 [::]:0 LISTENING 4
TCP [::]:8000 [::]:0 LISTENING 11360
TCP [::]:8080 [::]:0 LISTENING 7576
TCP [::]:16992 [::]:0 LISTENING 8572
TCP [::]:47001 [::]:0 LISTENING 4
TCP [::]:49664 [::]:0 LISTENING 792
TCP [::]:49665 [::]:0 LISTENING 1620
TCP [::]:49666 [::]:0 LISTENING 2636
TCP [::]:49667 [::]:0 LISTENING 3884
TCP [::]:49668 [::]:0 LISTENING 884
TCP [::]:49669 [::]:0 LISTENING 4324
TCP [::]:49670 [::]:0 LISTENING 864
TCP [::]:49711 [::]:0 LISTENING 884
TCP [::]:49767 [::]:0 LISTENING 2280
TCP [::1]:49819 [::]:0 LISTENING 7092
UDP 0.0.0.0:53 *:* 7936
UDP 0.0.0.0:68 *:* 1560
UDP 0.0.0.0:123 *:* 1364
UDP 0.0.0.0:3702 *:* 4220
UDP 0.0.0.0:3702 *:* 2120
UDP 0.0.0.0:3702 *:* 4220
UDP 0.0.0.0:3702 *:* 2120
UDP 0.0.0.0:5050 *:* 9320
UDP 0.0.0.0:5353 *:* 12908
UDP 0.0.0.0:5353 *:* 1640
UDP 0.0.0.0:5353 *:* 12908
UDP 0.0.0.0:5353 *:* 12908
UDP 0.0.0.0:5353 *:* 12908
UDP 0.0.0.0:5353 *:* 12908
UDP 0.0.0.0:5355 *:* 1640
UDP 0.0.0.0:51363 *:* 13704
UDP 0.0.0.0:51364 *:* 13704
UDP 0.0.0.0:51610 *:* 7936
UDP 0.0.0.0:51611 *:* 7936
UDP 0.0.0.0:55358 *:* 13704
UDP 0.0.0.0:55359 *:* 13704
UDP 0.0.0.0:55812 *:* 3884
UDP 0.0.0.0:58465 *:* 13704
UDP 0.0.0.0:58724 *:* 13704
UDP 0.0.0.0:60186 *:* 13704
UDP 0.0.0.0:60485 *:* 13704
UDP 0.0.0.0:60653 *:* 13704
UDP 0.0.0.0:61750 *:* 2120
UDP 0.0.0.0:63749 *:* 4220
UDP 0.0.0.0:64063 *:* 13704
UDP 0.0.0.0:64814 *:* 13704
UDP 0.0.0.0:64950 *:* 13704
UDP 10.0.75.1:1900 *:* 3176
UDP 10.0.75.1:55155 *:* 3176
UDP 127.0.0.1:1900 *:* 3176
UDP 127.0.0.1:55157 *:* 3176
UDP 127.0.0.1:55573 *:* 884
UDP 127.0.0.1:56290 *:* 1844
UDP 127.0.0.1:63405 *:* 15676
UDP 172.28.190.97:67 *:* 7936
UDP 172.28.190.97:68 *:* 7936
UDP 172.28.190.97:1900 *:* 3176
UDP 172.28.190.97:55154 *:* 3176
UDP 192.168.13.62:137 *:* 4
UDP 192.168.13.62:138 *:* 4
UDP 192.168.13.62:1900 *:* 3176
UDP 192.168.13.62:55156 *:* 3176
UDP [::]:123 *:* 1364
UDP [::]:3702 *:* 4220
UDP [::]:3702 *:* 2120
UDP [::]:3702 *:* 4220
UDP [::]:3702 *:* 2120
UDP [::]:5353 *:* 1640
UDP [::]:5353 *:* 12908
UDP [::]:5353 *:* 12908
UDP [::]:5355 *:* 1640
UDP [::]:51612 *:* 7936
UDP [::]:61751 *:* 2120
UDP [::]:63750 *:* 4220
UDP [::1]:1900 *:* 3176
UDP [::1]:55153 *:* 3176
UDP [fe80::4093:18ee:570c:cec1%14]:1900 *:* 3176
UDP [fe80::4093:18ee:570c:cec1%14]:55152 *:* 3176
UDP [fe80::a1f9:2642:3221:79db%17]:1900 *:* 3176
UDP [fe80::a1f9:2642:3221:79db%17]:55151 *:* 3176
The culprit is the data that's highlighted. However innocent that may look, that was a toxic dealbreaker that kept the app from running. To kill it, you use the PID number in the context of the following command:
C:users/b.gust>Taskkill/ PID 11360 /F
Again, "11360" is the PID number. Once you hit <Enter>, life returned to normal.
Also, if you want to clear the Command Line screen of multiple lines of requests etc, just type cls
Also...
I tried the above method and came up short for some reason. One thing that struck me as significant is the number of TIDs that were associated with the port number.
I did this, and that did the trick:
C:\Users\b.gust>netstat -ano | findstr :3000
TCP 0.0.0.0:3000 0.0.0.0:0 LISTENING 15928
TCP [::]:3000 [::]:0 LISTENING 15928
C:\Users\b.gust>tskill 15928
The first thing you want to understand about Node is that it is a "JavaScript Runtime Environment."
In order to understand "runtime," you first have to understand the difference between a compiled program and an interpreted program.
When you're working on a computer, you're dealing with a machine that understands one's and zeroes.
That's it.
So...- an interpreted program produces a RESULT
- a compiled program produces a PROGRAM written in assembly language. In other words, a compliled program is first creating architecture which then goes on to produce your result. Click here for more information