 React Native and Redux Course -> Table of Contents:
Any word that is highlighted in yellow represents a "tooltip." You can hover over it and see some additional information about that particular term. Any edits to that functionality can be investigagted by heading out to tooltipster.com.
React-Native Documentation | Stephen Grinder Tutorial | Atom Shortcut Cheat Sheet
Router Flux Documentation
You've got to use the Terminal to bring up the Simulator and then you'll need to run some commands in the Terminal. It looks like this...
A) Search Bar
B) Terminal Commands
If you're running Parallels, should you attempt to write anything in the console, you're going to run into a problem in that your Simulator will open up Google Chrome on the Windows side which will result in an error.
A) Chrome for Mac
1) "Command->D" to Debug Your Code
Using the Terminal to set up your new application.
A) Terminal Command to Setup New App
This is a great little tool that will alert you to code errors before you try running your application.
A) Atom Preferences
B) Linter Configuration
C) .eslintrc
A quick run down of all the major concepts and machinery that we covered in the first part of the tutorial where we built our first app.
A) Components
1) Class Level Components
2) Functional Components
B) Props
1) Decontstructing Props
This particular project was a bear despite it having been introduced as an "easier" segment in the tutorial.
The name of the project is "Tech Stack" and there's a lot to absorb...
A) What is Redux?
1) Redux Playground
B) Installing Redux
C) Bare Bones Beginning
1) App.js
2) The Header
D) Random Challenges and Problems
1) Simulator Not Working
2) Expected the reducer to be a function...
D) Review and Recap
1) Redux
2) Flowchart
3) Reducers
4) Actions
5) mapStateToProps
A "thick" app, but loaded with some great features and knowledge...!
A) Logging In Using Redux
1) Same Variable / Different Object
a) a) EMAIL CHANGED Dilemma & Utility
2) Establishing the Connection
3) this.renderError() -> Warning: Functions are not valid as a React child....
4) Firebase Gotcha
Router Flux Documentation
 This is a great little tool that will alert you to code errors before you try running your application.
A) Atom Preferences (back to top...)
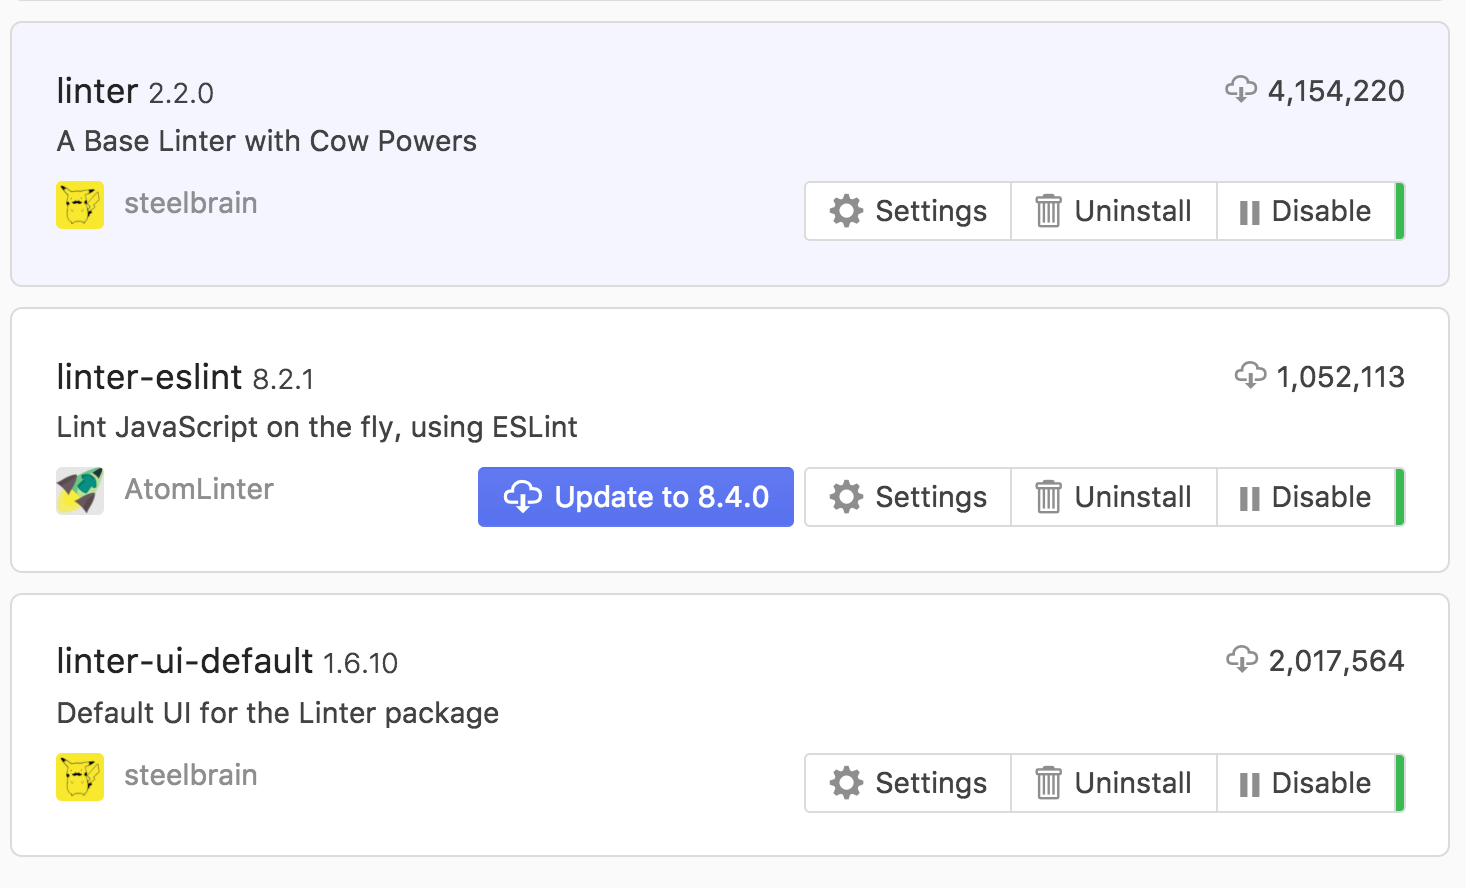
The first thing you need to do is navigate to Atom's Preferences and do a search for "linter-eslint." You'll want to install what you see in the image to the right. The packages you want to pay attention to are "linter" and "linter-eslint."
B) Linter Configuration (back to top...)
You're going to need to install a Linter Configuration file into your project directory. This will dictate how things are being evaluated by Linter and what will trigger its errors etc.
To do that, navigate to your project directory on your Terminal and type in the following command: npm install --save-dev eslint-config-rallycoding
C) .eslintrc (back to top...)
The last thing you're going to do is tell Atom to use "eslint" and give it a specific file to refer to that will point to the "rallycoding" dynamic you just defined as far as the config file.
To do that, you'll set up a new file in your project's route directory called, ".eslintrc." Make sure you preface it with a "." In that file, you'll put:
{
"extends": "rallycoding"
}
...and that's all there is to it!
A) Components (back to top...)
1) Class Level Components (back to top...)
These components are your upper echelon where you've got "state" as well as "life cycle" methods...
class AlbumList extends Component {
state = { albums: [] }; //used to "record" user reactions
componentWillMount() {
axios.get('https://rallycoding.herokuapp.com/api/music_albums') // fetch a list of albums
.then(response => this.setState({ albums: response.data }));// update "state" to include a list of albums
}
renderAlbums() {
return this.state.albums.map(album =>
<AlbumDetail key={album.title} album={album} /> //rendering one AlbumDetail component for every album retrieved
);
2) Functional Components (back to top...)
These components are your "pretty boys," in that you're using them in the context of leting your user "see" data:
This is a great little tool that will alert you to code errors before you try running your application.
A) Atom Preferences (back to top...)
The first thing you need to do is navigate to Atom's Preferences and do a search for "linter-eslint." You'll want to install what you see in the image to the right. The packages you want to pay attention to are "linter" and "linter-eslint."
B) Linter Configuration (back to top...)
You're going to need to install a Linter Configuration file into your project directory. This will dictate how things are being evaluated by Linter and what will trigger its errors etc.
To do that, navigate to your project directory on your Terminal and type in the following command: npm install --save-dev eslint-config-rallycoding
C) .eslintrc (back to top...)
The last thing you're going to do is tell Atom to use "eslint" and give it a specific file to refer to that will point to the "rallycoding" dynamic you just defined as far as the config file.
To do that, you'll set up a new file in your project's route directory called, ".eslintrc." Make sure you preface it with a "." In that file, you'll put:
{
"extends": "rallycoding"
}
...and that's all there is to it!
A) Components (back to top...)
1) Class Level Components (back to top...)
These components are your upper echelon where you've got "state" as well as "life cycle" methods...
class AlbumList extends Component {
state = { albums: [] }; //used to "record" user reactions
componentWillMount() {
axios.get('https://rallycoding.herokuapp.com/api/music_albums') // fetch a list of albums
.then(response => this.setState({ albums: response.data }));// update "state" to include a list of albums
}
renderAlbums() {
return this.state.albums.map(album =>
<AlbumDetail key={album.title} album={album} /> //rendering one AlbumDetail component for every album retrieved
);
2) Functional Components (back to top...)
These components are your "pretty boys," in that you're using them in the context of leting your user "see" data:
const AlbumDetail = ({ album }) => {
const { title, artist, thumbnail_image, image, url } = album;
const { thumbnailStyle,
headerContentStyle,
thumbnailContainerStyle,
headerTextStyle,
imageStyle
} = styles;
return (
<Card>
<CardSection>
<View style={thumbnailContainerStyle}>
<Image
style={thumbnailStyle}
source={{ uri: thumbnail_image }}
/>
</View>
<View style={headerContentStyle}>
<Text style={headerTextStyle}>{title}</Text>
<Text>{artist}</Text>
</View>
</CardSection>
 This particular project was a bear despite it having been introduced as an "easier" segment in the tutorial.
The name of the project is "Tech Stack" and there's a lot to absorb...
A) What is Redux? (back to top...)
First of all, here's a great resource to refer to when you're wanting to wrap your head around Redux: Redux Tutorial.
Bottom line: It's a library that runs independent of React. They "play well together," however, thanks to a hierarchy that looks like what you see to the right.
This particular project was a bear despite it having been introduced as an "easier" segment in the tutorial.
The name of the project is "Tech Stack" and there's a lot to absorb...
A) What is Redux? (back to top...)
First of all, here's a great resource to refer to when you're wanting to wrap your head around Redux: Redux Tutorial.
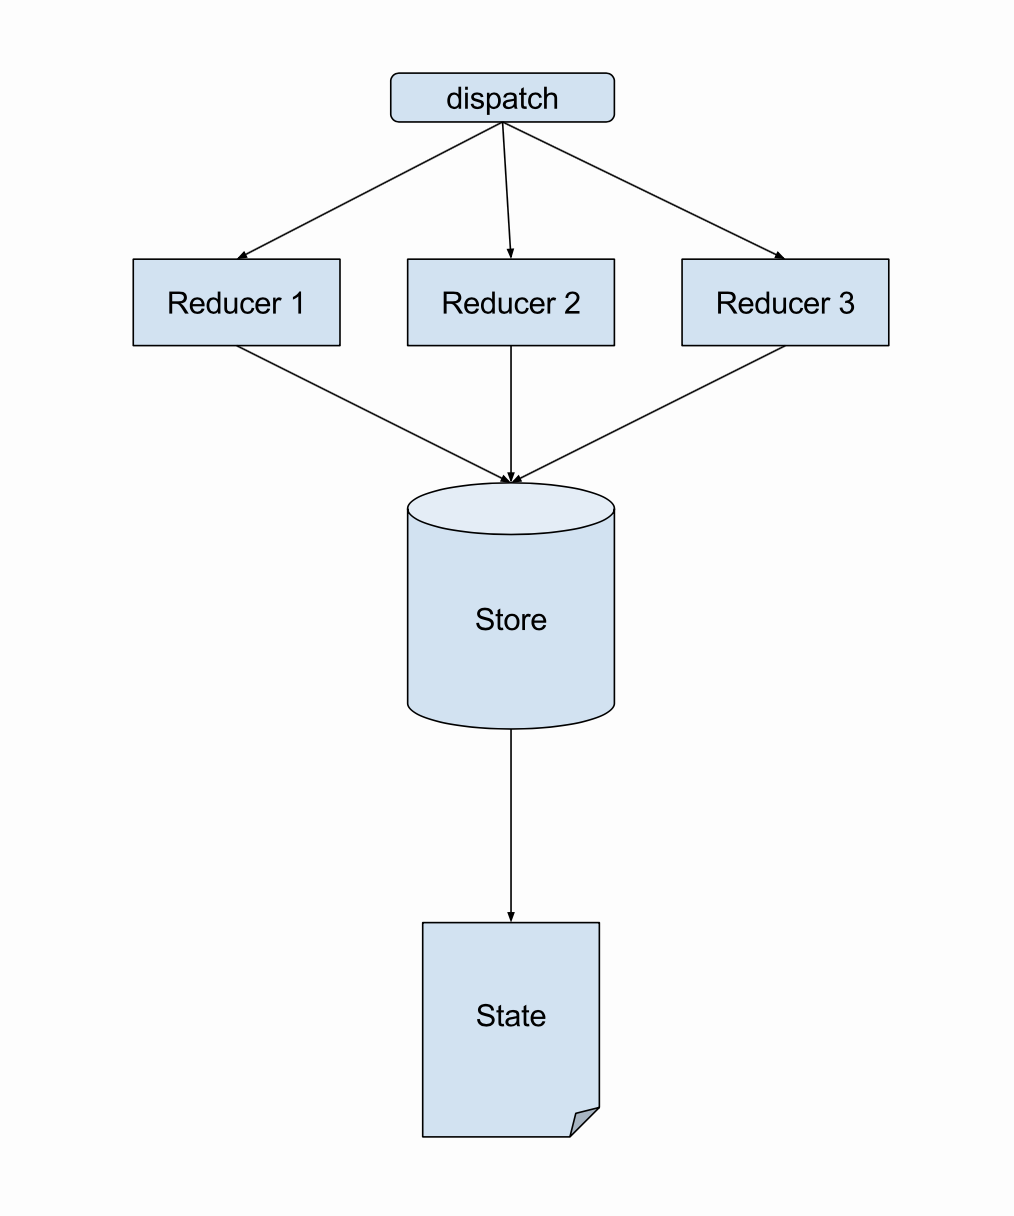
Bottom line: It's a library that runs independent of React. They "play well together," however, thanks to a hierarchy that looks like what you see to the right. - The "store" is where your functionality is occuring
- Your "Reducers" are what serves as the interface between React and Redux - this is what allows the two to talk to one another. You'll feed an "action" into your "Reducer" and that will be what influences your "store."
- The "state" is where you're going to find the end result of your interactions between React and Redux. This is what's being returned from your "store."
 import React from 'react';
import { View } from 'react-native';
import { Provider } from 'react-redux';
import { createStore } from 'redux';
import reducers from './reducers';
import { Header } from './components/common';
const App = () => {
return (
<Provider store={createStore(reducers)}>
<View>
<Header headerText="Tech Stack" />
</View>
</Provider>
);
};
export default App;
D) Random Challenges and Problems (back to top...)
This particular project had several challenges that needed to be overcome. Here are some notes so if these problems surface again, I've got a head start.
1) Simulator Not Working (back to top...)
For whatever reason, the Simulator kept giving me an error. The message on the Simulator was, "No bundle URL present." In order to clear the canvas and get things back in order, I ran this in the Terminal:
rm -rf ios/build/; kill $(lsof -t -i:8081); react-native run-ios
That did it!
import React from 'react';
import { View } from 'react-native';
import { Provider } from 'react-redux';
import { createStore } from 'redux';
import reducers from './reducers';
import { Header } from './components/common';
const App = () => {
return (
<Provider store={createStore(reducers)}>
<View>
<Header headerText="Tech Stack" />
</View>
</Provider>
);
};
export default App;
D) Random Challenges and Problems (back to top...)
This particular project had several challenges that needed to be overcome. Here are some notes so if these problems surface again, I've got a head start.
1) Simulator Not Working (back to top...)
For whatever reason, the Simulator kept giving me an error. The message on the Simulator was, "No bundle URL present." In order to clear the canvas and get things back in order, I ran this in the Terminal:
rm -rf ios/build/; kill $(lsof -t -i:8081); react-native run-ios
That did it!
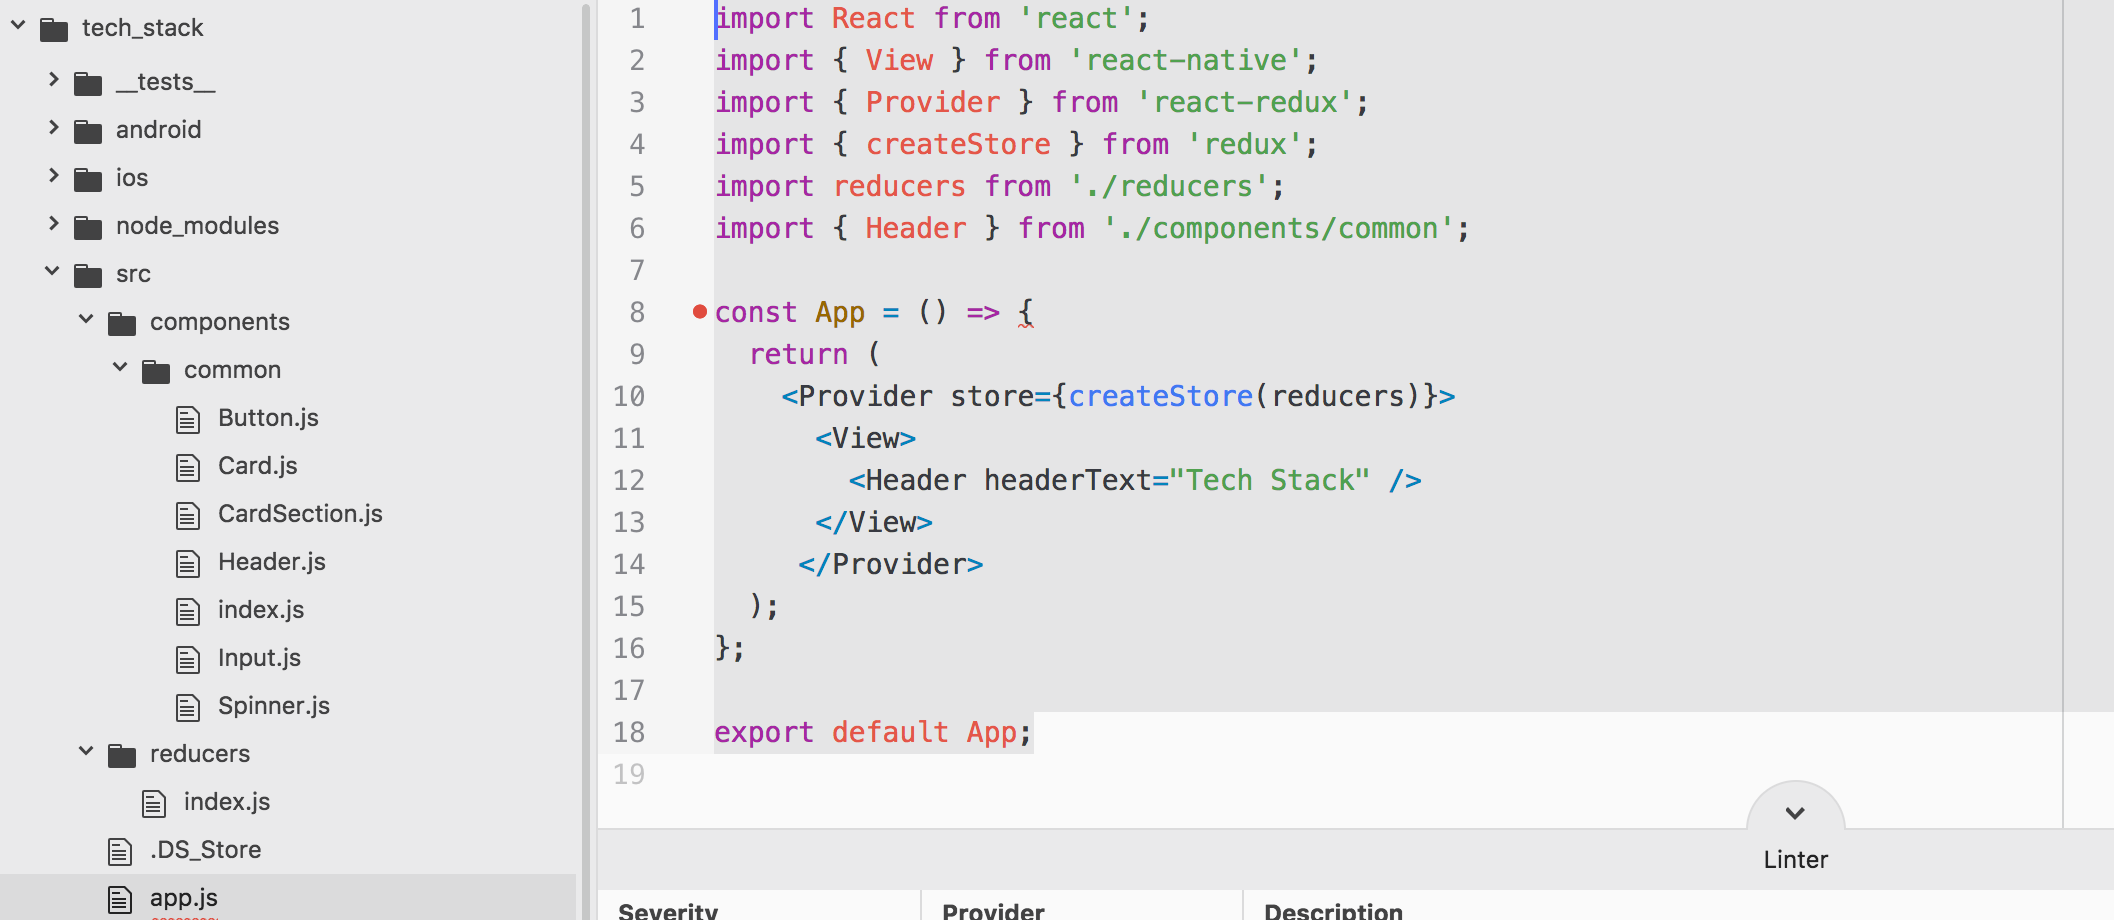
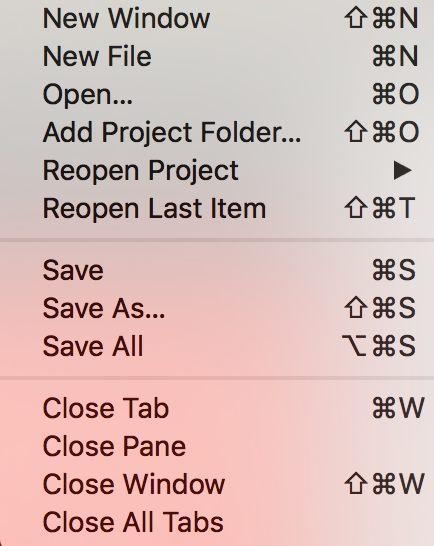 2) Expected the reducer to be a function... (back to top...)
This error may or may not be a thing, but it was solved simply by "Save All." Refer to the image to the right and take heed! You can spend a lot of time looking for an error the doesn't exist. All you need to do is make sure that ALL your files have been saved!
3) Nothing was returned from render (back to top...)
Look at this and notice the code that's highlighted in red...
import React, { Component } from 'react';
import { connect } from 'react-redux';
class LibraryList extends Component {
render() {
return;
}
}
const mapStateToProps = state => {
console.log(state);
};
export default connect()(LibraryList);
You won't get an error as far as ESLint is concerned, but you will get the "Nothing was returned from render..." error.
To remedy that you have to include the "mapStateToProps" dynamic into your connect function. Like this:
const mapStateToProps = state => {
console.log(state);
};
export default connect(mapStateToProps)(LibraryList);
D) Review and Recap (back to top...)
1) Redux (back to top...)
Redux and React are two different technologies and there needs to be some subtle intervention deployed in order for them to play nice together. That's what yo uhave with the "Provider." At the top of your app.js page, you've got this:
import { Provider } from 'react-redux'; // react redux is the tech that allows React and Redux to talk to tone another
import { createStore } from 'redux';
import reducers from './reducers';
const App = () => {
return (
<Provider store={createStore(reducers)}> // your Provider is what creates your Redux Store and that's where your magic is database magic is happening...
etc.
);
};
There's more to this that will be covered in more detail later, but it's the terminology and basic systemic scaffolding that I want to capture here.
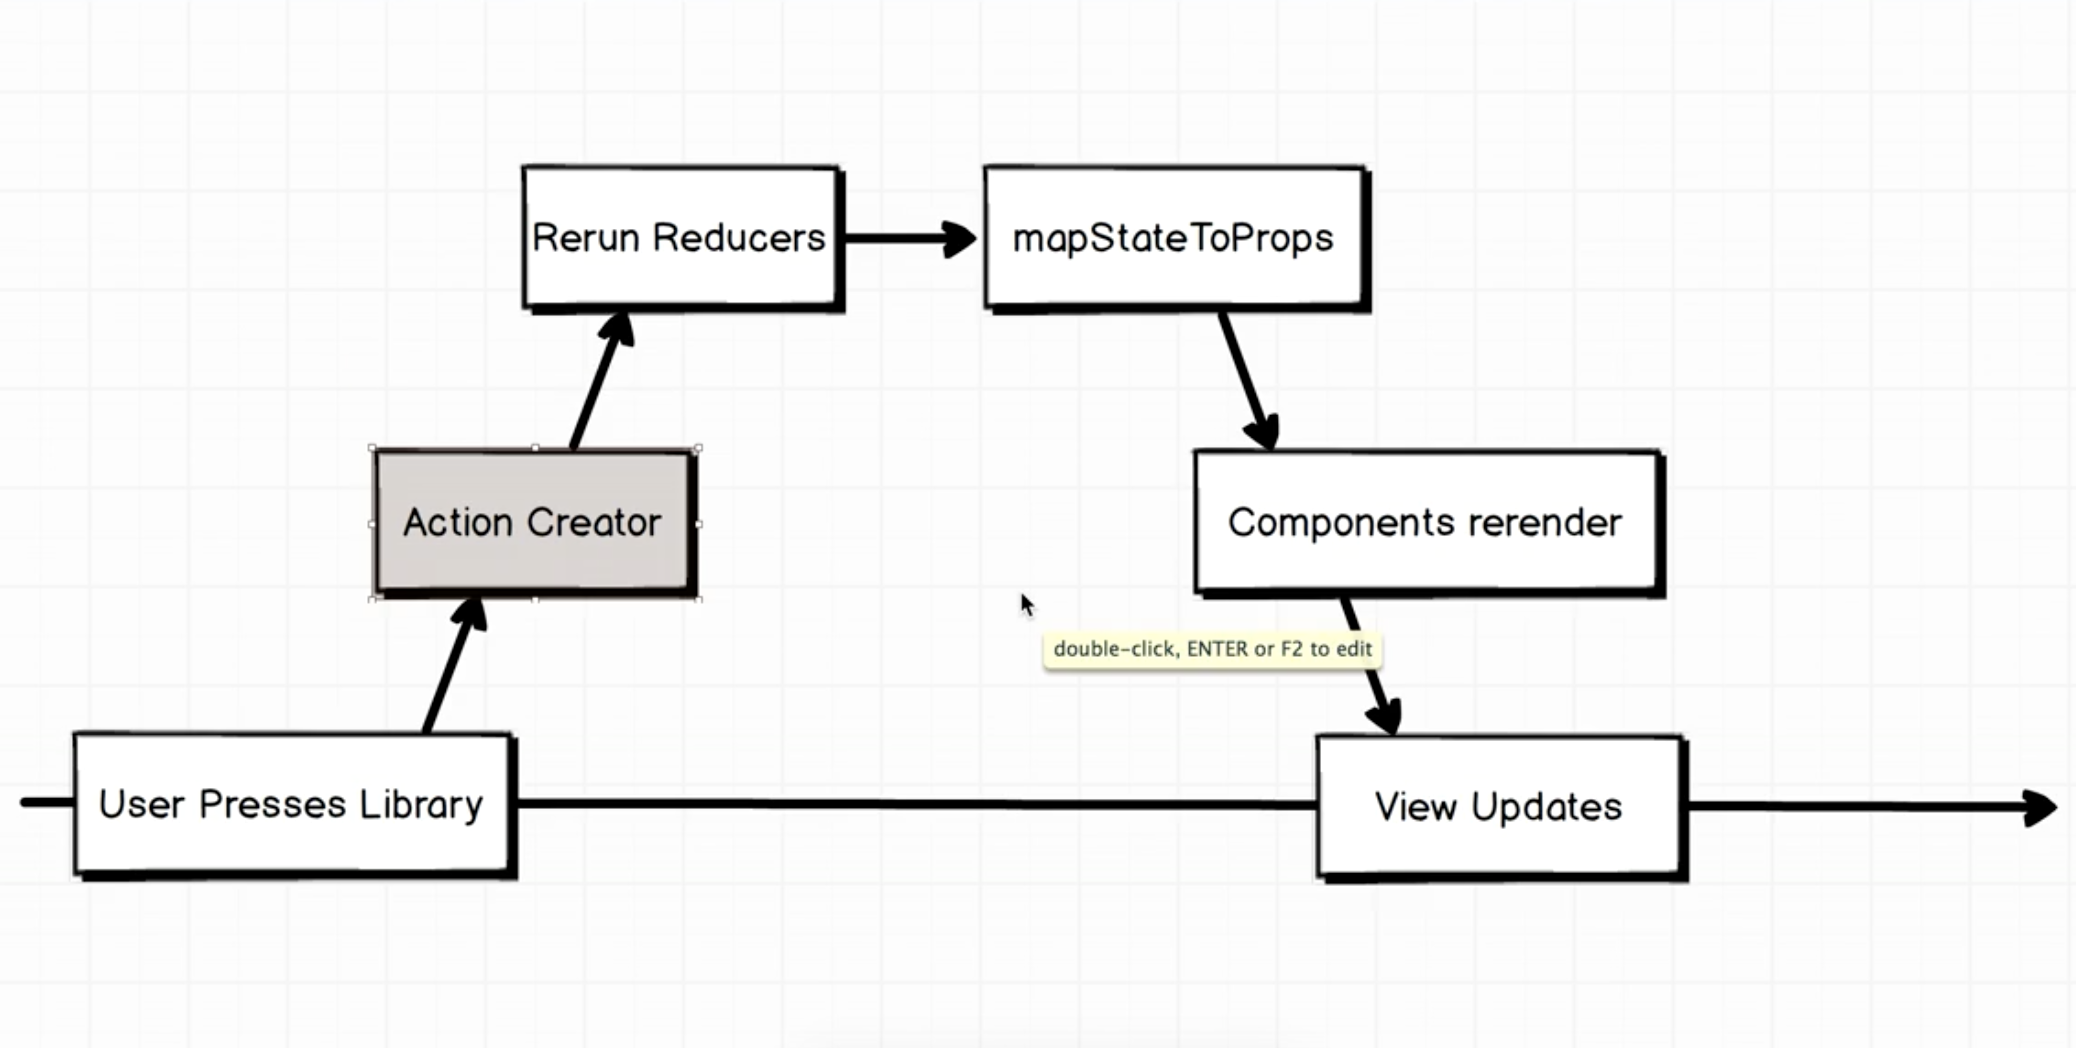
2) Flowchart (back to top...)
Here's a good diagram to help envision the "flow" of Redux and how Reducers are controlling / impacting the "state" of the "store..."
2) Expected the reducer to be a function... (back to top...)
This error may or may not be a thing, but it was solved simply by "Save All." Refer to the image to the right and take heed! You can spend a lot of time looking for an error the doesn't exist. All you need to do is make sure that ALL your files have been saved!
3) Nothing was returned from render (back to top...)
Look at this and notice the code that's highlighted in red...
import React, { Component } from 'react';
import { connect } from 'react-redux';
class LibraryList extends Component {
render() {
return;
}
}
const mapStateToProps = state => {
console.log(state);
};
export default connect()(LibraryList);
You won't get an error as far as ESLint is concerned, but you will get the "Nothing was returned from render..." error.
To remedy that you have to include the "mapStateToProps" dynamic into your connect function. Like this:
const mapStateToProps = state => {
console.log(state);
};
export default connect(mapStateToProps)(LibraryList);
D) Review and Recap (back to top...)
1) Redux (back to top...)
Redux and React are two different technologies and there needs to be some subtle intervention deployed in order for them to play nice together. That's what yo uhave with the "Provider." At the top of your app.js page, you've got this:
import { Provider } from 'react-redux'; // react redux is the tech that allows React and Redux to talk to tone another
import { createStore } from 'redux';
import reducers from './reducers';
const App = () => {
return (
<Provider store={createStore(reducers)}> // your Provider is what creates your Redux Store and that's where your magic is database magic is happening...
etc.
);
};
There's more to this that will be covered in more detail later, but it's the terminology and basic systemic scaffolding that I want to capture here.
2) Flowchart (back to top...)
Here's a good diagram to help envision the "flow" of Redux and how Reducers are controlling / impacting the "state" of the "store..."
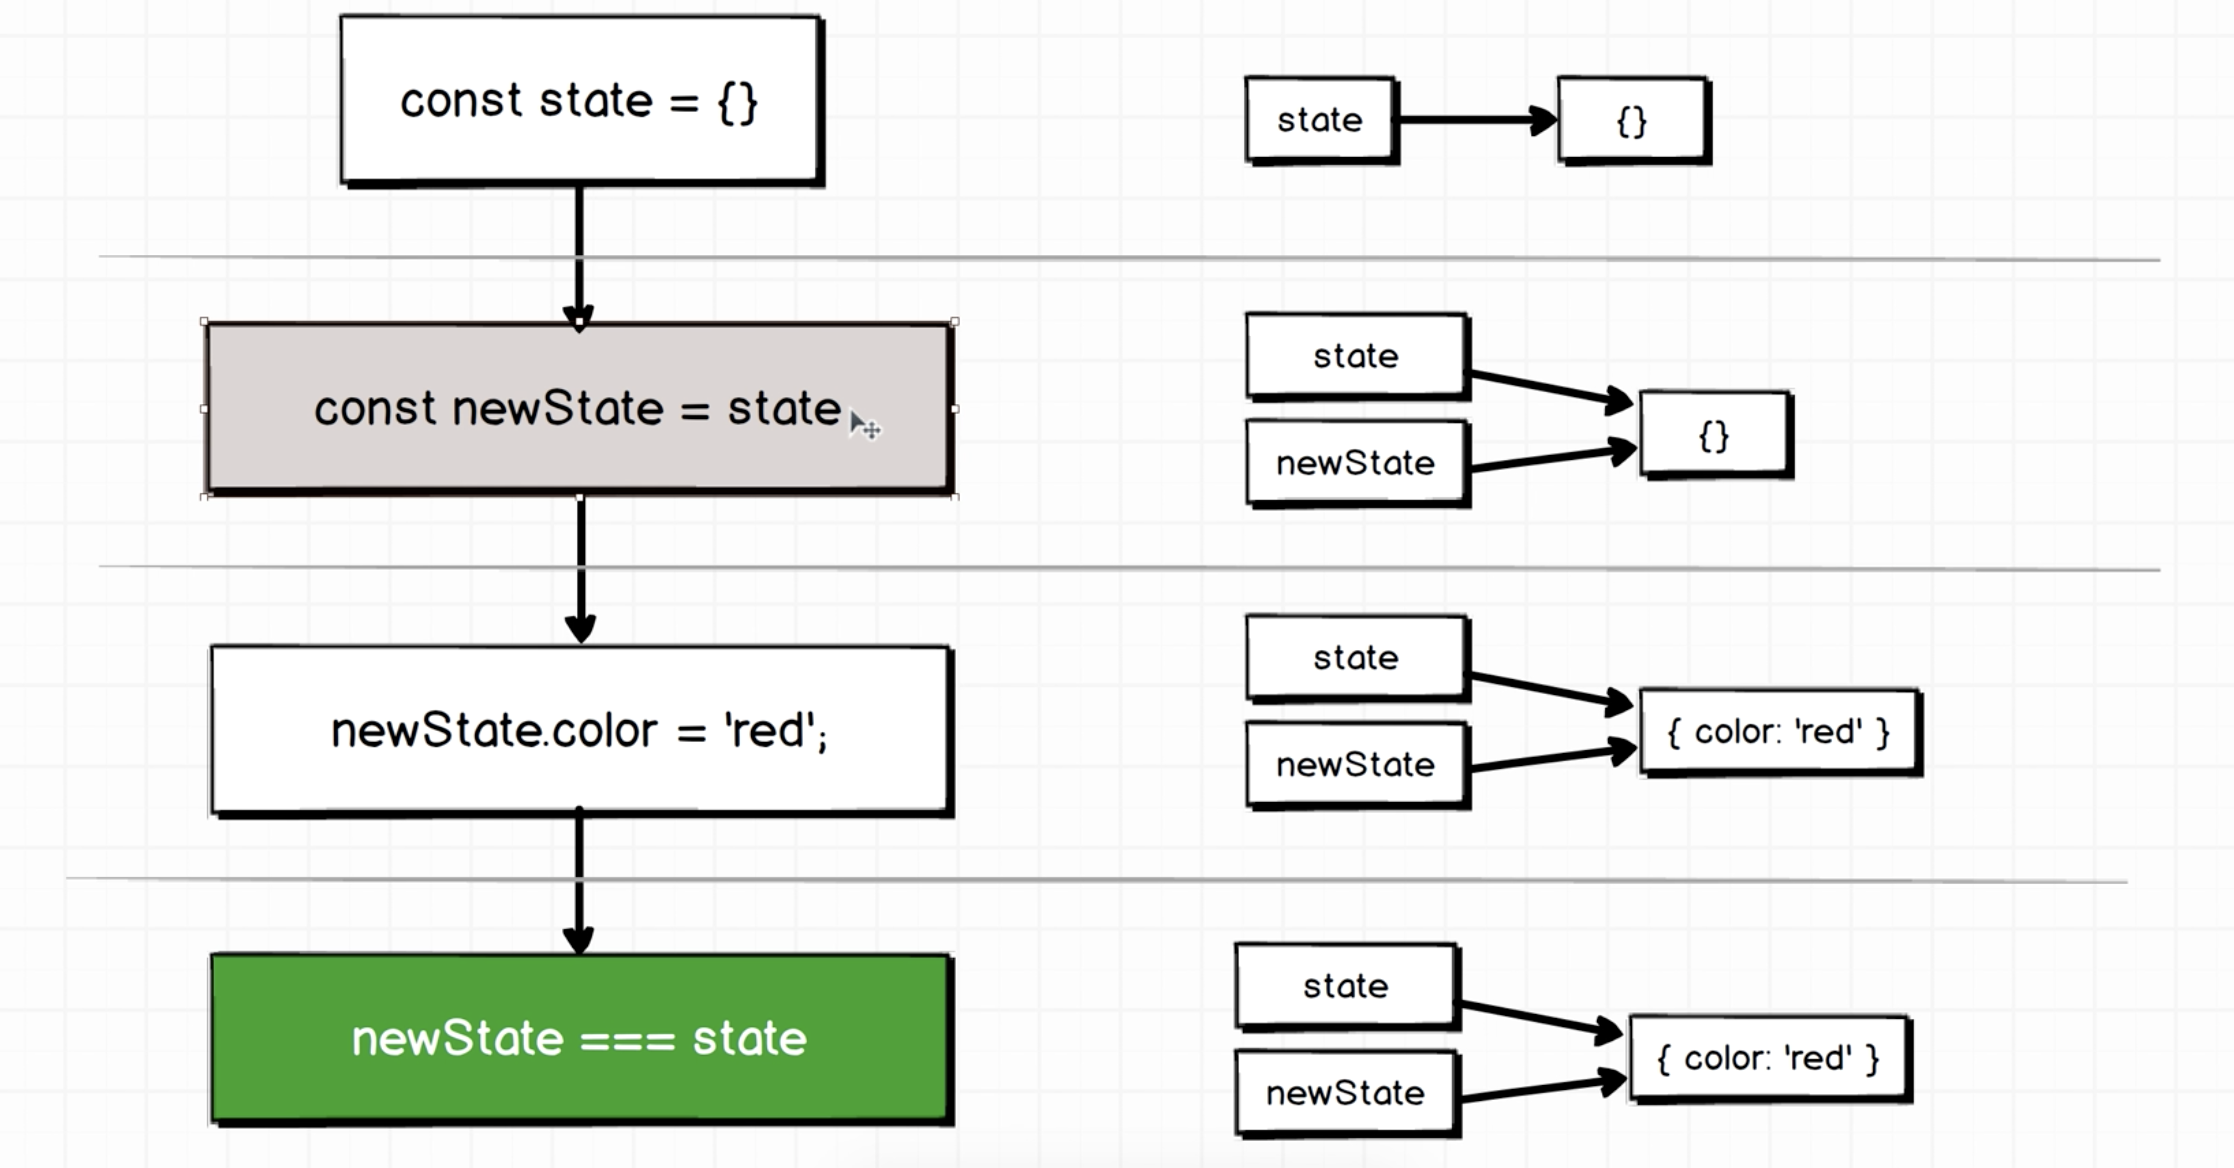
What's happening now is that the user enters something into the email field...
You're using the Event Handler that's documented at the top of the page as
onEmailChange(text) {
this.props.emailChanged(text);
...and triggered by what you've got in the email field:
onChangeText={this.onEmailChange.bind(this)}
value={this.props.email} // this specifies the value of this field as what's being entered by the user in that moment
That triggers the "action" that you have specified in your "actions -> index.js" file which, in this case, is "emailChanged." That looks like this:
import { EMAIL_CHANGED } from './types';
export const emailChanged = (text) => { //will be called with text
return { //always returns an action
type: EMAIL_CHANGED, //it always has a type property which in this case is "EMAIL_CHANGED"
//which was defined in types.js
payload: text
};
};
This is just the "action." The real functionality is the Reducer that is being called by the "action." The "Reducer" is specified in your connect function...
The "connect" function looks like this:
export default connect(mapStatetoProps, { emailChanged })(LoginForm);
It only makes sense when you look at the "mapStateToProps" const just above this line...
const mapStatetoProps = state => {
return {
email: state.auth.email // "auth" is your Reducer
};
};
And here's your Reducer. This is where the actual functionality is happening...
import { EMAIL_CHANGED } from '../actions/types';
const INITIAL_STATE = { email: '' };
export default (state = INITIAL_STATE, action) => {
switch (action.type) {
case EMAIL_CHANGED: // here's where your action type comes in to play and dictate systemic flow
return { ...state, email: action.payload }; // you're changing the value of the email field to what's in the payload section as dictated by the action
default:
return state;
}
};
This is what's being used to reproduce the value of the email field as the user is entering their email address...
3) this.renderError() -> Warning: Functions are not valid as a React child.... (back to top...)
At one point during this app, I got this error:
"Warning: Functions are not valid as a React child. This may happen if you return a Component instead of