 Healthkit -> Table of Contents:
Healthkit Notes
What you're looking at is an example of the approach I take anytime I'm tasked with either building something new or repairing an already working application that I'm not familiar with.
Whatever skillset you're bringing to the table, popping the hood on what you're trying to learn - be it a new language or just the infrastructure of an app built in a format you're familiar with - in order to get to that place where you truly understand what you're doing, you need to position yourself as a "note taking" student.
This is what I look like as a "note taking" student having been tasked with building an interface using OAuth to access a user's Fitbit information.
Starting with defining "Healthkit" and then several terms that are used to describe OAuth and Open Api, you'll then see my research into "Spotlight" and "Swagger" as part of learning how to craft an OpenAPI document.
At "IX," you'll see how I popped the hood on the Boilerplate our team was asked to use and then we get into the actual process of OAuth authentication.
XIII | B features notes from a youtube tutorial and then...
Letter C features the final, working code with certain elements intentionally omitted for the sake of security.
A) iOS
B) Healthkit
A) oauth
B) Open API
C) Markdown
D) Single Source of Truth
E) State
F) Microservices
G) Containerization
H) IDE
I) Modeling
J) enum
K) artifact
L) OAS
M) CRUD
N) contract
O) ETL
P) Datapoint
Q) Boilerplate
R) Endpoint
S) YAML
A) Definition / Description
B) Open API Specification
A) Definition / Description
B) Resources
A) Definition / Description
B) What's the Difference Between Swagger and Stoplight
C) Swagger Petstore Example
1) CURL
D) Create and Edit Your Open API on Swagger
1) Petstore Example
2) The Swagger v3 Contract
Here's a great web resource that documents any one of a number of real world examples of working OpenAPI contracts.
A) Apicurio
B) Working Example
A) json_decode
B) json_encode
A) Terms and Technologies
B) JSON WebToken Authentication
A) Definition
A) Stoplight
1) Nomenclature
a) Request Parameters
b) Responses
c) Send a Test Request
i) Settings
ii) Query
iii) Code Generation
A) Overview
A) Working OpenAPI Contract
1) Swagger Version
2) Stoplight JSON Version
B) JWT / Node Tutorial
C) Actual Authentication
1) Working Code
1) user.js
2) app.js
3) Setting Up a User
4) Finding the User
D) Deployment
E) Authentication w/ Database
{
"type": "string",
"enum": ["red", "amber", "green"]
}
"red" -> works
"blue" -> won't be accepted
IT'S NOT CODE!
OAS, Stoplight and Swagger are tools and testing enviornments that are code agnostic. You'll write you code later, the one caveat being that you'll be sending and receiving your data in the context of JSON.
This is a tool used to generated API documentation based on OAS 3.0 specifications. "OAS" stands for "Open API Specification." We've said that more than once, but it bears repeating...!
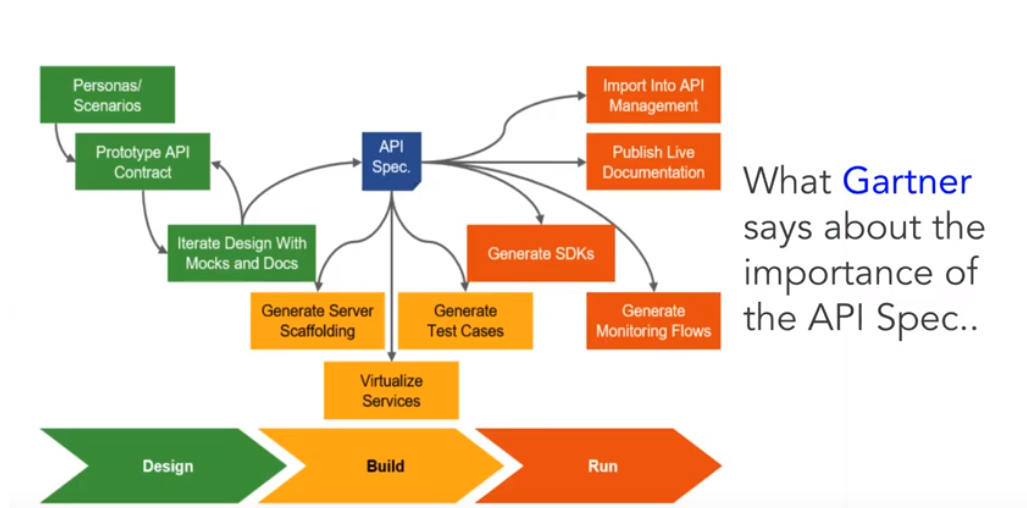
If you're inclined to think that an artifact or a contract may not be needful, consider the graphic below:
Most of what you're seeing from this point on that pertains to "Swagger" is coming from a series of videos that you can access by clicking here
You'll run across PATCH and PUT when you're looking at potential CURL commands. PATCH is sending some instructions to modify an already existing resource. PUT is sending the actual resource in a modified format (click here for more information.
Swagger Petstore is a sample of a fully armed and operational Open SPI contract that you can you run and play with to get your feet wet. For every end point, there's a corresponding "Try it Out" button.
To see the interface that allows you edit that sample - which is a great way to begin with a solid and accurate starting point - head out to the editor which you can access by clicking here.
1) CURL (back to top...)
Curl transfers information to data to URLs. You can use Postman, but you can also use CURL which stands for "Client URL."
The bottom line is that when POST, GET, DELETE or UPDATE are utilized, you're sending info to a URL which will respond according to the database that's positioned behind that URL. When you're testing your Open API's, you're not necessarily using a database. To mimic that scenario, you'll use something like Postman or...Curl. Here's a video that you can watch that gives you a two minute intro to Curl.
When you click on the "Try it Out" button, you'll see the CURL request, the Request URL and the Server Response.
D) Create and Edit Your Open API on Swagger (back to top...)
To create / edit your Open API on Swagger, you're going to go out to http://editor.swagger.io/A couple of terms right out of the chute:
- Resource - a collection of endpoints in one category. For example, "users" is a resource. "Comments" is a resource. And in the Comments resource, you've got several "endpoints."
- endpoints would be something like "delete," "edit" and "insert." Those endpoints correspond to a specific resource.
- Model is the schema of your database, more or less
swagger: "2.0"
info:
description: "This isn't a sample server Petstore server. You can find out more about Swagger at [http://swagger.io](http://swagger.io) or on [irc.freenode.net, #swagger](http://swagger.io/irc/). For this sample, you can use the api key `special-key` to test the authorization filters."
version: "1.0.0"
title: "Swagger Petstore"
termsOfService: "http://swagger.io/terms/"
contact:
email: "apiteam@swagger.io"
license:
name: "Apache 2.0"
url: "http://www.apache.org/licenses/LICENSE-2.0.html"
host: "petstore.swagger.io"
❷ basePath: "/v2"
❹ tags:
- name: "pet"
description: "Everything about your Pets"
externalDocs:
description: "Find out more"
url: "http://swagger.io"
- name: "store"
description: "Access to Petstore orders"
- name: "user"
description: "Operations about user"
externalDocs:
description: "Find out more about our store"
url: "http://swagger.io"
❶ schemes:
- "https"
- "http"
paths:
❸ /pet:
post:
❹ tags:
- "pet"
summary: "Add a new pet to the store" // self explanatory
description: "" // self explanatory
❺ operationId: "addPet" // self explanatory
❻ consumes:
- "application/json"
- "application/xml"
❼ produces:
- "application/xml"
- "application/json"
❽ parameters:
- in: "body"
name: "body"
description: "Pet object that needs to be added to the store"
required: true
schema:
$ref: "#/definitions/Pet"
❾ responses:
405:
description: "Invalid input"
❿ security:
- petstore_auth:
- "write:pets"
- "read:pets"
❶ put:
tags:
- "pet"
summary: "Update an existing pet"
description: ""
operationId: "updatePet"
consumes:
- "application/json"
- "application/xml"
produces:
- "application/xml"
- "application/json"
parameters:
- in: "body"
name: "body"
description: "Pet object that needs to be added to the store"
required: true
schema:
$ref: "#/definitions/Pet"
responses:
400:
description: "Invalid ID supplied"
404:
description: "Pet not found"
405:
description: "Validation exception"
security:
- petstore_auth:
- "write:pets"
- "read:pets"
❷ /pet/findByStatus:
get:
tags:
- "pet"
summary: "Finds Pets by status"
description: "Multiple status values can be provided with comma separated strings"
operationId: "findPetsByStatus"
produces:
- "application/xml"
- "application/json"
parameters:
- name: "status"
in: "query"
description: "Status values that need to be considered for filter"
required: true
type: "array"
items:
type: "string"
enum:
- "available"
- "pending"
- "sold"
default: "available"
collectionFormat: "multi"
responses:
200:
description: "successful operation"
schema:
type: "array"
items:
$ref: "#/definitions/Pet"
400:
description: "Invalid status value"
security:
- petstore_auth:
- "write:pets"
- "read:pets"
❸ securityDefinitions:
❹ petstore_auth:
type: "oauth2" // one of three types; basic, apiKey and oath2
authorizationUrl: "http://petstore.swagger.io/oauth/dialog" // the URL that a user will be routed
to when they're getting ready to be authorized
flow: "implicit" // only applicable when you're using "OAuth2.0" as your authorization protocol
❺ scopes:
write:pets: "modify pets in your account"
read:pets: "read your pets"
❻ api_key:
type: "apiKey"
name: "api_key"
in: "header"
❼ definitions:
Order:
type: "object"
properties:
id:
type: "integer"
format: "int64"
petId:
type: "integer"
format: "int64"
quantity:
type: "integer"
format: "int32"
shipDate:
type: "string"
format: "date-time"
status:
type: "string"
description: "Order Status"
enum:
- "placed"
- "approved"
- "delivered"
complete:
type: "boolean"
default: false
xml:
name: "Order"
Category:
type: "object"
properties:
id:
type: "integer"
format: "int64"
name:
type: "string"
xml:
name: "Category"
externalDocs:
description: "Find out more about Swagger"
url: "http://swagger.io"
 ② your "basePath" is the path upon which all of your others are built.
③ The "path" that's being asked for is the path you're constructing in your project. You see that in the screenshot to the right. You'll also specify whether it's a "GET" or "POST." This is also technically categorized as an "endpoint."
④ The "tag" is an intuitive label you're using to arrange your various endpoints. The highlighted section represents a list of all your tags in your contract. You'll see each tag reiterated along with more detailed information after each path / endpoint.
⑤ Operation ID is an optional unique string used to identify an operation. If provided, these IDs must be unique among all operations described in your API.
An "operation" is anything that falls under the heading of something like GET, PUT, POST, etc.
⑥ if your endpoint is going to "consume" some data (like in the "authentication" api we're building where it's going to be looking for a JWT in the HEAD), this is where you would document that. Otherwise, it's superflous.
⑦ similar to "consume," only this time it's what your API is "producing." In the example used in the tutorial, the output is JSON.
⑧ if you're getting ready to edit a resource, chances are excellent you're going to be looking at a URL that has the ID of that particular entity. This is where you would document what your app is expecting. In this example, there is not "GET," so we're set. This section would be deleted.
⑨ "responses" is pretty much a default setting in this instance. This is from the website:
② your "basePath" is the path upon which all of your others are built.
③ The "path" that's being asked for is the path you're constructing in your project. You see that in the screenshot to the right. You'll also specify whether it's a "GET" or "POST." This is also technically categorized as an "endpoint."
④ The "tag" is an intuitive label you're using to arrange your various endpoints. The highlighted section represents a list of all your tags in your contract. You'll see each tag reiterated along with more detailed information after each path / endpoint.
⑤ Operation ID is an optional unique string used to identify an operation. If provided, these IDs must be unique among all operations described in your API.
An "operation" is anything that falls under the heading of something like GET, PUT, POST, etc.
⑥ if your endpoint is going to "consume" some data (like in the "authentication" api we're building where it's going to be looking for a JWT in the HEAD), this is where you would document that. Otherwise, it's superflous.
⑦ similar to "consume," only this time it's what your API is "producing." In the example used in the tutorial, the output is JSON.
⑧ if you're getting ready to edit a resource, chances are excellent you're going to be looking at a URL that has the ID of that particular entity. This is where you would document what your app is expecting. In this example, there is not "GET," so we're set. This section would be deleted.
⑨ "responses" is pretty much a default setting in this instance. This is from the website:
For each operation, you can define possible status codes, such as 200 OK or 404 Not Found, and schema of the response body. Schemas can be defined inline or referenced from an external definition via $ref. You can also provide example responses for different content types.
⑩ here's where you're going to specify your security dynamic
① "put" doesn't exist in this app, so you can delete all of this stuff!
Remember, "put" is your operation. Next you'll have your "tag." At this point, you're still on "pet..."
② you're now on a new "path," hence the different indentation and look. This is going to be the route in your application and then what follows is repeat of what you've just done!
③ here's your Security Definitions which are defined here: https://swagger.io/docs/specification/2-0/authentication/. Basically, it's the section where you're defining all of the security dynamics you've got on your app.
④ arbitrary name you give to this particular authentication piece
⑤ scopes refers to the "scope" of the authenticated user's permissions
⑥ An API Key is...
An application programming interface key (API key) is a code passed in by computer programs calling an application programming interface (API) to identify the calling program, its developer, or its user to the Web site. API keys are used to track and control how the API is being used, for example to prevent malicious use or abuse of the API (as defined perhaps by terms of service).
For your purposes you will be using a JWT which will be documented as basicAuth.
⑦ definitions is where you're outlining the basic schema of the relevant tables in your database. Click here to see of the types.
2) The Swagger v3 Contract (back to top...)
You're working with version three of Swagger. The final working Open API contract looks like this:
openapi: 3.0.0
info:
title: Healthkit Authentication
description: Authenticating users coming from Healthkit to bIQ
version: 1.0.0
servers:
- url: <appliedsite>
description: server that is being accessed by incoming Healthkit authentication request
paths:
/authentication:
get:
summary: validates incoming JWT token
description: takes JWT token, breaks it up and then validates it according to what's in the database
responses:
'200': # status code
$ref: '#/components/responses/AuthenticatedUser'
'401':
$ref: '#/components/responses/UnAuthenticatedUser'
'403':
$ref: '#/components/responses/BadToken'
components:
responses:
AuthenticatedUser:
description: user has been authenticated
content:
application/json:
schema:
type: string
items:
type: string
UnAuthenticatedUser:
description: user has not been validated
content:
application/json:
schema:
type: string
items:
type: string
BadToken:
description: token is bogus
content:
application/json:
schema:
type: string
items:
type: string
securitySchemes:
bearerAuth: # arbitrary name for the security scheme
type: http
scheme: bearer
bearerFormat: JWT
schemas:
User:
type: object
properties:
id:
type: integer
email:
type: string
password:
type: string
security:
- bearerAuth: []
Redhat is an American multinational software company providing open-source software products to the enterprise community. Founded in 1993, Red Hat has its corporate headquarters in Raleigh, North Carolina, with other offices worldwide. It became a subsidiary of IBM on July 9, 2019
A) Apicurio (back to top...)
Login by clicking on the link. Enter in your basic info and then begin with the "Design" section.
Everything is pretty self-explanatory. Know that "tags" is an object that allows you to group the "paths" (endpoints) into named groups in the Swagger UI display. You don't need that for this challenge.
Server Variables: You're just establishing some protocols here. Click here for more information and examples.
B) Working Example (back to top...)
Here's a working example of the Authentication OpenApi that I had to craft using Apicurio...
openapi: 3.0.2
info:
title: Healthkit Authentication
version: 1.0.0
description: Authenticating user data as it's coming from Healthkit to Applied Health Analytics
contact:
name: Applied Health Analytics Dev Team
url: 'ontent has been removed
email: content has been removed
servers:
-
url: 'content has been removed'
description: >-
This is a placeholder for now. The actual URL will be better defined as we move further into
development.
variables:
majorVersion:
default: v1
description: The first crack at an epic API
paths:
/authentication:
description: >-
incoming JWT to be either authenticated, refused or with a response indicating it was not an
authentic JWT
servers:
-
url: content has been removed'
description: URL of application
get:
responses:
'200':
description: user has been authenticated
'400':
content:
application/json:
schema:
type: string
examples:
bad JWT:
value: MG9LJiEK5_Db8WpF5cWWRebXCtU (contains an _ character)
description: bad JWT
'403':
content:
application/json:
schema:
type: string
examples:
bad username / password:
value:
username: bogus
password: mcgee
description: the username and password don't exist in the database
security:
-
bearerAuth: []
summary: get JWT from user
description: >-
after process of authentication has been accomplished, the appropriate response is made with
routing user to the next part of the app or informed that their credentials are wrong or the
JWT was invalid
components:
schemas:
username:
title: Root Type for username
description: username of person attempting to access bIQ from Healthkit
type: object
properties:
username:
description: username of person attempting to access bIQ from Healthkit
type: string
password:
description: password of user attempting to access bIQ from Healthkit
type: string
example:
username: John Doe
password:
description: password of user
type: object
properties:
password:
description: password of user attempting to access bIQ from Healthkit
example:
password: Secret
responses:
'200':
description: OK
'401':
description: Not authenticated
'403':
description: Access token does not have the required scope
securitySchemes:
bearerAuth:
scheme: bearer
type: http
description: 'JWT coming in the header as Authorization bearer: '
security:
-
basicAuth: []
{
"openapi": "3.0.0",
"info": {
"version": "1.0.0",
"title": "OAuth Authentication Service API",
"description": "OAuth Authentication microservice API for AHA",
"contact": {
"name": "AHA API Team",
"email": "content has been removed",
"url": "content has been removed"
},
"license": {
"name": "Apache 2.0",
"url": "https://www.apache.org/licenses/LICENSE-2.0.html"
}
},
"servers": [
{
"url": "content has been removed"
}
],
"paths": {
"/authorization": {
"get": {
"description": "OAuth Authorization Endpoint",
"operationId": "auth",
"parameters": [
{
"name": "username",
"in": "query",
"description": "Credential username",
"required": true,
"style": "form",
"schema": {
"type": "string"
}
},
{
"name": "password",
"in": "query",
"description": "Credential password",
"required": true,
"style": "form",
"schema": {
"type": "string"
}
}
],
"responses": {
"200": {
"description": "OAuth authorization response",
"content": {
"application/json": {
"schema": {
"type": "array",
"items": {
"$ref": "#/components/schemas/AuthCredentials"
}
}
}
}
},
"default": {
"description": "unexpected error",
"content": {
"application/json": {
"schema": {
"$ref": "#/components/schemas/Error"
}
}
}
}
}
}
}
},
"components": {
"schemas": {
"AuthCredentials": {
"required": [
"jwt"
],
"properties": {
"jwt": {
"type": "string"
}
}
},
"Error": {
"required": [
"code",
"message"
],
"properties": {
"code": {
"type": "integer",
"format": "int32"
},
"message": {
"type": "string"
}
}
}
}
}
}
<?php
$someJSON = '[
{"name":"Jonathan Suh","gender":"male"},
{"name":"William Philbin","gender":"male"},
{"name":"Allison McKinnery",
"gender":"female"}
]';
$the_array=json_decode($someJSON, true);
print_r($the_array);
?>
<?php
$someJSON = '[
{"name":"Jonathan Suh","gender":"male"},
{"name":"William Philbin","gender":"male"},
{"name":"Allison McKinnery",
"gender":"female"}
]';
$the_array=json_decode($someJSON, true);
foreach ($the_array as $key => $value) {
echo $value["name"] . ", " . $value["gender"] . "<br>";
}
?>
William Philbin, male
Allison McKinnery, female
B) json_decode (back to top...) To convert a PHP array into a JSON string, you would do this:
<?php
// Array
$someArray = [
[
"name" => "Jonathan Suh",
"gender" => "male"
],
[
"name" => "William Philbin",
"gender" => "male"
],
[
"name" => "Allison McKinnery",
"gender" => "female"
]
];
// Convert Array to JSON String
$someJSON = json_encode($someArray);
echo $someJSON;
?>

When a user chooses to login to an app using their Facebook profile, it can be real convenient, especially if that user is already logged in to Facebook. In that instance, the user won't have to enter any login criteria and they're given access to the app they're trying to login to. Facebook assumes the device the user is utlilizing at that point is secure and the user is who they claim to be. It can be kind of shady, but that's why in some instances, some apps will ask you to field an email or answer a text to validate your identity.
B) JSON WebToken Authentication (back to top...)
For the app you're building, you're not trying to access HealthKit, rather HealtKit is trying to access your database. You're not knocking on their door. Rather, they're knocking on yours.
The login credentials are going to be kept in a separate database on our server. The whole purpose of their having reached out to AHA is to facilitate an ETL transaction. They're going to be coming to you with a JSON WebToken. Your job is to authenticate them based on that token and then give them clearance to proceed to the other parts of our system.
So, what is a JSON WebToken?
This is all coming from "bits and pieces"...
A JSON Web Token (JWT) is a safe, compact, and self-contained way of transmitting information between multiple parties in the form of a JSON object. The way that it typically works is that a user wants to login to an app and clicks on the option to login using Facebook. The app knocks on the door of Facebook with the user's Facebook credentials (if the user is logged in to Facebook already) and Facebook responds with at JWT that has all of the user's info and that user is admitted into the app.
The structure of the JWT is divided up into three parts:- header
- payload
- signature
{
"alg": "HS256",
"typ": "JWT"
}
{
"sub": "65165751325",
"name": "Rajat S",
"admin": true
}
- JavaScript Web Signature - comes with a signature to prove it's authenticity but the contents are not encrypted.
- JWE-JS - comes with a signature and the contents are encrypted.
 Dockerizing" is the facility that allows an engineer to package up an entire application and make it portable and capable of being inserted into any application / environment. Click on the link to get a run down on how to get things set up.
To set up an account, click here.
What makes this so crucial to our Healthkit project is that we're going to package our authentication code within the Boilerplate and then stick that into a Docker environment.
A couple of key concepts:
You're going to write your code to what amounts to a "Docker Image." That "image" file is run by the "Docker" facility on your server. Everything is self contained so you don't have to concern yourself with different technologies installed on your server. If you have "Docker," you're all set!
A couple of changes that had to be made in order to get this to work:
First of all, I needed to change the "experimental" setting to "true" in Windows 10 settings. To do that, right click on the Docker instance, go to Settings -> Daemon -> Advanced -> set "experimental" to "true."
Second, I had to enable nested virtualization by going to the "Parallels" icon in the upper right hand corner of the screen and click on "Control Center." From there, click on the "gear" icon and then "CPU and Memory." You'll see the box to click on at that point.
Dockerizing" is the facility that allows an engineer to package up an entire application and make it portable and capable of being inserted into any application / environment. Click on the link to get a run down on how to get things set up.
To set up an account, click here.
What makes this so crucial to our Healthkit project is that we're going to package our authentication code within the Boilerplate and then stick that into a Docker environment.
A couple of key concepts:
You're going to write your code to what amounts to a "Docker Image." That "image" file is run by the "Docker" facility on your server. Everything is self contained so you don't have to concern yourself with different technologies installed on your server. If you have "Docker," you're all set!
A couple of changes that had to be made in order to get this to work:
First of all, I needed to change the "experimental" setting to "true" in Windows 10 settings. To do that, right click on the Docker instance, go to Settings -> Daemon -> Advanced -> set "experimental" to "true."
Second, I had to enable nested virtualization by going to the "Parallels" icon in the upper right hand corner of the screen and click on "Control Center." From there, click on the "gear" icon and then "CPU and Memory." You'll see the box to click on at that point.
$$.env refers to environment variables. By definition, environment variables are variables established outside a particular code block. Unlike constants or vars, these are defined outside the system. With Stoplight, the $$.env variables are going to help defined your environment which allows you to switch back and forth between two testing paradigms. Here's the actual definition:
Say you have a scenario step that sends an HTTP request to authenticate a new user. The response from that request includes an apiKey that you want to use for other requests. You can easily save that apiKey to an environment variable, for later re-use, by adding a capture in the form $$.env.apiKey = output.body.apiKey. After running the step, check your current environment variables and note the newly added apiKey!
A) Stoplight (back to top...)
1) Nomenclature (back to top...)
After you login to Stoplight, click on the the "Applied Health Analytics" name under "Organizations" and click on "Healthkit Integration." After that click on, "Authentication Service.oas3."
Here's what you've got in place right now as far as "basics:"
a) Request Parameters (back to top...)
You've got two query parameters: username and password
b) Responses (back to top...)
The route is "authorization"
200 -> jwt string which is going to be an array. This is what happens in the event of a
successful response from the server. In other words,
the authorization was successful. This theoretical in that you're probable not using a GET, but this is a starting point nevertheless.
default -> this is your error code.
c) Send a Test Request (back to top...)
i) Settings (back to top...)
A couple of things: First, you'll notice on the "Settings" tab there's a snippet about "$$.env" variables. Refer to the call box to the right for info about that. CORS is something you'll need in place to protect any personal information in the context of your testing.
ii) Query (back to top...)
Here you're documenting your query parameters.
iii) Code Generation (back to top...)
This is what you get after sending a "Test Request." A lot of this, I think, are placeholders right now, as far as what's on Spotlight right now. But the thing you want to be sensitive to is the "Headers" section.
"Headers" is going to be the place where you define the content type. You're not going to be rendering a page. Rather, you're going to be making available some JSON - at least I think that's the target.
A) Overview (back to top...)
"OAuth" means "Open Authentication..."
 OAuth, which is pronounced "oh-auth," allows an end user's account information to be used by third-party services, such as Facebook, without exposing the user's password. OAuth acts as an intermediary on behalf of the end user, providing the service with an access token that authorizes specific account information to be shared. The process for obtaining the token is called a flow.
The bottom line is that you're not exposing the user's password. When you login into APIcurio using your Github account, you're not using your username and password from Github to login. Rather, a pre-manufactured agreement has been established by both Github and APIcurio which includes a specific URL. Click here to watch a video that details that process.
Imagine "MyBucksApplication" provides great dashboard views of financial information. Sarah wants to view her "Memorial Bank" statements via the "MyBucksApplication." She logs into "MyBucks" and "MyBucks" reaches out to "Memorial Bank."
"Memorial Bank" receives an Authorization Request, answers it in the affirmative and then "MyBucks" responds with an Authorization Grant, "Memorial" gives "MyBucks" an Access Token. That Token gives "MyBucks" access to specified areas of "Memorial Bank" that are particular to Sarah.
Notice there's no exchange of Sarah's login credentials that are particular to "Memorial Bank."
That's the beauty and the utility of OAuth. Click here to watch a video that gives you an Overview of OAuth.
A) Working OpenAPI Contract (back to top...)
1) Swagger Version (back to top...)
When you go out to Swagger's Editor, you're given the "Petstore" example which represents a sound starting point right out of the chute and it's here where you can begin writing your contract.
Here's the Authentication code that passed the Swagger error check:
OAuth, which is pronounced "oh-auth," allows an end user's account information to be used by third-party services, such as Facebook, without exposing the user's password. OAuth acts as an intermediary on behalf of the end user, providing the service with an access token that authorizes specific account information to be shared. The process for obtaining the token is called a flow.
The bottom line is that you're not exposing the user's password. When you login into APIcurio using your Github account, you're not using your username and password from Github to login. Rather, a pre-manufactured agreement has been established by both Github and APIcurio which includes a specific URL. Click here to watch a video that details that process.
Imagine "MyBucksApplication" provides great dashboard views of financial information. Sarah wants to view her "Memorial Bank" statements via the "MyBucksApplication." She logs into "MyBucks" and "MyBucks" reaches out to "Memorial Bank."
"Memorial Bank" receives an Authorization Request, answers it in the affirmative and then "MyBucks" responds with an Authorization Grant, "Memorial" gives "MyBucks" an Access Token. That Token gives "MyBucks" access to specified areas of "Memorial Bank" that are particular to Sarah.
Notice there's no exchange of Sarah's login credentials that are particular to "Memorial Bank."
That's the beauty and the utility of OAuth. Click here to watch a video that gives you an Overview of OAuth.
A) Working OpenAPI Contract (back to top...)
1) Swagger Version (back to top...)
When you go out to Swagger's Editor, you're given the "Petstore" example which represents a sound starting point right out of the chute and it's here where you can begin writing your contract.
Here's the Authentication code that passed the Swagger error check:
openapi: 3.0.2
info:
title: Healthkit Authentication
version: 1.0.0
description: >-
Authenticating user data as it's coming from Healthkit to Applied Health
Analytics
contact:
name: Applied Health Analytics Dev Team
url: 'companyURL
email: companyURL
servers:
- url: 'companyURL'
description: >-
This is a placeholder for now. The actual URL will be better defined as we
move further into development.
variables:
majorVersion:
default: v1
description: The first crack at an epic API
paths:
/authentication:
description: >-
incoming JWT to be either authenticated, refused or with a response
indicating it was not an authentic JWT
servers:
- url: 'companyURL'
description: URL of application
get:
responses:
'200':
description: user has been authenticated
'400':
content:
application/json:
schema:
type: string
examples:
bad JWT:
value: JWTValue (contains an _ character)
description: bad JWT
'403':
content:
application/json:
schema:
type: string
examples:
bad username / password:
value:
username: bogus
password: mcgee
description: the username and password don't exist in the database
security:
- bearerAuth: []
summary: get JWT from user
description: >-
after process of authentication has been accomplished, the appropriate
response is made with routing user to the next part of the app or
informed that their credentials are wrong or the JWT was invalid
components:
schemas:
username:
title: Root Type for username
description: username of person attempting to access bIQ from Healthkit
type: object
properties:
username:
description: username of person attempting to access bIQ from Healthkit
type: string
password:
description: password of user attempting to access bIQ from Healthkit
type: string
example:
username: John Doe
password:
description: password of user
type: object
properties:
password:
description: password of user attempting to access bIQ from Healthkit
example:
password: Secret
responses:
'200':
description: OK
'401':
description: Not authenticated
'403':
description: Access token does not have the required scope
securitySchemes:
bearerAuth:
scheme: bearer
type: http
description: 'JWT coming in the header as Authorization bearer: '
security:
- basicAuth: []
{
"openapi": "3.0.0",
"info": {
"title": "Healthkit Authentication",
"description": "Authenticating users coming from Healthkit to bIQ",
"contact": {
"name": "AHA API Team",
"email": "companyURL",
"url": "<appliedsite>"
},
"version": "1.0.0"
},
"servers": [
{
"url": "<appliedsite>",
"description": "server that is being accessed by incoming Healthkit authentication request"
}
],
"paths": {
"/authentication": {
"get": {
"tags": [
"authenticate"
],
"summary": "validates incoming JWT token",
"description": "takes JWT token, breaks it up and then validates it according to what's in the database",
"operationId": "auth",
"responses": {
"200": {
"$ref": "#/components/responses/AuthenticatedUser"
},
"401": {
"$ref": "#/components/responses/UnAuthenticatedUser"
},
"403": {
"$ref": "#/components/responses/BadToken"
}
}
}
}
},
"components": {
"responses": {
"AuthenticatedUser": {
"description": "user has been authenticated",
"content": {
"application/json": {
"schema": {
"type": "string",
"items": {
"type": "string"
}
}
}
}
},
"UnAuthenticatedUser": {
"description": "user has not been validated",
"content": {
"application/json": {
"schema": {
"type": "string",
"items": {
"type": "string"
}
}
}
}
},
"BadToken": {
"description": "token is bogus",
"content": {
"application/json": {
"schema": {
"type": "string",
"items": {
"type": "string"
}
}
}
}
}
},
"securitySchemes": {
"bearerAuth": {
"type": "http",
"scheme": "bearer",
"bearerFormat": "JWT"
}
},
"schemas": {
"User": {
"type": "object",
"properties": {
"id": {
"type": "integer"
},
"email": {
"type": "string"
},
"password": {
"type": "string"
}
}
}
}
},
"security": [
{
"bearerAuth": []
}
]
}
❶ const express = require('express');
❷ const jwt = require('jsonwebtoken');
❸ const app = express();
❹ app.get('/api', (req, res) => {
res.json({
message: 'Welcome to the API'
});
});
❺ app.post('/api/posts', verifyToken, (req, res) => {
❻ jwt.verify(req.token, '❼ secretkey', (err, ❽ authData) => {
if(err) {
res.sendStatus(403);
} else {
res.json({
message: 'Post created...',
authData
});
}
});
});
❻ app.post('/api/login', (req, res) => {
❼ // Mock user
❽ const user = {
id: 1,
username: 'brad',
email: 'brad@gmail.com'
}
❽ jwt.sign({❽ user}, 'secretkey', { expiresIn: '30s' }, (err, token) => {
res.json({
token
});
});
});
// FORMAT OF TOKEN
// Authorization: Bearer <access_token>
// Verify Token
❾ function verifyToken(req, res, next) {
// Get auth header value
❿ const bearerHeader = req.headers['authorization'];
// Check if bearer is undefined
❶ if(typeof bearerHeader !== 'undefined') {
// Split at the space
❷ const bearer = bearerHeader.split(' ');
// Get token from array
❸ const bearerToken = bearer[1];
// Set the token
❹ req.token = bearerToken;
// Next middleware
❺ next();
} else {
// Forbidden
res.sendStatus(403);
}
}
app.listen(5000, () => console.log('Server started on port 5000'));
One term you'll encouter when reading through explanations about JWTs is "SPA" or "Single Page Application." Basically it's that webpage that never reloads because it's being presented by a JavaScript application that's running the background. Click here for more info.
⑧ here's where you're creating your token and your payload etc. This goes back to the documentation that you see at https://www.npmjs.com/package/jsonwebtoken. There it's documented as both synconous and asyncronous. This is synronous so we're using a callback. This particular line is utilizing ES6. Again, this is producing the token.
⑨ this is where you're breaking your token down into its payload etc. This is middleware in that you're accessing the request and the response objects as well as what represents the "next" middleware function in the application's request-response cycle.
⑩ your JWT is coming to you in the header. You're going to find it documented as Bearer <access_token>. That is what's going to come back provided it's not undefined.
① checking to make sure bearer exists
② using "split" which turns a string into an array. With this little device you can isolate the value associated with the "Authorization" value. Remember, that's going to be // Authorization: Bearer <access_token>. You're "splitting" it at the " " between "Bearer" and the actual token.
③ in your array, the [0] value is "Bearer" and the [1] value is your token. So, const bearerToken is going to be your token.
④ setting the request object token to the bearer token.
⑤ keep things moving using "next"
⑥ this is your callback that includes the "req.token" that was established with your "verifyToken" function.
⑦ "secretkey" can be any value. Usually it's a highly random value that is kept confidential and only accessible to your server.
⑧ your "authData" is going to look like this:
{
"authData": {
"user": {
"id": 1,
"username", "brad",
"email": "brad@gmail.com"
},
"iat": 1513884407 // iat stands for "expires in"
},
}
That's the content that was encryped as your JWT on jwt.sign({❽ user}.
The way this going to translate to your project is that instead of the "login portion" (⑥ ) that's generating your token, instead you'll have that token embedded in your header.
// The way your OpenAPI is going to expect that as something that is stored in local storage in your header. The header title will be "Authorization" with a value of "bearer" and then the token.
C) Actual Authentication (back to top...)
Using the above as a template, here's the final working code:
require("dotenv").config();
const express = require("express");
const jwt = require("jsonwebtoken");
const app = express();
const mongoose = require("mongoose");
const session = require("express-session");
const MongoDBStore = require("connect-mongodb-session")(session);
const csrf = require("csurf");
const superPassword = process.env.SIGNATURE;
//console.log(superPassword);
const MONGODB_URI =
"databaseURL";
app.get("/api", (req, res) => {
res.json({
message: "Welcome to the API"
});
});
app.post("/api/posts", verifyToken, (req, res) => {
jwt.verify(req.token, superPassword, (err, authData) => {
if (err) {
res.sendStatus(403);
} else {
res.json({
message: "Post created",
authData
});
console.log(authData.user.username);
}
});
});
app.post("/api/login", (req, res) => {
//Mock User
const user = {
id: 1,
username: "brad",
email: "brad@yahoo.com"
};
// jwt.sign({ user: user }, "secretkey", { expiresIn: "30s" }, (err, token) => {
jwt.sign({ user: user }, superPassword, (err, token) => {
res.json({
token: token
});
});
});
// format of Token
// Authorization: Bearer <access_token>
//verify Token
function verifyToken(req, res, next) {
//get auth header value
const bearerHeader = req.headers["authorization"];
// check if bearer is undefined
if (typeof bearerHeader !== "undefined") {
// split at the space
const bearer = bearerHeader.split(" ");
//get token from array
const bearerToken = bearer[1];
console.log(bearerToken);
//set the token
req.token = bearerToken;
next();
} else {
//forbidden
res.sendStatus(403);
}
}
mongoose
.connect(MONGODB_URI)
.then(result => {
app.listen(5000);
})
.catch(err => {
console.log(err);
});
This section is in case a database needed to be included in order to facilitate the "mining" of the payload as criteria to be used in a SELECT
The first thing you want to is set up your "user.js" model which will house your username, SSN, DOB etc.
You're going to do that by setting up a new database in MongoDB Compass and then initiating a new collection through your "user.js" model in your app. That's going to look like this:
const mongoose = require("mongoose");
const Schema = mongoose.Schema;
const userSchema = new Schema({
username: {
type: String,
required: true
},
ssn: {
type: String,
required: true
},
dob: {
type: String,
required: true
},
email: {
type: String,
required: true
},
password: {
type: String,
required: true
}
});
Notice how you're establishing teh "Schema" constant right out of the chute. As you might expect, this is a package you're having to import on your "app.js" page. That, along with several other packages will need to in place. Let's see what that's going to look like...
2) app.js (back to top...)
We're going to break this down into stages...
First of all, here are you packages:
const express = require("express");
const jwt = require("jsonwebtoken");
const app = express();
const mongoose = require("mongoose");
const session = require("express-session");
const MongoDBStore = require("connect-mongodb-session")(session);
const csrf = require("csurf");
const MONGODB_URI =
"databaseURL";
The big thing, in addition to all of the crucial things that we've already covered, is the database connection. You'll see referenced at the very end of "app.js" like this:
...
mongoose
.connect(MONGODB_URI)
.then(result => {
app.listen(5000);
})
.catch(err => {
console.log(err);
});
3) Setting Up a User (back to top...)
First of all, run your app so the model that you set up with "user.js" establishes the correct columns and fields etc.
Next, you can manually insert your user with all of the necessary data with the exception of the encrypted password. To encrypt your password, rather than create a form that captures what's in the database and then use "bcyrptjs" tool, you can click here to do it online. Great way to get it done for the sake of drill.
4) Finding the User (back to top...)
The way this is going to work is you're going to use "Postman" to post a user as a collection of Bearer Tokens that will be an encrypted version of the user's DOB and the last four of their SSN. That will be compared to what's in the database and if there's a match.
D) Deployment (back to top...)
Good PUtty tutorial: https://www.youtube.com/watch?v=_GSOnHRYSS0
E) Authentication w/ Database (back to top...)
Final version where we're actually grabbing the corresponding token / info from a database and comparing that value to the incoming JWT rather than hard wiring the token and leaving that potentially exposed.
❶ require("dotenv").config();
const express = require("express");
❷ const jwt = require("jsonwebtoken");
const mongoose = require("mongoose");
const app = express();
❸ const superPassword = process.env.SIGNATURE;
const conn = process.env.CONNECTION;
const tokenID = process.env.THE_TOKEN_ID;
❹ const Authorization = require("./models/authorization");
app.post("/authentication", ❺ verifyToken, (req, res) => {
jwt.verify(req.token, superPassword, (err, authData) => {
if (err) {
res.sendStatus(403);
} else {
res.json({
message: "user is authenticated",
authData
});
}
});
});
function verifyToken(req, res, next) {
const bearerHeader = req.headers["authorization"];
if (typeof bearerHeader !== "undefined") {
const bearer = bearerHeader.split(" ");
const bearerToken = bearer[1];
Authorization.findById(tokenID).then(security => {
if (bearerToken == security.token) {
req.token = security.token;
next();
} else {
res.sendStatus(403);
}
});
}
}
mongoose
.connect(conn)
.then(result => {
app.listen(5000);
})
.catch(err => {
console.log(err);
});
As an aside, that collection isn't automatically created until you actually use it! In other words, you've got to create a document within that collection in order for it to show up in the database!
⑤ while this has been covered before, it bears repeating. This whole process of "verifyToken" is to simply define the "req.token" value according to what's coming in via the Header, or at least it was in the previous tutorial. In the tutorial, we were simply ensuring that there was a value and, if so, we "split" it so we could read the token apart from the "Bearer" dynamic.
In this instance, we're doing that but we're also comparing that to the token associated with the "_id" of the token that corresponds to the value we have stored as "THE_TOKEN_ID" in our ".env" file. If the incoming JWT is valid and it matches the token that's associated with the "_id" we have stored in our ".env" file, then "req.token"